Saturday, December 31, 2005

Tamrac Expedition 7 Backpack - Part 1

The most desired item on my Christmas list was a Tamrac Expedition 7 backpack. Luckily, my wife was kind enough to buy it for me.

I've actually been wanting a backpack for quite a while now. As my camera bag reaches the 15 lbs mark, it has started to become a bit of a burden to support on one shoulder. Carrying it on a couple of the 1 mile (each way) hikes I've gone on has been very difficult. I found myself repeatedly shifting the bag to different positions just to stay comfortable: Right shoulder, left shoulder, right hand, left hand, cradle it with both arms, etc. There have been a few hikes that I just didn't have the motivation to go on, simply because I knew how painfully far I'd have to carry that bag.

For this reason, I've been thinking about shifting to a backpack for about 8 months now. I almost hurried and bought a backpack before my trip to Seattle last May, but decided I didn't want to rush into it...I wanted to think about it some more. After all, a backpack isn't a godsend. It does have one major downside, which is the lack of accessibility to equipment. Every time you want to get out a new piece of equipment, you need to take the backpack off, open it, get what it is you want, close up the backpack (can't just leave it unzipped like a shoulder bag), and put it back on. A major pain.

So, afraid that I wouldn't like the decreased accessibility, I put off purchasing a backpack. However, every single time I had to carry that heavy bag on my shoulder, I though a little bit more about getting a backpack. With Christmas coming up, and my choice of tripod undecided, I figured this would be the perfect time to ask for one.

So why did I choose the Tamrac Expedition 7? After comparing backpacks from many different vendors, the Tamrac Expedition series seemed to have the most features and also, even more importantly, seemed to do the most to minimize the accessibility downside of using a backpack. I'll explain this in a minute. Looking at the Expedition series, only the 7 and 8 models seemed to have enough room for the equipment I wanted to carry, and only the 7 and 8 had the extra waist strap to help spread the weight of the pack across your body.

Comparing the two models, the 8 seemed a bit large for my body (I'm not a very larger person...about 5'7" and 160 lbs), and it seemed like it had WAY more room than I needed (though now that I've loaded up my 7, I can see how the 8 would have been a good idea). So, I settled on the Tamrac Expedition 7 as my pick.

So back to the accessibility issue. Well, the thing I liked best about this backpack was that it had the most room and most convenient arrangement for expansion. It has all sorts of places where you can connect on an extra lens case or a pouch. There are 4 on the side, and 2 on the shoulder straps. In addition, although not an official attachment slot, there are 4 places on the waist belt which could be used to hold expansions...2 would work well for carrying lenses, and 2 are perfect for my filter pouches.

So which accessories did I decide on? First, I got a large pouch, which is the perfect size for holding my Sigma flash unit. Next, I got a large lens case so that I can get access to switch off a lens easily (though now I wish I had asked for 2). When out hiking, you are bound to get thirsty, and I'd hate to carry a water bottle separately, so I got the water bottle attachment. I also got a 4-slot memory card/battery pouch that attaches to the shoulder strap. This way I can swap out the items which I change almost as often as my lenses. Finally, I got a pair of cinch straps, which are just for generic use, however I decide to use them...like maybe attaching a light rainjacket/windbreaker to the side of the backpack.

So that gives you an introduction to the backpack...why I wanted one, what I thought about, how I decided on what I wanted, and what I ended up getting. The post is getting a bit long at this point, so next time I'll post more details on the backpack now that I have it in my hands...my thoughts on construction and features, how I loaded it up, and what I think I'd like to add. I'll post some pictures of it. However, being that I'm sick right now (see yesterdays post) and stuck in the house, I'll have to leave my thoughts on actually using this backpack until a future part 3.

Update: Tamrac Expedition 7 Backpack - Part 2
...click here to read more!

Friday, December 30, 2005

A Merry Christmas and an Unhappy New Year

Santa was pretty good to me in the photography department this year. I put together a list of equipment I wanted for Christmas, and I got a good portion of it. I'll talk about the various pieces of equipment individually over the coming days, but here's a quick summary of what I got:

Tamrac Expedition 7 backpack
5 accessory attachments for the backpack:
      lens case
      accessory pouch
      water bottle & pouch
      4 pocket memory card/battery pouch
      two cinch straps
Plamp + 1 foot extension
McClamp
Better Beamer
Lumiquest Promax System (80-20 + 3 reflectors + diffuser)

The item I really wanted most was a new tripod and a ballhead. However I couldn't decide on exactly which one I wanted (and I'm still trying to figure it out) so that got left off of my list. Unfortunately, when trying out some of my gifts the day after Christmas, one of the locking levers on the leg of my current tripod snapped off. At least it's stuck in the leg expanded position, so I can still make use of the tripod...I just can't close that one leg all the way. But it's kind of pressing the issue now, so I have to figure out pretty soon which equipment I really do want so I can order it.

So, gifts from Santa was the Merry part of Christmas, but (despite how it might sound) the broken tripod is NOT the unhappy part about the new year. No...the unhappy part is that, despite the fact that I have the entire week off from work, I can't go out hiking with my backpack, or trying out my better beamer on the winter birds. And why not? I'm SICK!!!!!

I came down with a cold the other day. Not much of a big deal...I deal with colds all the time and don't let them concern me much. However, the first day I went out to the grocery store, and later that night I came down with a fever. Now I have a bit of a cough and little bit of a sore throat. It's probably best if I don't go hiking through the winter weather right now, so I'm confining myself to the indoors. Maybe I'll find myself some abstract macro subjects around the house to take pictures of...make use of the Promax and the clamps.
...click here to read more!

Monday, December 26, 2005

Grid wall instruction

UPDATE (June 21, 2006): I've made a few changes to the design, making on site assembly (at the art show) easier and probably even lowering the total cost by $20 or so. Read through this posting first, then take a look at the changes I made here

I promised back in September that I'd get these instructions up in the next couple days. So much for that, but better late than never, so here we go. But before I get into the details, just to clarify for those unfamiliar: 5" = 5 inches, 5' = 5 feet. Don't mix them up

Cut your conduit

First thing we need to do is cut up the conduit. We'll need 22 pieces of 10' long, 1/2" electrical conduit. Take 18 pieces of conduit and cut them all the same: Cut off a 5' 6" section (66"), a 3' 1/8" section (36 1/8"), and your remainder should be about 17 5/8". Next, take 3 more pieces of conduit and cut each one into 4 equal pieces or about 2' 6" (30") each (minus whatever is lost to the sawblade). Finally take the last piece, cut off two 4' 6" sections (54"), and scrap the remaining foot.

In addition, we'll also need 1 piece of 10' long 3/4" electrical conduit, which will be cut into one 5' section and two 2' 6" sections.

Drill and assemble the 9 panel frames

Next, we will need 36 corner braces. I used some heavy duty 3" braces. They are 3" long on each side and have 2 holes approximately 15/16" and 2 9/6" from the corner. If your dimensions are different, you will need to drill some of the holes differently in the next step.

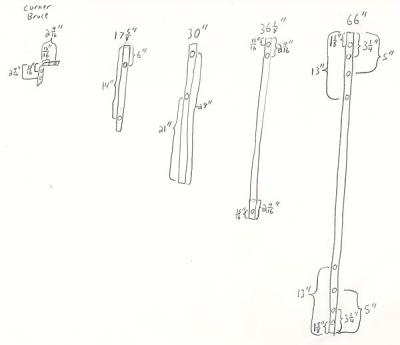
Now we need to prepare the tubes for assembly. Take all 18 of the 66" sections, all 18 of the 36 1/8" sections, all 12 of the 30" sections, but only 6 of the 17 5/8" sections (the other 12 can be set aside for now). First, use a flat file to smooth down the cuts on each end. Now, what we need to do is drill the necessary holes in them according to the diagram below.

There are a few important details. First, it is important that these holes be drilled as accurately as possible. It would be best to use a drill press with a table vice and a production stop. That way you can be sure the corresponding holes get drilled at the same location on all 18 pieces so that they all line up later. Second, you want these holes to be drilled parallel to each other, so that both the entry and exit holes line up. With a drill press, this is no problem when drilling a square piece of stock. However, with a round piece of stock (ie: no flat surface) it's VERY easy to rotate the stock at an angle.

This problem would best be solved with proper machining facilities. However, doing this out of my basement, I had to improvise. The trick I used was to purchase a 6" long 1/4" bolt and small 6 " magnetic level. Assuming your drill press table is level, and your drill bit is perpendicular to the table, you drill your first hole in each piece at any angle. Then for subsequent holes, you place the bolt sticking up through the original hole, stick the level onto the bolt, rotate the piece until it's level (ie: the bolt is pointing perfectly up), clamp it down in the drill press, and drill your hole. After all holes are drilled in each piece, use a round file to clean out the holes and a flat fill to remove any left over burrs.

OK, onto the diagram. Using a 1/4" drill bit, drill holes into each piece of conduit according to the diagram below (click the picture for a full size image).


Now with all the holes drilled, we need to assemble the 9 sections of panel. For each one, we will need two 66" conduits, two 36 1/8" conduits, 4 corner brackets, 16 bolts (1.5" long, 1/4" diameter) and 16 nuts (1/4" diameter"). Connect them together so that they end up like the following picture (note how the excess length of the bolt is on the INSIDE of the frame.


Now that each frame is assembled, you should be left with 4 unused holes on each of long sides. These holes will be used later by the bolts that hold the sections together to form an entire wall. We're not ready for that step yet, but there is one thing you should do at this point. In theory, if you machined all of you pieces identically, then all the holes should line up perfectly. However, in reality there probably are going to be slight differences in the way things line up. To make assembly easier, it would be nice if these holes were opened up slightly to allow some room for error. To do this, I took a hand drill with a 1/4" drill bit, put it in each hole, turned it on, and rocked the drill around to all angles (kind of in a circle). This widens the hole up slighly to allow room for error and to make assembly easier. Then I just filed down the holes again.

Attach grid wire to each panel frame

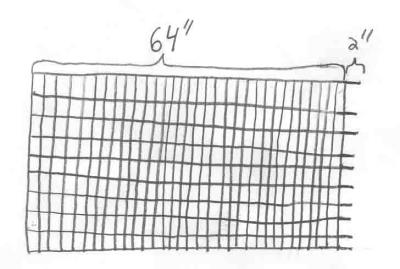
Once you have that done for all 9 sections, then we need to apply the grid wire. Get a 50' roll of 36" wide grid wire (the holes in the grid should be 2"x4"). If you cut this VERY carefully, you should be able to get all your cuts out of 1 roll (with about 6 inches to spare). You want to cut off 9 section that are 64" long. However, no matter how you cut the wire, either the piece you are currently cutting or the next piece will have some nubs sticking out at the end. What you really want to do is cut the wire just before the 66" mark. The extra 2" nubs will be on the piece you just cut off. Then you can trim them off the current piece you that you have a 64" piece of grid. The diagram below should make this more clear. It depicts the nubs on the right side. After you trim off the 2" nubs, the right side and left side would look the same.


Now you want to take each section of grid wire, grind off any sharp ends from your cuts, set them in place in each of the 9 frames, then use a couple dozen 7 inch zip ties to secure the grid wire in place. When you attach the zip ties, it's a good idea if you space them out evenly, and its also helpful if you attach them at the same locations on each panel. After attaching all of the zip ties and pulling them all tight, you can now use wire cutters to trim off the excess.

Assemble 9 panels into 3 walls (3 panels each)

Now you should have 9 panels built. Next step is to assemble each of the 3 walls (and you will need to do this each time you set up your display). Take 3 of your panels and lay them on the ground. Take two 17 5/8" pieces and place them between each pair of panels at the top edge, so that about 1" of tubing will stick out over the top of the panels once they are assembled. Now take 4 of the 30" pieces, and place these at the bottom so that they stick out about 16" to form the legs, one on the left end, one on the right end, and 1 between each pair of panels. Now we need to bolt them on. To do so, use 1/4" bolts and nuts. Use a pair of 2" length bolts to attach each of the 2 legs on the ends. Then use a pair of 2.5" length bolt on each of the middle legs and each of the upper arms.

One note before bolting these down. You may notice that the heads of some of the other bolt on the 3 panels will be sticking out, getting in the way of each of these tubes you try to bolt on. My solution was to take a pair of 1/4" hex nuts, tape them to the jaws of a vice so that they line up (one on each jaw), mark each piece of tubing where a bolt will be in the way, place the tube in the vice so that the taped hex nuts line up with the marks, then tighten the vice to indent there areas. You can kind of see how this looks in the top picture above. I also found that the straps from the zip ties also got in the way a little. To deal with this, I just place that section of the tube in the vice (without the hex nuts...using the bare jaws) and tightened it down to indent it JUST A LITTLE BIT. Don't overdo it. Once you have this done for all the pieces, go back and assemble them with the bolts as indicated above. Repeat assembly instructions for each of the other 2 wall.

Attach the walls to your canopy frame

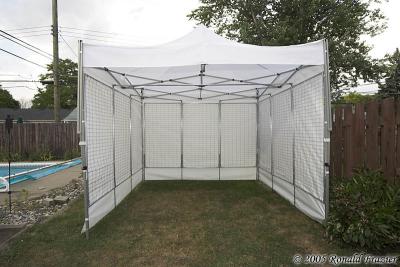
If you followed instructions correctly, you should now have a full wall, approximately 9.5' wide (I never measured it exactly). This should fit perfectly between the legs of an EZ-Up canopy. Take each of the 3 walls, stand them up between the canopy legs, then zip tie them to the legs using some heavy duty zip ties. I initally took 2 of my 7" zip ties, connected them together to form a longer one, and used this. However, I have since purches some heavier duty 11" ties instead. Whatever you decide, you will want to use 4 ties on each wall (one at the top and bottom of each end).

Assemble crossbar supports

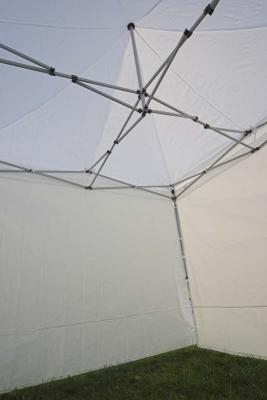
Your display should now be pretty sturdy. It could probably stand on it's own this way just fine. However, I wanted to be a little more careful, and add a little more support. And that's what the little 1" nubs sticking out at the top of each wall are for. I built some cross supports. I put one long support going from the left wall to the right wall, and the a shorter support going diagonally from each of the side walls to the back wall. When all 3 are attached, you get a sort of triangle shape, but with the points of the triangle flattened off . You can see these supports in the photo below.


To consturct the longer support, take the 5' section of the 3/4" conduit, and slide one of the 54" section of 1/2" conduit into each end. You will need to find a way to bold these pipes together tightly. The easiest way I found was to use soome litle threaded inserts...the kind used to add metal thread holes into a wooden object. I used ones that are threaded to accept 1/4" bolts. I then drill a hole in each end of the 3/4" conduit big enough for the insert to poke through, then placed the insert through the hole from the INSIDE of the conduit sticking out. The problem here was, because of the shape of the threaded insert, there was no longer enough clearance inside the conduit for the 1/2" conduit to fit. To fix this, I had to file off a lot of the insert to make it fit better. It's really difficult to explain this in words, so the pictures below should make this clearer.


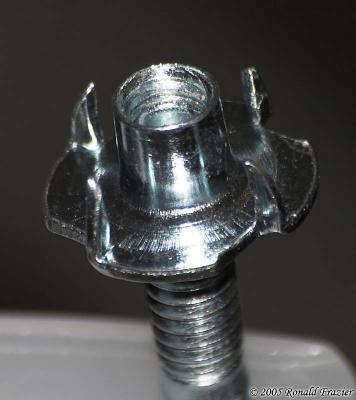
unmodified threaded insert


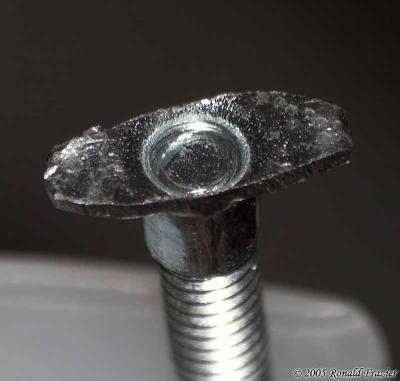
threaded insert, filed down


threaded insert installed in cross bar


Instead of doing all of this, you could just use a single long piece of 1/2" conduit for the support. However, you then have to make sure to cut it at the exact length, and you need to fit this nearly 10 foot long piece of conduit into your vehicle. With the design I used, the length is adjustable, and it disassembled to a much more manageable length.

Now you need to repeat this process for each of the smaller supports. For each one, use one of your 2' 6" sections of 3/4" conduit along with two of your remaining 17 5/8". Repeat the process of drilling holes and inserting the threads.

Finally, you will need to attach each of these sections to the walls. You'll need to use six L-connectors for 1/2" electical conduit, as shown in the image below.


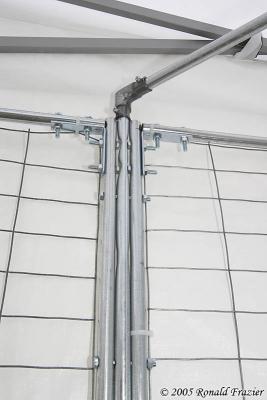
Loosen the bolts on the support bracket, attched on of these L-connectors to each end, tighten down the screw on each connector, puth the entire support in place, tighten it down on the wall section, then tighten the bolts on the support.

Enjoy your grid walls

This is certainly no easy task to get these all assembled, but if you made it this far...congratulations.
...click here to read more!

Tuesday, December 13, 2005

I won in a photo contest

I just found out last week that a couple of my photographs won in a contest. The University of Michigan - Dearborn held a photo contest in September: A Day in the Life of UM-Dearborn. There were 4 categories:

Student Life - photo of students
Faculty/Staff - photo of faculty/staff
Nature - must be on campus
Black & White - open category, but must either be on campus or include student/faculty/staff.

You could submit up to 5 photos. I submitted 4 photos: 2 in the nature category and 2 in the black & white category. I skipped the other categories....people really isn't my specialty. Well, 2 of my photographs won. Here are the winners (click on each picture for the full size image.

Living Among Us
Nature


The Mardigian Sky
Black & White


Also, here are the 2 photograph that didn't win.

The Shining Sun


Reflected Design


As a winner, my photographs will be professionally enlarged and framed. They will hang in the University Center for 1 year. After that, I get to take them home and keep them. I'm really quite excited.
...click here to read more!

Monday, December 12, 2005

Fall colors in Traverse City

OK, I'm guilty...I haven't posted here in a while. I've been a bit busy with some other things around the house, so I haven't had a whole lot of time for photography lately, and when I do have the time it's mostly been unexciting stuff to write about (just more picking out, working on, and framing prints).

However, one thing worth writing about (which I should have posted about a month ago) was a fall color trip. The last weekend of October, we took a trip up to Traverse City to get some shots of the last weekend of peak fall color.

The first day, we left home early to begin the 4.5 hour trip up to Traverse City. Once we got near the area, we diverted onto some smaller back roads to get a better look at some of the scenery. A few pretty sights, but nothing spectacular. Once we got into Traverse City, we stopped for lunch, and then started a trip up the 16 mile long Old Mission Peninsula.

At the tip of the peninsula is Old Mission Point Lighthouse. We stopped here for some pics. It was difficult getting any good shots of the lighthouse at this time of year, since the sun is so low (as you can see in the first picture below). The first surprise here was how low the water level of the lake is. The lighthouse is supposed to sit just off the edge of the water, and then there is supposed to be a very shallow (about 1-2 foot deep) sandy and rocky bar that extends out about 400-500 feet. However, this year the water was so low, that entire bar was exposed. In the following picture, I'm a little more than halfway out on the bar. You can just barely see the lighthouse nestled in the trees.


From that point, the water should have appeared to go right up to the tree line, but not this year. Here's a better look at the lighthouse and also a cabin near the lighthouse.


After leaving the lighthouse, we headed back down the center of the peninsula (we came up the west shore) for a different view. There were some pretty sights, but the best were from the vineyard of Chateau Chantel. I got the following shot before heading inside for some free wine tasting.


After getting back to the city, we checked into our hotel, went out for dinner, and then hurried for a drive around Lake Leelanau before the sun set. We just winged it, taking random roads here and there, and got some nice shots from that drive.


By now it was getting dark. We went to the beach to see if there'd be any sort of sunset color, but the sky wouldn't cooperate. So, we headed back to our hotel and called it a day.

The next day we slept as long as we could, but we were up early, and because of the time change, that made it even earlier. And with the short days, the sun comes up so late. We didn't want to get anywhere too early, so we sat around for a few hours before heading out. We took a drive towards the Lake Michigan shore. Along the way, we saw a really cool looking red barn:


Then we took a drive through the Pierce Stocking Scenic Drive in Sleeping Bear Dunes National Lakeshore. We went here last year in the spring, but it was quite a different sight once all the trees are colorful.


We then headed home down the shore, stopping at a few lighthouses along the way, and got a few nice pictures.

We found this nice little lake view in Empire:


This is also were we saw the Manning Memorial Lighthouse:


The waves were really breaking at Frankfort North Breakwater Lighthouse:


There was some painting and restoration going on at Point Betsie Lighthouse, so we couldn't any good shot without scaffolding getting in it.


Finally, we hit the Manistee North Pierhead Lighthouse:


We didn't want to get home too late, and the day was getting short, so we headed home after this. It was a nice enjoyable trip.


I plan to put up a few more updates this week. A few photos of mine won a contest. I'll post about that tomorrow. I'd also like to share my experiences repairing my Sigma flash, and finish writing up the instructions on building my display panels (I got them half written up 2 months ago and never finished). Hopefully those 2 will make it up later this week.
...click here to read more!

Friday, October 07, 2005

Website for fall colors

I was just watching the news this morning and they mentioned a website called the Foliage Network: (http://www.foliagenetwork.com/)

They have spotters across various states (mostly Bed&Breakfast owners) who report on the status of the fall color change twice a week from September to November. You can pull up a map of both the color status and the leave drop status. It looks like a really handy website. Actually, I've been trying to find a website just like this for a while so that I can plan a quick trip to the UP on a colorful weekend.
...click here to read more!

Tuesday, September 20, 2005

Building my display grid walls

Once I purchased my display canopy, the next thing to figure out was how to hang my photos on the wall when the wall of the canopy consists of nothing more than a tarp held in place by velcro.

Taking a look around at some of the commercial options, I realized this was going to be quite an expensive prospect. The nicest looking option is to go with Pro Panels (propanels.com). However, those run $110 per panel. For 9 panels (3 per wall) plus accessories, thats over $1000. Another nice option is to buy mesh walls from flourish (www.flourish.com/ez_up_mesh_panels.html). However, even that option still runs $600. There are several other sources for display wall, but they sell for similar prices.

Clearly, for someone just getting started and not trying to invest too much money up front, those options are way too expensive. It was time to improvise and build something myself.

There are several options for the do-it-yourselfer. Probably the lowest budget option is to pick up some plastic construction fencing and devise a way to hang that from the canopy supports. That might work, but it would probably look ugly and might not be the most sturdy option. Other option including using things like pegboard or wood lattice. That would probably work well (and I'm sure people are using stuff like this fine), but I was hoping to build something a bit more sturdy and water resistant.

Another DIY option I read about (bermangraphics.com/artshows/booth.htm) was to weld together some electrical conduit and garden grid fencing (similar to chicken wire, but heavier duty and rectangular rather than hexagonal grids). This can be a very affordable option. About $50 in conduit, $20 for grid wire, and $10-$20 for misc accessories (connecting panels together and supporting them), plus costs for the fuel/oxygen/welding rod (not sure if that would be significant). The problem I faced were
1) I didn't own a welding torch
2) When I've used a torch before, I was never really very good at welding.
3) The full size grid with legs is about 6.5 to 7 feet tall...too long to fit into either of my available vehicles

So I set out on a quest to build something similar to these grid walls while avoiding all 3 obstacles. To conquer #1 and #2, I decided to connect my panels together with nuts, bolts, and zip ties. To conquer #3, I made my panels 5.5 feet long and then added 1.5 foot long removable legs.

The total cost was about $170 for all materials, plus whatever type of fabric I might decide to cover them with (I'll just let the bare grid show for now). Once the sections were built, assembling them together (as I would need to do at a show) took about 30 minutes. I've only assembled them this one time so far. Hopefully future attempts will only take about 15 minutes as I begin to master the assembly process.

I'll post more detailed instructions (including all the tricky parts and measurements) in bits and pieces over the next couple of days. For now, I'll leave you with some pictures to give you an idea of what I did.


...click here to read more!

Monday, September 19, 2005

What I've been up to

I've been a bit absent around here lately. In fact, I haven't been doing a whole lot online lately. I've spent a bit of time working on the grid walls for my display booth. As of last week, that's finally complete. I'll post the pics and a detailed description of it tomorrow. I took a one day lighthouse trip up to the thumb area...got a couple new lighthouses and revisited a few others we saw before. I haven't got the pics online yet. I've worked on framing a few more pictures for sale. I've got about 1/3 the number of framed pics I'll need for my display to look decent. So that's my primary focus now.

Other than that, I haven't been doing a whole lot photography related lately. Just been enjoying summer, catching up on hobbies, doing a bit of work around the house, reinstalling my computer from scratch (I try to do that every couple of years, plus I got a new/bigger hard drive for my photos), and that sort of stuff.

I think we're going to try and take another trip as soon as we get another good weekend. Actually, we are considering a few different trips coming up...but it will depend on money, weather, and timing as to how many/which ones we make. We'd like to revisit the lighthouses in the area of Lake Michigan from Manistee to Petosky. We didn't spend much time at those ones last time there, as we hadn't quite taken up our full fledged interest in lighthouse. Plus it was raining/stormy, so we didn't do more than take a few shots from as close to the car as possible (and also, my wife's camera had a shutter failure so none of those pics exposed). We also want to hit a few of the closer ones in the upper peninsula, but we might try to time that trip to coincide with the fall tree colors. I've been trying to keep an eye on the butterfly situation at point Pelee...time a trip there on a weekend when butterflies are abundant. They only had 6 a few weekends ago. Last weekend they had about 100. I've heard they can get up to 500-1000 per day. That's what I'm hoping to time it for. Finally, I'd like to visit Hocking Hills in Ohio, but again, I'm thinking that might be a nice trip for when the trees are changing colors.

As I said, I'll have a detailed writeup on my grid walls tomorrow. For now, here's a quick teaser pic:

...click here to read more!

Thursday, July 28, 2005

First assembly of my display canopy

Since I purchased my King Canopy from Sams Club a few days ago, it's just been sitting in my basement, begging me to set it up in the backyard. Well, I could resist no further, so I took it out of the bag and assembled it for the first time.

It went up rather easily, though I did have a few issues. Of course, I was assembling it alone, so that made it a bit more difficult.

First issue I had was expanding the frame to the halfway point (first step in the instructions). I got it halfway to where I needed it, but then I couldn't get it to expand any further. Had I another person to help, it might have been figured out faster, because I initially just blamed the problem on the fact that I was really doing a 2 person job by myself. However, it ends up that wasn't the problem. It was actually just the sliding corner brackets getting hooked on the posts for the front awning. One I opened up the awning posts just a tiny bit, it went right up.

The second issue was more a case of my interpreting the instructions badly. The instruction told me to secure the corners of the roof with the hook and loop straps. That kind of confused me...I couldn't find any hooks anywhere, and the only loop straps I had were in the center of each side, not the corner. In the corners, all I had to secure it was Velcro...one half on the cloth, and the other half on the corner posts. Obviously, those had to connect together, but what was this other thing they were talking about? Well, after about 5 minutes of looking at the canopy and rereading the instruction, over and over again, I finally realized my mistake. "Hook and loop strap" is a generic term for Velcro.

The third issue appeared when I was securing down those Velcro loops in the center of each side. Each side had a pair of those loop, which you are supposed to unfasten, wrap around the frame, and refasten. Well, one of the loops on the front was accidentally caught by the sewing machine. As a result, it's now sewn into position. You can unfasten it, but you can't wrap it around the frame. I might give the manufacturer a call and ask them to replace the top for me.

The fourth issue was with putting up the walls. Mostly it was just a matter of learning the right technique to attach them, but I did have some problem with the zippers. First, it seemed like the sides were a little too short. That turned out to be a case of the legs simply being opened too far. However, when I got around to attaching the fourth wall (like I would when closing up for the night, I ran into a problem. The sides are made to just barely fit as it is, but with the addition inch or so for the front awning's bars on each side, the front ends up being about 2 inches too short.

I tried closing in the front leg more (to shorten the distance between legs) but that still didn't help. I managed to just barely get the zipper over the awning bracket when I could see the zipper starting to give way...almost ready to tear out from the stitching. I quickly undid it. As it stands now, I can zipper up 3 of the corners fine, but that 4th corner only attaches by the Velcro loops. That might work alright, but then again, water might get in there and hit my corner display rack (once I get one built) getting the cloth wet. I'm not sure what I'll do with this. Possibly make a small 2 or 3 inch strip with zippers on both sides to connect it.

Heres a few pictures of the tent...one after being fully assembled (including the 4th side, but not the awning) and one on the inside.


I've left it sitting up overnight. I'll start construction on the display racks this weekend (I've already got most of the pieces sitting in my basement). I also have to test its ability to withstand water leakage and pooling.
...click here to read more!

Tuesday, July 26, 2005

Purchased a display canopy

Yesterday, I picked up a canopy for my display booth when I go to sell at art shows. I've been reading through the artshowphoto yahoo group and finding a lot of information and recommendations on booths. Lots of people are recommending light domes and flourish canopies, but these all sell for $800 and up. Thats a bit more than I'm ready or able to invest at this point. A few people mentioned getting good deal on those canopies on ebay, but I looked around for a week and only found one, which ended up going for over $500 with shipping...that still too expensive for me at this time.

A bunch of people were recommending a less expensive canopy from Costco that runs only $200. After looking around, that seemed to be the best bet for me. I was getting ready to go buy it when I found out Sams Club sells a similar model for the same price, but the Sams Club version has a stronger top, and its 4 wall close with zippers rather than velcro. I went and picked it up last night. Tomorrow I should get around to setting it up in the backyard. Then I have to get to work figuring out how to setup some walls I can hang some framed photographs on.

I'll also need to do some rain tests on it. Some people complained of these pyramid topped canopies leaking that the seams. Seam sealant fixed those problems for most people. A few more unfortunate people have reported that the roof sags and pools water, and once enough water pools up the edge of the roof gives way from the frame and dumps water into the booth. Again, people have come up with creative solutions to this...pulling the canopy tight and clamping it down, adjusting the spring tension to raise the peak higher, or even using inexpensive funnoodles (the swimming pool toys) to pull the top tight and remove those sags. It's not something I'm terribly concerned about as long as I test and prepare for it.
...click here to read more!

Sunday, July 17, 2005

Pastel Sketching

This weekend I've been working on getting more of my photos ready for selling at an art show. In addition to the many regular photos I've been printing up, I thought it would be cool to do a few stylized ones, where I do a bit more photoshop work to give the image a surreal or non-photorealistic look. I came across some nice actions and instructions. A few really caught my eye, and I'd like to mention one of them.

I was playing around with Isabel's Pastel Sketch action, and really liked the results I got from it. Here's a sketch of the Sand Hills Lighthouse


I started out working with the action, but I really had no idea how it was working or what effect my adjustments were having. I did some digging around and found a post on dpreview from Isabela explaining the technique step by step.

http://forums.dpreview.com/forums/read.asp?forum=1006&message=11085888

Doing it by hand (rather than through the action) and reading some of her additional explanation really helped me understand what was going on. The action has a ton of extra adjustment dialogs which aren't really necessary for the basic effect. To me, they just confused me further, as I didn't know what effect anything I clicked on was having on the picture.

This is a really nice result. I've tried this trick with a tree pic and a butterfly pic...both came out very cool looking. I'm thinking this effect will look really good printed on a matte or art paper. I'll continue to play with this effect.
...click here to read more!

Monday, July 11, 2005

Evaluating RawShooter Essentials 2005

I've been a devoted fan of the C1 raw converter software from Phase One for a little over a year now. My love for it is primarily for it's more convenient workflow when processing dozens of Raw Files at once. Compared to Photoshop, where you can only deal with converting one raw file at a time, C1 is a godsend.

A couple months back, when I heard about a new Raw converter called RawShooter Essentials 2005 (hereafter referred to as RSE), is was only mildly interested. When I found out it was free, I took note. When I heard it was written by some former people from Phase One, I decided to give it a download. I took a quick look at it, and it seemed nice, but not a whole lot different than C1. I never really got around to giving it a thorough test. However, this week I had about 600 photos from my Copper Harbor trip to sort through and convert. This seemed like a decent test, so I went and downloaded the latest version (1.1.3) and got to work.


The good:
The workflow in RSE is very nice. Much like C1, you can scan through an entire folder of raw files very quickly...view the thumbnails and then click each one to get a close up view. However, I quickly discovered some really nice advantages to working with RSE.

1) Perhaps my favorite feature is the priority grouping. In C1, you have an option to tag an image and then later view only those images that are tagged. Thats handy for narrowing down a long list of raw files to select only your very best. However, RSE takes this feature a step further by including three priority groups in addition to tagging/flagging. You can optionally assign each image to a priority group and use that however you want. One way is to categorize your images into "convert now", "convert later" and "convert if I get around to it" groups. Another way is to recursively narrow down you images by marking all your favorites as priority 1, then going through priority 1 and moving your favorites to priority 2, then repeat moving from priority 2 to priority 3. When you are done, you should have your favorite of your favorites in priority 3. However you decide to go back and recheck the images you included in the first or second priority group, but eliminated before getting to the 3rd, you can do that too. However you decide to use it, it is a very handy feature.

2)Another very nice workflow feature in RSE is the setting snapshot. In C1, I often find myself wondering what an image would look like with 2 different settings. If it's just a single contrast or saturation slider, it's easy enough to slide it back and forth to compare. However, if you want to compare between 2 totally different groups of settings, it's not very realistic. In RSE, that problem is nicely overcome. Simply press the snapshot button and a new tab bar pops up with a tab for each settings snapshot. You can jump back and forth to each snapshot, further refine it, and even create additional snapshots. Very nice for experimentation.

3)RSE is fast. Very fast. I compared conversion speeds on my Pentium 4 3.4GHz machine using a batch of 15 files, converting them to 16 bit TIFF files. C1 converted the batch in 3 minutes 17 seconds (~13.1 seconds/image). RSE converted the exact same batch in just 1 minute, 40 seconds (~6.7 seconds/image). That makes RSE almost twice as fast as C1. I thought it might be an issue of settings...one was applying sharpening and the other wasn't, or some similar issue. However, after going through the different settings, that didn't appear to be the case. No matter how I configured it, RSE came out almost twice as fast as C1.

4)RSE has a simple and convenient EXIF display. C1 originally had a nice EXIF display on the Capture tab. It was a simple docked panel that displayed a subset of the image's EXIF data. The downsides of this panel are that it contains more than just the most common info (though it's more concise than the entire EXIF block) and that it's only visible on the Capture tab. Newer versions of C1 have made the EXIF data visible on a floating tool window, which resolves the last problem, but lets the EXIF data window always get in the way (no way to dock it). With RSE, there is a simple little panel at the bottom that contains only the basics (but most commonly used) bits of the EXIF block: camera model, aperture, shutter speed, focal length, and ISO. It's in a format very easy to read (easier than in C1) and it's alway visible without it getting in the way.

5)RSE has some better viewing options. There are sliders to adjust the size of the thumbnail images. More convenient slider for adjusting the main image zoom...the zoom slider and the 100% zoom button are right on the toolbar rather than being located inside of another button like C1, making them easier to access. The fit to screen button is right next to the zoom button/slider, rather than at the opposite end of the toolbar (like in C1)

6)RSE has a nicer set of adjustment controls. The contrast slider in C1 has been outdone by 2 sliders in RSE: shadow contrast and highlight contrast. There is an edge sharpening option added to RSE. There are 2 sliders for noise/color-noise suppression. The controls for white balance, image adjustment, and sharpening all appear on the same tab in RSE rather than on 3 different tabs as they do in C1. And finally, simply pressing the Ctrl button show you which parts of the image are clipped (I find this more convenient than the using the F5 key as your would in C1 simply due to it's position on the keyboard and the fact that it works off a simple press and release rather than press once to turn on, press again to turn off).


The bad:
1) Even though RSE gives some more options for adjustment, it loses a few at the same time. First, there is no curves adjustment in RSE. Second, even though there is an edge sharpening option added to RSE, the regular sharping option is simplified from the one present in C1...just a single slider for amount (compared to C1's separate sliders for amount and threshold, plus a selection box for normal or soft sharpening)

2) Although this is very subjective, I tend to like the default appearance of images from C1 slightly better. With a bit of work, though, I can get very similar results from RSE. Also, making the adjustments in C1 to get to the best results is quicker than in RSE, though I will admit that may be due to my extra experience working with C1.

3)In RSE, there is no cropping tool, no split screen view to work on 2 images at once, and no black and white button (you need turn the saturation down on individual images...not as convenient when trying to look at an entire gallery in B&W mode)

4)Instead of using a standard Windows menu bar, RSE uses a bar full of buttons that generate drop down menus. While this may be personal opinion, I think that was a bad choice. It's a little more confusing than having simple text for the menu trigger instead of buttons.

5)After going through my entire 600+ images from Copper Harbor, picking out my favorites, adjusting them, converting them to TIFFs, further processing them in Photoshop, converting them to web format, uploading them to my website, and arranging my entire online gallery, I made one very annoying discovery: THE EXIF DATA IS MISSING. Even though I had the "Meta Data" box in the convert tab set to EXIF, there was no EXIF data in the resulting TIFF to indicate any of my camera settings. I now have an entire gallery of images online with no EXIF info, and all the options available for adding that info back in are quite time consuming.

After digging around online, I discovered that the problem was due to me not having the THM (thumbnail) files in the same location as the CRW (raw) files. The CRW files only contain a subset of the EXIF data, while the THM files contain the complete EXIF data. On the one hand, I think that is somewhat a failure on Canon's part...there's no reason the CRW shouldn't contain all the info on it's own. On the other hand, the CRW does at least contain the most important settings (ISO, aperture, shutter speed, and focal length), so why couldn't RSE at least include that data in the output file? It has no problem reading that data and displaying it on screen while you are working on the image, so it should at least continue to use it. C1 has no problems doing this...if the THM is not present, it includes as much EXIF as is available in the CRW file.


The ugly:
Nothing. At first, I thought the EXIF problem above (bad #5) was ugly, but after figuring out the problem was caused by a missing THM file, I upgraded the problem to only bad.


In conclusion, I was quite happy with the workflow features of RSE. Keeping in mind the EXIF issue (which will hopefully get fixed...and until then, I'll be sure to keep the THMs and CRWs together), and being a bit forgiving of the slower image adjustment process (which will hopefully go away once I become accustomed to working in RSE), I am very happy with the results I got out of RawShooter Essentials. For now, I may continue to bounce between the C1 and RSE as I compare them in more detail, but at the moment I'm leaning a little towards moving to RSE for all of my raw conversions.
...click here to read more!

Wednesday, July 06, 2005

Returned from Copper Harbor

I just returned a few days ago from a 4 day trip up to Copper Harbor, Michigan and a few other areas in the Upper Peninsula along the way. While up there, we got to see 11 lighthouses, some nice shorelines, some "mountain" views, a handful of waterfalls, a sunrise and sunset over the lake, a quick trip into the Porcupine Mountains, and another visit to Mackinac Island.

The bugs are nasty up there this time of year. The beaches are swarming with those biting black flies. I got bit quite a few times. We also had some windy weather a few days...camping in 50MPH winds is not ideal for a light sleeper like myself. In the end, it was worth it. I took about 600 photos and got some nice ones. I'm sorting through them right now...hopefully by this weekend I'll have the best ones online.
...click here to read more!

Tuesday, July 05, 2005

Photos from Washington

I returned from my Washington trip just over a month ago, but I never got around to posting a link to the photos (even though they are just on my pbase site).

http://www.pbase.com/ldkronos/washington

Here are a few of my favorite shots:

This shot of the Kautz Creek at Mount Rainier was one of my favorites. Something about the way the time lapse exposure came out, giving the creek a cartoonish look to it and the tree leaves a slightly soft appearance.


The green water of Lake Diablo in the North Cascades is beautiful. I think the color is due to minerals dissolved in the water. In a way, it reminds me of the deep blue waters in crater lake


We saw this lighthouse at Browns Point a few hours after arriving. A storm was just blowing in across the Pugit Sound while a small break of blue sky was just rolling out. While not the prettiest lighthouse I've photographed, this one certainly makes for the most dramatic lighting.


This panorama of Mount Saint Helens was actually stitched together from 10 separate images. The full resolution file is just under 16,000 pixels wide and contains an amazing level of detail. The trick here will be in getting this one printed up and framed


There are lots of other great shots in the galleries, so check out the link above.
...click here to read more!

Wednesday, June 29, 2005

Replaced my i950 with a i960

Last week I mentioned that my canon i950 had gone on the fritz and was cross-contaminating ink cartridges. After some additional testing and troubleshooting, I decided the only reasonable explanation left was an internal crack in the print head. Looking on ebay, print heads were going for $50 + shipping. That would hopefully fix the problem, but there was a chance that the problem might be somewhere else in the printer and that the $50 was wasted. After contemplating upgrading to a 13x19 printer but deciding I can't afford it just yet, I started thinking about what to get for an inexpensive printer until I can justify a more expensive one.

I looked into some of the newer canon iPixma printers, but the 6 color models were still over $200. Then, someone posted a suggestion on a message board that factory refurbished printers can be had quite cheap, and they come with new ink cartridges and a factory sealed print head.

I did some digging around on various sites trying to find a good deal on a refurbished i950 or i960. The best deal turned up on pricegrabber.com, where a reputable dealer was selling an i960 for $85 ($70 + $15 S&H). I thought about it for a few days. In the end, I figured I normally pay about $50 (shipped) for a set of ink cartridges, so this left the effective price for a new printer at $35. Cheaper than the print head, it guarantees that any other hidden problem is eliminated, and gives me a 90 day warranty. It seemed like a no brainer, so I ordered it.

The printer arrived Monday, so I set it up. I had some trouble at first. All the cartridges except Cyan primed and printed right away. I remember when I bought my original i950 I had the same problem with either the Cyan or Magenta not printing at all. In that case, not even a deep cleaning fixed it, so I ended up having to exchange it. I was afraid that was the case again, but after 3 normal cleaning cycles it was almost printing fine...the 4th cleaning cycle was the charm. The next problem was in running the print head alignment process...it kept failing on the second page, but switching to a manual alignment worked flawlessly.

So now I have a nice new working printer, plus it gives me a few upgrades. Hi Speed USB (not that it makes much difference to performance), a port to print direct from camera (doubt I 'll use it), and a holder for 4x6 photo paper (might use it). In addition, I haven't read through the book yet, but it looks like there is a door on the back for feeding in thicker stock....that's a feature that might come in handy.

So, I'm happy for now. I can get back to printing photos.
...click here to read more!

Saturday, June 18, 2005

Canon i950 Problems

A few weeks ago, when I was working on some matting for the enlargements I printed from the Holland Tulip Festival, I noticed that on one of the photos there were some black lines running through the yellow sections at a regular interval. At the time, I figured the paper was probably bowed up somehow or another, and the paper had made contact with the print head and smeared some ink. I set the photo aside, intending to reprint it, but forgot about it.

Earlier this week, I went to print out some documentation from a web site, but when the paper came out of the printer, the colors were all screwed up. I assumed I was experiencing a clogged nozzle, and that one of the colors was not spraying out properly. I ran a nozzle check, and imagine my surprise when I see the grid for the yellow ink is very much black. So I open the lid to the printer, pull out the yellow cartridge, and this is what I see:


Not realizing what was going on, I immediately thought that the cartridge contained the wrong color ink when I bought it. In a panic, thoughts started going through my mind....did Canon make a mistake? I'd like to think not, so is there a better explanation? Was this possibly counterfeit ink, and if so, was the rest of my ink counterfeit? Are all the enlargement I printed up recently done with substandard ink?

I immediately ran to the message boards and posted about my problem. Within no time, another user was able to calm my fears about counterfeit ink with a much better explanation: ink had leaked from one cartridge to another. But how did this happen?

Some explanations included an internal crack in the print head, a dirty purge pad, and a defective cartridge. One way or another, something was causing black ink to wick up into the yellow cartridge.

I immediately got to work, disassembling parts of my printer, taking out the purge pad and sponge, cleaning it, and then wiping down some of the other parts of the printer that might be causing the contamination. I used compressed air to spray clean the print heads. Finally, I replaced the contaminated (and nearly full) yellow cartridge with a brand new one. I ran a few tests and all seemed fine.

This morning I woke up and immediately ran a nozzle check on my printer. I was glad to see that the yellow grid looked fine, but I quickly noticed another problem: the black ink had now taken on a yellow tint. The direction of leakage had now reversed. Upset that I now had a different cartridge contaminated, I quickly ran a cleaning cycle and then ran another nozzle check. This time it came out fine...the contamination was only in the print head...it hadn't yet reached the cartridge. That's good, but I now have another problem...everything else was cleaned, so where is my problem now? Is it a bad black cartridge, or is there perhaps an internal crack in the print head causing a leak between black and yellow?

Now I'm trying to figure out what to do. How much money do I want to waste on this printer trying to fix it. I can get a print head off eBay for $50, but is it worth it, or do I want to invest that money into a new printer? I've been wanting something that can print wider format. The Canon i9900 would be nice. It's under $500, and it does 13x19. On the other hand, I would like to also be able to print panoramas, and unfortunately the Canon drivers do not seem geared towards printing arbitrary length prints from roll paper. Its also worth considering switching to something that is pigment based. Some of the Epsons run for about $500, are pigment based, do 13x19, and print from a roll. However, there is the brand new Epson 2400 printer which uses a new and (from what I hear) much better set of pigment inks. On the down side, this printer sells for about $850. What to do...

In the mean time, this all happens at a bad time for me. I'm right between paying for 2 vacations, and in the last month all kinds of things have gone wrong (car accident, home air conditioner, car air conditioner, swimming pool, cat got injured and needed to go to the vet, and now my printer.

In addition, I'm trying to get prints ready to sell at the art fairs in the coming months, but that's going to be tough to do with a printer on the fritz. So now, before any cartridges become contaminated, I'm trying to get together and print out as many of my photos as I can. So far today, I've managed to get 5 photos processed and printed out 2 copies of each. I've got enough paper left on hand to get about 5 or 6 more photos done, so that's what I'm going to try and get done this weekend.
...click here to read more!

Tuesday, May 31, 2005

Back from Washington State

I just returned a few days ago from a 10 day trip to Washington State. I have family in the Seattle area, so I went to visit them, but I used the nearby scenery as an excuse to get out and take a few pictures....1201 pictures, to be precise.

The weather the first few days was kind of crummy...either lots of rain and sunshine, back and forth, or just cloudy most of the day. However, after those first few days, the weather turned very nice, and I had some nice photo trips. I managed to photograph a lot of subjects while there:
Space Needle
Seattle Aquarium
8 lighthouses up close or at a reasonable distance
3 lighthouses from far or very far away
1 lightship from a medium distance
Snoqualmie Falls
Mt Saint Helen's
Mount Rainier
North Cascades
Hurricane Ridge
Hoh Rain Forest
Daytime and Sunset on the Pacific Ocean
Tidal Pools on the Straights of Juan de Fuca
Cape Flattery

After several hours of looking over the course of 2 days, I've completed my first pass at the pictures and weeded them down to about 150. Now I need to make another pass to narrow them down more, then look through all the pics again to make sure I didn't leave anything out. Then starts the time consuming work of processing all of the images.

Hopefully by weeks end, I'll have my pictures ready, printed, and uploaded to the web site.
...click here to read more!

Wednesday, May 18, 2005

The Canon 50mm f/1.8 lens is repaired

A few weeks ago I finally got around to sending in my Canon 50mm f/1.8 lens for repair. The FedEx guy showed up on Monday with my repaired lens. The upside: Canon replaced the front element and reassembled it good as new...focus appears to be fine. The downside: Canon insists that the lens sustained an impact (not sure how that happens to a lens that has never been dropped and is stored in a well padded area of the camera bag). As a result, they wouldn't fix it under warranty, so they charged me $40 for the repair and $5 for return shipping. Including my original shipping, I got the lens repaired for $50 with a total turnaround time of 3 weeks (the lens was in my hands exactly 2 weeks from the day I faxed in the repair authorization).

I guess it's not a bad deal. It saved me about $25 compared to what I would have paid to buy a new one. It's about the same price I would have paid to buy one used off of ebay. I still would like to upgrade to the f/1.4 lens, but this saves me from having to dish out that money right now (difficult to afford with some summer trips coming up). And if I later do decide to upgrade, I can probably sell this on ebay and get the entire $50 back.

I'm also happy that I finally got this thing fixed. I'll be able to use it on my upcoming trips to Seattle and Copper Harbor. That makes me quite happy simply because this lens takes such wonderfully sharp pictures.
...click here to read more!

Monday, May 09, 2005

Tulip Time - Holland, Michigan Tulip Festival

This weekend we took a trip to Holland, Michigan for the tulip festival. It was our first time visiting for the festival, and it sure was a treat. Tulips everywhere in town.

Our first stop was at Windmill Island. Here there were plenty of tulips, to be sure. But more importantly, true to it's name, there is a giant windmill named "De Zwaan" (The Swan), which is an authentic windmill from the Netherlands, build in the 1700 and shipped to Holland, MI in 1964. We actually got to go up into the windmill, see how it was used to mill grain, and walk around the deck.


Unfortunately, there was a huge crowd touring the windmill, and with so many people in a confined space, I wasn't able to get many shots of the inside.

Out next stop was to the Veldheer Tulip Farm. This is where you can find pretty much any variety of tulip you never even knew existed. They have 30 acres of tulips for you to wander in, and each section of tulips is numbered so you can look it up in the catalog and order bulbs to grow your own.


The rest of the tulip photos can be found here:

http://www.pbase.com/ldkronos/tulipfestival


The weather wasn't all that bad. I was hoping for blue sky with some spotty clouds, but the sky just didn't cooperate There was some blue sky with a few thin wispy clouds to the northeast, but the sun was to the south/southeast and it was pretty well overcast anywhere to the west.

However, at least we were able to get enough sunlight earlier in the day to help bring out the colors of the tulips. Later in the day, as the sun moved west, the clouds moved east, and around 1:30 or 2:00 the sun pretty much disappeared for the day. By then, we were off to get a few shots of some nearby lighthouse.

First we hit the Holland Lighthouse (AKA Big Red) then we traveled south to hit a few other before heading home. Here's a shot of Big Red.


The rest of the lighthouse shots are here:

http://www.pbase.com/ldkronos/lighthouses&page=7
...click here to read more!

Wednesday, May 04, 2005

Prints, Papers, Matting, and Framing

Over the last few weeks I've been working more on getting some images ready for sale. I took 4 of the collages and prints that I've done previously, and re processed them to make them look a bit better quality than the quick prints I made for myself. Making prints to sell is a bit more difficult. Whereas normally I look at my photos and decide I like it or don't like it, now I find myself critically evaluating every little detail...noticing everything I don't like. I eventually convince myself that the photo looks like crap, only to look at it again later and realize it actually looks nice, and I'm just nitpicking.

I've also been cutting up my matboard into sizable pieces. I now have a stack of 8x10 and 11x14 pieces in about a dozen different colors. I also took 2 pieces of each color and of each size and bevel cut out the center in 2 different width so that they can form a top layer and a bottom layer. Now as I work on new photos, I can start mixing and matching colors for mats to determine which color combinations work best for that photo.

Last night I took a swing by the art/crafts store and picked up a few more frames. I'm planning on selling mostly matted, unframed photos, but I do plan on having a few pieces onhand that are framed...both to show of my work and get peoples attention, as well as to provide for those people who don't want to frame it themself or can't quite imagine what the print will look like in a frame.

Finally, I started looking into different paper types. I've been using the Canon Photo Paper Pro for almost 2 years now and have been very happy with it. The color is great, and it seems very resistant to fading (no problems yet, except that the white yellows slighly in exposure to sunlight). However, I decided it would be interesting to at least begin exploring other paper types. I picked up a pack of Ilford Gallerie Smooth Pearl last week. I was at the store looking through samples and just loved the texture of that paper.

I did a few test prints and it seemed to work quite well. It looks very nice. The only downside so far is that it's not 100% water resistant. After letting it dry for several hours, I ran the corner under some tap water. I could instantly see a change in color, and even after letting it dry out I could still see the change. I let the print dry a few more days and tried again and it was much better this time...it was barely noticable after the water dried off, but still a slight difference. Of course, this was in the sky, where it was easy to see the difference in a solid blue area. When I tried wetting down the trees, I couldn't really tell the difference after letting the print dry out again.

So I definitely think (based on a quick evaluation) that the Ilford Gallerie Smooth Pearl could be a wonderful addition to my printing repertoire. I'll have to do some more longer term tests to ensure I'm still satisfied with the paper before I consider selliing photos printed on it.

Anyway, as I said, I've got 4 more prints all ready to go. I post some matted mockups of those this week.
...click here to read more!

Tuesday, April 19, 2005

First photo ready for sale

I've been working off and on for several weeks, picking out some of my favorite photos...the ones that I think are the best and have the most potential to sell. While I've certainly got some nice photos all finished up and hanging on my walls, I haven't gone back to re-finish those photos (double check the quality, set them up for easy automatic printing, etc). I guess I figured they were mostly done, so I'd rather spend my time looking for more photos and just come back to finish up those later.

In my searches, a few weeks ago I found a group of photos that I really like. They show various views of/from the Au Sable Point Lighthouse. I really like the photos together as a group. Maybe it's just nostalgia for the fact that my wife and I had to walk over a mile each way down a closed off service road just to get to the lighthouse...the extra effort required to get those shot gives them a special place in my heart. Or maybe its the fact that, after all that walking, when we got back to the car, the battery was dead and we had to flag someone down to give us a jump start in the middle of nowhere. Whatever it is, I felt there was something about these photos that, together, really told the story of this lighthouse.

So, at the time I loaded the files up really quick in MS Publisher and proofed the layout and configuration of the photos. When that worked well, I mocked up a double layered mat in Publisher and fooled around with color options.

Once I was convinced I had something worthwhile here, I immediately got to work fixing up those photos. The first step was to work on each of the individual photos, converting from CRW (canon raw) to TIFF format and post processing. The next step was to get the photos working together in a single TIFF file. This required cropping the images down to the required proportions (including some bleed around the edges), then resampling all images to a common DPI, sharpening each individually, and then copying them to the final image and positioning them relative to each other. The final step here was to work on the text...picking out the right fonts and sizes, choosing the wording, and creating the text layout.

Once the image was all set to go, it was time to print the image. Just one slight problem...the image I created was 11"x14". I do have some 13"x19" paper that I can just cut a slice off of (I've done it before) but the widest my Canon i950 can print is 8.5". Luckily, my image had a 1.5 inch border, leaving 8 inches of actual content. Add 1/4" for bleed to each side and you've got exactly 8.5". However, the next problem is that, in order to print the full 8.5" width you need to put the printer driver in borderless mode, and unfortunately (for who knows what stupid reason) borderless mode is only available for a few fixed paper sizes...not for custom sizes. Luckily (once more) my image had a bar of whitespace that spanned the entire width of the image about 2/3 down the page. This allowed me to break the image into a two 8.5"x11" halves. I just print the top half, turn the paper around 180 degrees, and then print the bottom half upside down.

The next step was to make a custom collage mat. My first try was a disaster...crooked lines, wrong measurements, and on top of that, I actually cut the mat backwards (mirror image). I didn't feel like taking another shot at it right away, so I went back to other things for over a week. Today, I decided to take one more stab at making the mat. This time it came out great, and I managed to get 2 double layer sets cut.

So here it is...a publisher/photoshop mock up of my first complete image ready for sale.

Au Sable Point Lighthouse
Pictured Rocks National Lakeshore
Au Sable Point, Michigan

...click here to read more!

Friday, April 15, 2005

It's starting to feel a lot like....

No, not Christmas! It's starting to feel a lot like spring time. I'm getting a bit excited. I like to do a lot of outdoor and landscape photography, but I think last summer just sucked. It was nice that there weren't a lot of hot days, but there were just way too many rainy and overcast days. I had some decent weather on a few of my smaller trip here and there, but there were even more bad days. My August trip around Michigan got half rained out. Half of my lighthouse trips ended up being overcast skies. Not to mention (unrelated to photography) I hardly got to do any swimming all year. While not a horrible summer, I was more than a bit disappointed.

In fact, thinking back about it now, I was starting to wonder if maybe I was having clouded memory about just how bad the weather was last year. So I decided to go back and review the summer/fall months from last year to see if it was as bad as I remember. A quick look at the historical data over at Weather Underground (a wonderful site to get your weather from) shows that, nope...it's not just my memory. June was really the first month after getting my camera in which I was able to start doing some decent shooting, so I started there. So how bad was the weather? For the summer months (June/July/August) here is what I came up with:
19 sunny days
28 partly cloudy days
2 completely overcast days
43 rainy days

Wow...that's one heck of a crappy summer. September offered a bit of relief, with 18 sunny day(thats one day less than all 3 summer months combined), 8 partly cloudy, 1 overcast, and 3 rainy. However, October went back to the bad weather: 5 sunny, 4 partly cloudy, 8 overcast, and 14 rainy.

This year, Mother Nature is starting to get my hopes up for some good shooting weather. There have been a tremendous number of clear days so far. Lots of beautiful sunrises and even some nice sunsets. One day had one of the coolest sunsets I've ever seen. The clouds had rolled in as a solid layer, but there was a break at the horizon for the sun to do some dramatic side lighting on the wavy underside of the cloud layer. I was completely unprepared for what was about to happen, and I didn't have my camera on me at the time, but my brother-in-law was able to snap a nice shot on his Canon S-70 from his front porch.


Last week, the first flowers started popping up. First it was some daffodils at work. I could not resist snapping a few shots of those, including the following.


Then at home, our tulips just started to open, along with some other purple flowers which I planted a few years ago, but can't remember the name of. There were also some yellow blossoms opening up on one of the neighbors bushes.


So anyway, I'm just hoping that this is really a sign of a nice summer to come, and not just Mother Nature's way of torturing me with a sick sense of humor. I'm looking forward to getting some better photo opportunities this year. I've got a few trips planned already.

In May, I'll be heading to Seattle for a week. I hope to hit a number of sites there. I'd like to spend a whole 2 days on the Olympic peninsula: in the mountains, the rain forest, and stopping off at the ocean beach. I'm also planning a day for Mt. St. Helen's (volcanic activity permitting...you never know what it's going to do lately), and another day for Mt. Rainier. That leaves 4 days to see other things. Of course, I'll hit the usual spots downtown (waterfront, pikes place, space needle). I also hope to get to Snoqualmie Falls. Other than that, we'll see what happens.

In July, I've got a trip planned for 4 days in Copper Harbor, Michigan. There are a few lighthouses in the area I'd like to see, some wonderful shorelines, some old growth forests, lots of small towns, and a few decent (though not huge) waterfalls. Unlike my usual trips of packing a lot of things into a few short days, I'm intentionally under scheduling this trip. My hope is to just be able to spend a lot of time in one area, and really focus on shooting more of the smaller details This is in contrast to my usual strategy of getting the grand overview of a place with some basic but lovely shots, and then moving on. With the extra time, hopefully I'll be able to get some better shots, and be able to capture more of the heart and soul of the area.
...click here to read more!