About a month ago, I received my new propanels to replace my old homemade panels made from electrical conduit + grid wire. I got to use them for 2 shows now, and I must say I like them a lot. They look so much more professional than the old burlap covers I made for the homemade panels. They setup so much easier, are more rigid, and a tiny bit lighter in weight. But the biggest thing I like about them is that Velcro sticks to the carpet. Even in just this short time, I've already realized that velcro (or more generically, hook and loop fastener...specifically the hook side) can be used for just about everything. In fact, I've already gone through a 75 foot roll of hook velcro and just ordered 2 more rolls.
Hanging artwork
When I got my panels, the first problem I needed to solve was how do I hang my work? I used to use curtain hooks that went through the burlap an over the grid wire. You can use the same on propanels, but they have no internal grid, so the hook is really just supported by the carpet. The problem here is that it will stretch the carpet out. From my understanding, that's not a problem because the carpet will return to normal after it sits. However I've seen it done and it looks a bit unattractive, because the picture leans out a bit and you can see it stretching away from the wall.
Another option is the hangers that you can buy with your propanels. They hang over the top and extend down as far as you need. I shot this down for a number of reasons. They cost a fair bit of money, they are a little limiting in how you hang photos, and they don't look as nice since you see the hanger running down the panel.
Instead, I thought I'd try a different approach: velcro.
Canvas wraps
Since I was going to be showing a number of canvas wraps this year, I figured "those are pretty light...what if I tried hanging them with velcro?". I went and got a roll of sticky backed velcro, attached it too back of the finished canvas wrap, and hung it. It worked like a charm. Easy to hang up and easy to take down. The sticky backing on the velro has excellent adhesion. However, just to be safe, I put 3 staples in each strip of velcro (one on each end, and one in the middle). The canvas is very secure. In fact, if anything I overdid it and made it too secure. It sticks to the wall so good, it takes a concerted effort to remove it (but still, no more than 5 seconds)
Here's a photo of the back on one of my canvases. As you can see, I put a strip of velcro across the top and bottom edge of the wrap, and then just a small peice on each edge. For as light as these canvases are, you could probably easily get away with only half as much velcro.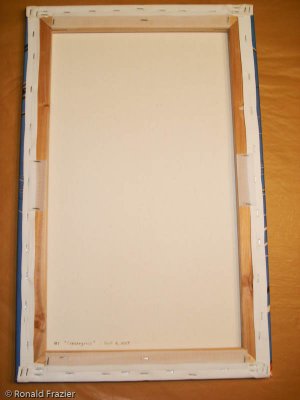
Back of a canvas with velcro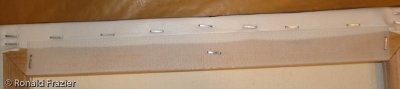
Closer look at the velcro
The thing I like most about this design is how easy it is to hangup frames in the booth. In 2 seconds I can have the frame right where I want it. In addition, the frame isn't going to shift when things get windy and the booth rocks...no more periodically straightening frames throughout the show.
Hanging wood frames
Well, I thought if this worked so incredibly well for wraps (which are just wood) they should work equally well for regular wood frames. My heaviest work is a 24x36 with acrylic instead of glass, so it only weights about 12 pounds. I did the same thing with my wood frames, and it worked like a charm. 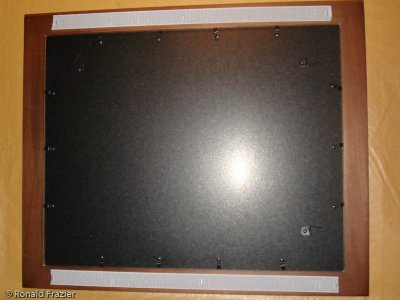
Wood frame with velcro
Pictured here is one of my 16x20's. It holds well with just the 2 sections of velcro. For my larger, more expensive pieces, I wanted to be extra careful so I put a lot of velcro on the sides as well.
Hanging metal frames
Now came the tricky part: hanging metal frames. With such a thin surface area to adhere to, and without being able to staple the velcro to the frame, I was extremely apprehensive about taking the same approach. After thinking about it a bit, I thought "what if I made a short piece of velcro and put curtain hooks through it". It would be just like the old way, except instead of piercing the hooks through the wall, I'd velcro the hooks to the wall.
In designing these, I had a few concerns. First, with the weight on such a small piece of velcro, I was concerned about it coming off. If I attached the hook up high on the velcro, the weight of the picture would in effect peel the velcro off from the top until the whole thing comes loose. If I instead attached the hook to the bottom of the velcro, the weight would pull the velcro down instead of peeling it off. Since the velcro doesn't easily slide across the carpet, that would solve that problem for all but the heaviest frames (much heavier than anything I display).
The other concern was that if I punctured the curtain hook through the velcro, the weight could cause it to tear through the velcro until it breaks loose. Of course, the velcro I'm using is quite tough, but still better safe than sorry. I decided to simply re-enforce the hole with a metal washer.
Making these hangers was quite simple. Cut 2 identical size pieces of adhesive backed velcro (one piece hook, the other loop). Take one piece and peel off the backing. Take a tiny metal washer and place it about 1/4 inch from one end. Then take the other piece of velcro, remove the backing, and stick it perfectly to the first piece. Once it's stuck together, it should be an extremely strong bond, and the washer should be firmly in place. Now take a curtain hook, puncture the velcro with the sharp end (making sure to puncture through the washer). You may need to use pliers to bend the hook some so you can put it through the velcro, and then bend it back to its original shape after it's assembled.
Now you've got your finished velcro hook. Just make a bunch of these, and use them to hang your frames (I use 2 per frame).
Parts needed (plus a curtain hook)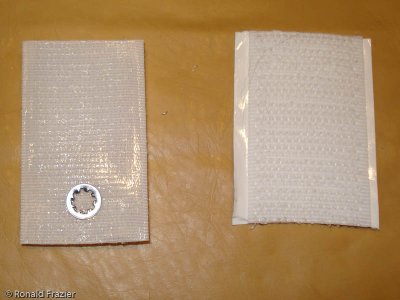
peel off the backing and place the washer
Carefully attach velcro, adhesive backings together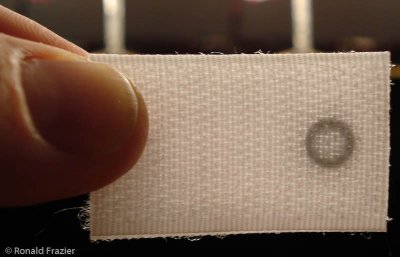
Finished strip, backlit so you can see the washer inside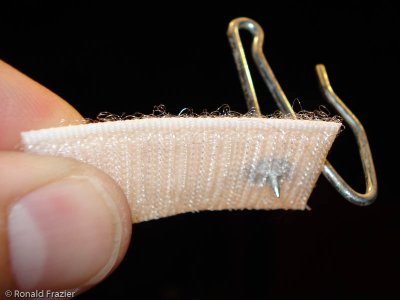
Puncture the hook through the washer (make the hook side is down)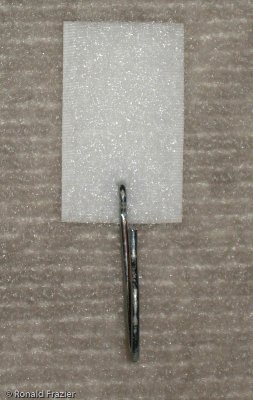
Finished piece on a propanel.
Getting these cut perfectly the same length so that none of the adhesive is exposed can be a bit tricky. What I found to work better was to make a dozen at once. Peel off a couple feet worth of loop velcro, stick a dozen washers to the back (evenly spaced every 2 inches), then attach the hook velcro to the back of it (peeling as you go, so that it doesn't accidentally get stuck to anything. When you are done, you have a 2 foot long strip. Cut it every 2 inches, near each of the washers.
Hanging everything else
Next I figured if I'm using Velcro for the heavy things, why not the light things, too? Anything that I wanted to put on display was promptly stuck with velcro. Price signs, credit card signs, information plaques, etc. Anything in my booth...if it was attached to my propanels, it was done with velcro (with one exception...my shelves where attached by shelf brackets, but I'm sure I could figure out how to velcro those too if I had the need).
Where to get velcro
I found my velcro cheapest on ebay. Look for 1" wide, adhesive backed, 25 yard (75 foot) rolls. If you buy 2 rolls together, you should be able to get them for about $20 a roll shipped. The first order I got 1 roll of loop and 1 roll of hook. I hardly used the loop, but I finished off the hook rather quickly, so my second time I ordered just 2 rolls of hook.
If you don't want to order through ebay, the company that I bought from sells direct. Their hook-and-look can be found at http://www.baerfabrics.com/hook-and-loop-fastener.asp
...click here to read more!
Friday, June 27, 2008
ProPanels - Velcro is the new duct tape
Monday, June 23, 2008
Next show only slightly better
I had another show this week. This time it was the Northville Art in the Sun show. The gist of it is, I did a bit better...made a small profit, but still nothing to get excited about.
Setting Up
This was attempt number 2 at setting up my new booth. Unfortunately, this show only had a morning setup (no option to setup the night before). On top of that, my wife ended up having to work at the last minute, so I was doing things on my own. And on top of that, I only had about 4 hours of sleep.
Then on my drive in, I literally missed hitting a deer by about 2 feet (the driver next to me hit the second deer). In fact, I would have hit the deer I missed had I not mistakenly thought the lane I was in was ending and thus cut over 1 lane. The scariest part was that I didn't even see the deer coming. When I realized I shouldn't have cut over 1 lane, I looked in my passenger mirror to make sure the lane was clear, and as soon as I looked back forward, the deer was already in front of me. I slammed on the brakes and she just barely got out of the way. As I'm trying to stop, the deer carcass from the other car is sliding down the hiway at the same speed as me, spinning in circles as it slides. I was just hoping it wouldn't slide into my lane before I stopped.
Well, despite being alone, and then very freaked out, it didn't work out so bad. I put a few parts on backwards, and a few other mistakes, but I got everything together fine.
The show
Traffic was a LOT better than Livonia. Not even any comparison. There were a few dull spots, but mostly it was good. The slow periods mostly corresponded to the rain. A medium rain came in about 1 hour before the end of day 1. Then there was lightening about 15 miles away and reports of hail at another nearby city. Some strong gusts of wind came in. An artist a few booths down selling wooden bowls was in the middle of securing her canopy side walls when the wind grabbed it, hit her display, and destroyed $700 worth of work. Everybody started packing up. After being one of the few holdout artists, I decided enough was enough and closed up 30 minutes early (the first time I've ever done that at a show).
Day 2 was very similar. Similar traffic (perhaps slightly better). Similar gusts of wind, and threats of rain, but nothing much came of it. Happily, since no rain came, my tent was able to dry out, which means I now don't have to unpack it at home to let it dry out.
The sales
Well, it was better than last time. At least I made a profit (though remarkably tiny, after deducting booth/app fee, materials, and gas). I figured I worked 22 hours this weekend for about $3 an hour.
I wasn't the only one doing poorly. Everyone else had similar complaints. I saw very little artwork in patron hands. The number of people I saw walk past carrying photos from other photographers...well, I didn't need 2 hands to count them. The market just wasn't there
Conclusion
A slight turnaround, but still disappointing. But it was a fun experience. At least now I know I can setup the whole display (9 foot trimline included) all by myself (with just a tiny bit of help putting on the legs). I figured out some cool new ideas for my setup. I've got 5 weeks until my next show and a number of ideas to consider implementing before then. Hopefully then things will turn around a bit.
...click here to read more!
Thursday, June 19, 2008
Starting off year 3 with a terrible show
Once again I'm off to a bad start for the year. Last weekend I did the Livonia Art From the Heart show, for the third year in a row. It ended up terrible...I lost money. However, it was good practice with some of my new equipment, so not all is lost.
History of Livonia Art From the Heart
Just to recap a brief history, Livonia was my first show ever, and ended up as my best show the whole first year. The second year was a LOT worse. I actually lost money that time and it was my lowest sales show of the year. However, at the time I did the show, I had not yet experienced a better show, and so (not knowing what was out there) I was too quick to just write it off as a bad year and thus signed up for year 3 on the spot (in order to get a $50 discount). Well, year 3 turned out just like year 2.
Way fewer artists this year
When I received my welcome packet a while ago, the first thing I noticed was the layout of the show. The isles looked like they had way fewer booths than last time. This time there were less than 100 booths, whereas (I believe) the prior year had about 150 booths. Obviously a lot of people were upset about 2007 and didn't return.
When I arrived on Friday night to to check in, the thing I noticed was that they were hand writing in several people onto the show layout chart and filling out their signage by hand. In contrast, most everyone had them prefilled in and computer printed. It's possible these were alternates called in at the last minute. However, given the decrease in the number of booths, I don't think that was likely...I suspect they actually accepted everyone who applies. The only other thing I could think was that they were actually accepting last minute entries.
One benefit of the fewer artists was that our booth space was increased from 10x13 to about 15x13. That would have been useful had I realized it before I finished setting up...I could have put up another awning and put some more work on the outside wall. Oh well.
Friday night setup...in the rain
When I arrived to setup on Friday night, it had just started raining. On the plus side, we missed the lightening that was originally forecast, and the rain was only relatively light...no downpour. Normally I would have been upset about the rain, but this year I had my new Trimline canopy. If it were as good as its reputation, I'd have nothing to worry about. Another upside to the rain was that we were one of only about 6 people who chose to setup on Friday night, so there was no fighting for parking spots.
Even though I bought the trimline at the end of last year, I never used it because I wanted some more practice setting it up. The only setup I had done before, I got as far as assembling the frame and top, but no walls or awnings. Well, I never got around to practicing, so essentially I was doing my first whole setup of the tent on the spot. I ran into a few small snags, but nothing I didn't quickly figure out. I'll write more about the booth in another post.
Once we got the canopy up (including walls), we were much relieved, as we were able to finish our work in the dry interior. We setup the pro-panels (which we also had never setup before), hung a few frames, and then decided we were exhausted enough to head home and leave the rest for tomorrow morning.
The show
Saturday was entirely uneventful. No rain, no major traffic, no snags. Nothing interesting to report on at all. Sunday started out the same way. Then there was a minor surge in traffic that made it hopeful that things would start picking up, but it ended as quickly as it started. A few more brief surges happened over the next few hours, but it never went anywhere.
There was a storm scheduled to come in right around the time we were to close (5PM), but it arrived early. At 1:30PM the storm hit. I closed up the booth, but there was lightening, so I figured it was safest to retreat to the car. The rain lasted only about 15 minutes. I returned and reopened.
The early exodus
Right after the rain, artists immediately started packing up. Our row held the line (we only lost one booth), but the next row over lost all but 3 booths. About 3PM I decided to take a walk around the show to see (what was left of) the other artists. It was sort of embarrassing how quickly I walked the entire show. There was hardly anything left.
It got a bit windy, and one of the artists who was packing up had her easy-up canopy roll on her. She made the mistake of leaving it up with no weights and no stakes holding it down.
The results
When it was all said and done, I made about $190 in sales on a $200 booth fee, so I lost $10 plus materials, gas, credit card fees, and time. What was most interesting was that even my cheap $5 gift cards couldn't save me. I sold a set of 5 and a single card. Three of the prints I did sell were discounted prints on my clearance shelf (I had too much inventory for my bin and wanted to move some of the older prints).
Another artist near me only sold a bit over $500 worth of stuff, and $325 of that was due to to a single large canvas sale. A jeweler near me only made $35 on Sunday.
Done with the show
I was a bit stupid for signing up again, but now I know better. I've found better shows, and there's no need to hope for a turnaround on this one. I'd rather spend my time trying out new shows than come back to this one, so that's another show off my list for next year.
Next up...the Northville show this coming weekend. Also up this weekend....a forecast for scattered thunderstorms :-( On the upside, maybe all this rain (if it keeps up) will make for a wonderful display of autumn colors this year. That upside is 4 months away. I must be desperate for good news.
...click here to read more!


