I've been thinking lately about what my goals are for my photography. The number one goal for me over the past 10 months or so has been to gather up a nice collection of photographs and to eventually start selling prints at art fairs as well as online. I know it's not usually the way to get rich in photography, but it means the most to me. I'm not particularly interested (at least at this point in time) in doing paid assignments (weddings, corporate shoots, journalism). I don't intend for this to become another job where I work for someone else taking the shots they want. Selling prints allows me to do photography on my terms....I take the shots I want, produce the prints I'm proud of, and don't worry if someone's not thrilled with my work (they just don't have to buy it).
So now it's about time I start transitioning into the next phase of the process...thinking more about business aspects. I've been putting together a list of things I need to do and think about. Today I mailed off the paperwork for my sales tax license. I consider that my first official step. Hopefully that will jump start my drive and motivation to get things done. At least the simple act of finally dropping it in the mailbox has gotten me a bit fired up about everything. The next thing I'd like to do is work on a business plan. I tend to wander aimlessly if I don't lay out a clear direction for what I need to accomplish. That's just my personality. I probably could have done more by now if I had done that 6 months ago, so the last thing I want to do is put it off. So I've been doing some initial research into writing business plans and coming up with a few ideas, but I'm still early in the process. However, I know myself...if I don't put my mind to it, I'll drag the process out and still be working on it in a month. So here is my goal: Tuesday I do some reading. Wednesday I do a rough outline, and then I work on doing some more research and refining it over the next several days. One week from today (Monday, February 28) I want to...no, I will have my initial version complete. So that's goal #1.
The next thing I need to do is get to work on gathering up my best prints, post processing, then printing and matting them, and even framing a few. I've been told to sell matted prints rather than framed prints, but having a few framed ones on hand is probably a good idea to show off their real potential. I've been picking up some supplies over the last couple months. I have a few frames ready, several mats, and some backing board. I'll need to pick up more of those, plus some plastic baggies that the prints go into. After that I need to work out a web site and some business cards. I should also put together a little portfolio of photos...a book I can take with me showing off a bunch more of my photos, even if I don't have them all available and matted (would allow me to take custom orders).
And of course, through all of that, I need to continue to take more photos. I still haven't been taking as many as I should, though I do have a backlog of photos I need to process, print out, and upload. I've been getting excited to go do some more shooting. I've been reading "Learning to See Creatively" by Bryan Peterson. It's a really good book. I'm about halfway through it and it's been giving me some ideas. I should finish it up in the next week or so (I'm not that fast of a reader, plus my priority should be more towards my business plan). As soon as I get the book finished, I'll post a review here.
I'll finish up here with one last thing. A week ago I started putting together this little list of things to do on a post-it sized sheet of paper. For the last thing on my list, I tried something different. I've always read/been told to write myself little inspirational/motivational messages. It's always seemed to me to be a rather hokey idea, but I finally figured "what the heck" so I added one last item onto the list. It seems to be working. I look at that list every day, and it really makes me want to get things done. I've written lists before and then never follow through, but I think I realize this time that if I ignore my little message I'll be letting myself down. This time I'm really starting to get things done. So what was my message?
STOP SCREWING AROUND!!!
...click here to read more!
Monday, February 21, 2005
Getting a business rolling...
Tuesday, February 08, 2005
Ohio Lighthouses...applying some new ideas.
A few weekends ago my wife and I made a trip up to Port Huron, MI to try and get some winter lighthouse pictures to add to our collections. It was an OK trip, but I wasn't fully satisfied with what we saw (we only made 3 stops, and one of them was on coast guard property so we could only photograph over the fence). So this last weekend, we decided to hit some more lighthouses. Being that the sun is so low on the horizon, we made the mistake last November of hitting some lighthouses on the North side of Lake Erie. Not wanting to face similar conditions (with the resulting less-than-stellar photos), we decided it would be a good idea to head for the South side of Lake Erie, so Ohio here we come!!!
Being that we had limited winter daylight, and we didn't plan on making this an overnight trip, we picked a handful of lighthouses to hit from Port Clinton to Lorain. By the time morning rolled around, there was some very nasty fog which didn't clear up until sometime past 11AM. The thought did occur to me to get out early and get some cool lighthouse-in-the-fog shots. However, I remembered last time we tried that the photos didn't come out nearly as good as they did in my mind. So, we waited until around 9AM to leave, getting us to our first lighthouse right around 11:30AM.
We got some good shots on the trip. I was especially pleased with the shots I got from the Marblehead and Huron Harbor lighthouses. Lake Erie was frozen over as far as the eye could see. I took advantage of the opportunity to walk a short distance out onto the ice so that I could capture the frozen shoreline in a few of the shots.
While I was out taking shots, I figured it would be a good opportunity to try out some of my new ideas picked up from "Understanding Exposure". First, I decided that I was going to shoot mostly in M mode.
In trying to look up just how many of my shots were manual, I noticed a bug in C1. It seems that it's reporting my manual mode shots as being shutter priority. Interesting....
Anyway, my purpose for shooting in M was (as I mentioned in my last update) to try and avoid the pain of dealing with erratic meter readings in Av or Tv when pointing the camera at slightly different subjects. Since taking pictures of a given setting should give roughly the same exposures, I was hoping to be able to set it and (mostly) forget it.
So after switching to M mode, I pointed the camera at the (clear blue) sky to take a meter reading. Unfortunately, I was expecting to have to do a lot of fiddling with settings, so I didn't clearly make note of what my original adjustments were, but as best as I can recall I originally came up with 1/200 or 1/250 @ f/11 with ISO 100. In my sample shots, there was a little bit of blown out highlights in the snow and sky, so I bumped the shutter speed up to 1/400. This gave perfect results for almost everything. When pointing directly towards the sun, I did bump up to 1/500 to avoid blowing out the sky immediately surrounding the sun, but other than making that adjustment every now and then, the settings seemed to be fine. When going into the shadow of the trees, I did have to go to a 1/160 to 1/200 shutter speed, but that was the majority of my fidgeting.
The end result is that I got some great photos with these settings, and I enjoyed myself a lot more in the process . Not having to take the same shot 2 or 3 times because the meter readings would jump all over the place was a relief. I also found that after a while I was plenty comfortable that the exposure was good, and I found myself looking down at the LCD (ie: "chimping") a heck of a lot less.
So here are a few of my favorite pics from the trip. The rest of the pics can be found here: http://www.pbase.com/ldkronos/lighthouses
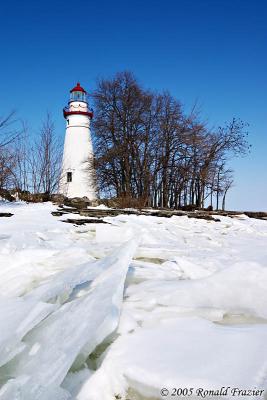
Marblehead Ligthouse
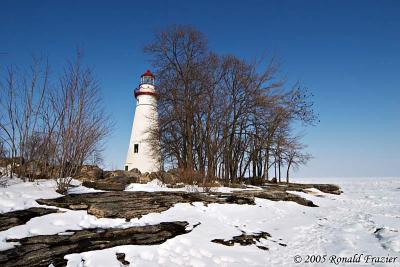
Watching over a frozen Lake Erie
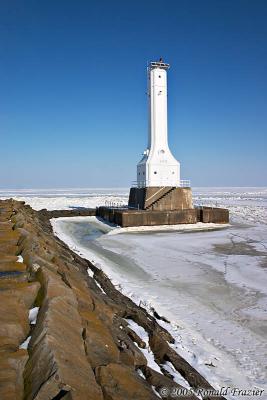
Huron Harbor Lighthouse

Geese on the Portage River - Port Clinton
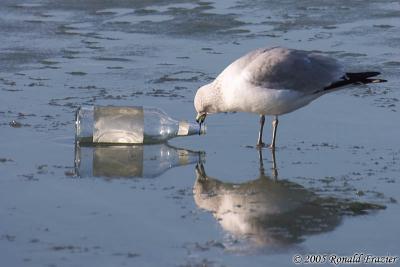
Sea Gull plays Spin the Bottle
...click here to read more!
Sunday, February 06, 2005
My thoughts on "Understanding Exposure"
As I mentioned last time, I decided to pick up a few gifts for myself after not getting any photography books for Christmas. Among those was "Understanding Exposure" by Bryan Peterson. Now, I first must say that this book certainly had a lot to live up to in terms of expectations. For many, many months now I've heard nothing but praise about this book and how helpful it was. So how did it live up to the hype?
After reading though this book, I've been reminded of something I touched upon in one of my entries a while back, and that is how I take some of the things I know for granted. I've had a very good understanding all along of how shutter speed & aperture affect the captured exposure, and it's something I've always assumed everyone else has just picked up on. I therefore was expecting this book to contain some sort of "magic" of which I had no clue existed...something that was going to transform the entire way I thought about photography. Well, as it turns out, about 80% of the important stuff covered in this book is all about how aperture and shutter speed come together to create depth of field, motion blur, freezing action....stuff like that. I'd just forgotten that not so many people understand how that works and how to use it to their advantage. So, there was no "magic" element in the book for me.
So does this mean I was disappointed by the book? Not by a long shot. It was just one of those cases where I built the book up so high in my mind, there was no way it could have lived up to what I expected. Again, I had no idea what I thought it was going to teach me...I just thought it would contain that unknown "magic".
Not wanting to come away from the book hating it, I was determined to look a little deeper into the book and find the things there that I though might be helpful to me. Well, I had no trouble finding some interesting ideas. Some were a bit new to me, while others I had known but just kind of glossed over before and not thought much about. As I went through the book, I made note of what I thought were the most important things I wanted to remember when I was done. Here's what I came away with.
Once you get to understanding how to use shutter speed and aperture to create various effects, there was one concept in that book which I thought was the most important: The Creatively Correct Exposure. "A creatively correct exposure always relies on the one f-stop or the one shutter speed that will produce the desired exposure". The idea here is that, while you can take a picture using any of a half dozen to a dozen different aperture/shutter speed combinations and maintain proper exposure, there is usually only one of those combination which will give the effect that will make a good photo into a great one. Its a concept I'd like to try to focus a little more on. Occasionally I find myself taking pictures worried about the depth of field, and then later on I realize what I needed to be concerned with was a slow or fast shutter speed. Its really easy with modern cameras, and especially with digital, to just start snapping away at a scene with whatever setting you might have left on the camera for your last shot, and probably just leave it in Av or Tv (or heaven forbid...full auto) to let the camera determine the correct exposure. The idea is to stop and think first: "what effect will make this scene jump out of my photo, and what setting will achieve that effect"
The next most important thing I took from the book was to reexamine how I do my exposure settings. Tv and Av modes make it really easy to just pick the one setting you want (the one that will give you the "creatively correct exposure"), point the camera, and take the shot. In the ideal world, the camera would determine proper exposure and you'd end up with a nice photo (not to dark, but not blown out). Well, thats a nice theory, but it never quite works out like that. It seems inevitable that I take the shot and the sky ends up half blown out. So I set the exposure compensation to underexpose by a stop or so and then try to retake the shot. Only this time, I point the camera ever so slightly different and the meter gets a different reading. This time it makes a good guess at exposure, but I've told it to underexpose, and the end result is a dark image. Even without using exposure compensation, just point your camera a couple different ways and the exposure will jump all over the place (1/500 here, but turn a few degrees and now it says 1/250). The end result is that if I'm trying to take 3 or 4 angles of a given shot, I might end up taking 6 to 12 attempts to get those 3 or 4 angles all exposed properly. Its really a frustrating thing to deal with.
As I was reading through the book, I realized just how often manual mode was used and how little emphasis was placed on Av and Tv modes. It seems that these days, using manual mode excessively is interpreted by people one of 2 ways: you're an old timer who can't get with the times (we have smart cameras now, grandpa...they're smarter than you) or you're a newbie who's trying to learn to swim by jumping in the deepest end of the pool. Of course, it's well accepted that even manual mode has it's proper place and time, but still...if manual mode is your everyday setting, you are likely to find people looking at you one of those 2 ways.
However, manual mode is a wonderful tool to combat those jumping-exposure problems I talked about. I noticed how Bryan was alway saying he pointed the camera at this or that and took a reading in manual mode, then pointed where he wanted to actually take his shot and fire off a frame. Of course, you can do this same thing in Av or Tv by using the exposure lock feature on your camera. The trouble with that is, every time you want to take a shot, you either need to keep the exposure lock held down or take the reading every single frame. The thing is, even if you are recomposing the scene, often the exposure is going to be about the same. So why not just take the reading once, leave a little bit of headroom so a slight variation in lighting doesn't blow out the shot, then just fire away multiple angles. This is a concept I plan to work with quite a bit in the future.
In the process of taking readings for shooing in manual mode, one thing that comes to mind is where do I point the camera to take the reading, and what kind of reading can I expect? Bryan gives a few pointers for different situations. Is there a bright sky? If so, point the camera at the sky (but not straight at the sun) and take a reading. Chances are that the sky is the brightest thing in the scene and your exposure will come out best. Trying to take a shot of something that's back lit? Again, point the camera to expose the background properly (but again, don't point it at the sun...point it to the side of the sun) and your exposure should come out ideal. Taking a shot of a water sunset? Point at the reflection in the water and take your reading. Is there no sky, but lots of green in the shot? If so, point the camera at the green, and then underexpose by 2/3 of a stop. Is it night time? Just meter the sky and let everything else silhouette. Shooting a portrait? Move in really close so your subject fills the frame, take your reading, then back off to get the composition you want. Also mentioned is a concept of using your palm as a substitute for carrying around a grey card.
Another concept from t he book that I just loved was the "who cares" shot. Sometimes you want your shot to have huge depth of field, so that everything is in focus. Other times you want a shallow depth of field. But then there is this whole class of photos in between where you could say "it really doesn't matter". In these cases I was always inclined to just pick a random aperture (and usually, it was whatever aperture I used in my last shot). However, an important concept to remember is that lenses always have a range where they produce the optimum quality results. Usually this is in the f/8 to f/11 range. So the whole idea is, if I don't care what the depth of field in the shot is, then I'm going to use f/8 to f/11 so that I get the best quality image possible.
Other interesting notes:
Aperture_diameter = focal_length/f_stop (ex: 50mm lens, f/2.0 ==> 50mm/2 = 25mm wide aperture). Doesn't really mean much in terms of how I work, but it's an interesting little factoid.
Use a sprinkler and back lighting to simulate rain shots (use with fruit, flowers, anything that looks good in the rain).
Back light semi-transparent object (like leaves) to make them glow.
So despite this entry starting off sounding like I was going to bash the book, the book is really quite excellent, and I'd recommend it to anyone (even an accomplished expert).
Yesterday I took a trip to get some winter lighthouse photos. In the next day or two, I share a few of my shots from that trip along with some of the ways I applied the ideas from this book to come up with some nice shots.
...click here to read more!


