Once I purchased my display canopy, the next thing to figure out was how to hang my photos on the wall when the wall of the canopy consists of nothing more than a tarp held in place by velcro.
Taking a look around at some of the commercial options, I realized this was going to be quite an expensive prospect. The nicest looking option is to go with Pro Panels (propanels.com). However, those run $110 per panel. For 9 panels (3 per wall) plus accessories, thats over $1000. Another nice option is to buy mesh walls from flourish (www.flourish.com/ez_up_mesh_panels.html). However, even that option still runs $600. There are several other sources for display wall, but they sell for similar prices.
Clearly, for someone just getting started and not trying to invest too much money up front, those options are way too expensive. It was time to improvise and build something myself.
There are several options for the do-it-yourselfer. Probably the lowest budget option is to pick up some plastic construction fencing and devise a way to hang that from the canopy supports. That might work, but it would probably look ugly and might not be the most sturdy option. Other option including using things like pegboard or wood lattice. That would probably work well (and I'm sure people are using stuff like this fine), but I was hoping to build something a bit more sturdy and water resistant.
Another DIY option I read about (bermangraphics.com/artshows/booth.htm) was to weld together some electrical conduit and garden grid fencing (similar to chicken wire, but heavier duty and rectangular rather than hexagonal grids). This can be a very affordable option. About $50 in conduit, $20 for grid wire, and $10-$20 for misc accessories (connecting panels together and supporting them), plus costs for the fuel/oxygen/welding rod (not sure if that would be significant). The problem I faced were
1) I didn't own a welding torch
2) When I've used a torch before, I was never really very good at welding.
3) The full size grid with legs is about 6.5 to 7 feet tall...too long to fit into either of my available vehicles
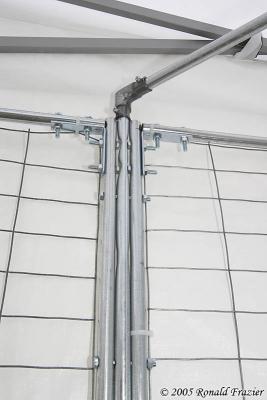
So I set out on a quest to build something similar to these grid walls while avoiding all 3 obstacles. To conquer #1 and #2, I decided to connect my panels together with nuts, bolts, and zip ties. To conquer #3, I made my panels 5.5 feet long and then added 1.5 foot long removable legs.
The total cost was about $170 for all materials, plus whatever type of fabric I might decide to cover them with (I'll just let the bare grid show for now). Once the sections were built, assembling them together (as I would need to do at a show) took about 30 minutes. I've only assembled them this one time so far. Hopefully future attempts will only take about 15 minutes as I begin to master the assembly process.
I'll post more detailed instructions (including all the tricky parts and measurements) in bits and pieces over the next couple of days. For now, I'll leave you with some pictures to give you an idea of what I did.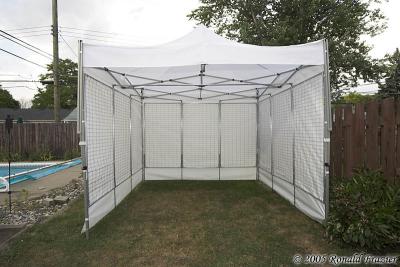


Tuesday, September 20, 2005
Building my display grid walls
Subscribe to:
Post Comments (Atom)


No comments:
Post a Comment