I finished reading "Learning to See Creatively" by Bryan Peterson a few weeks ago. This was quite an incredible book. In terms of the absolute content covered, I would put this book just a hair behind "Understanding Exposure". However, taking into account that I already knew a lot of the ideas covered in that one, I would say that this book was probably a little more helpful to me. So what did it cover?
Bryan starts out with a discussion of the broad categories of lenses (standard, macro, wide, zoom). Not a lot of new material for the intermediate or advanced photographer. However, more so than reading what he says about each category, it's really worth looking at his photos of how he used each one in creative ways. My favorite example from this section was a shot of a mountain where, rather than focusing on the mountain as most people would do, he picks his primary subject to be some wildflowers in the field in front of the mountain, and then leaves the mountain itself to be an out of focus (but still very recognizable) background. His macro shots in this section are also wonderful.
Next, Bryan goes onto covering the 6 elements of creative design: Line, Shape, Form, Texture, Pattern, and Color. Although this only comprises a little more than 1/4 of the book, I really felt that the ideas in this part were the real meat of the material. Very interesting reading his thoughts on how to use each element alone, as well as with each other. He talks about the different types of moods evoked by different lines (curve vs diagonal vs zig zig), and how you can often improve the composition by simply rotating the camera to change the angle of the lines. He discusses how the different elements are affected by different angles of lighting. How to use contrasting object to interrupt a repeating pattern. How to use opposing colors together. Tons of other stuff here too. This section was just too valuable to pass up.
In the next section, Bryan continues on with an amazing discussion of different techniques of composition. He reiterates the often heard mantra of getting in closer (no...CLOSER!!), as well as the popular Rule of Thirds. Another interesting idea here was his mention of the "Right Third", and how often a picture can look even better when flipped so the subject is in the right third of the picture rather than the left. He discusses taking landscape shots without including the horizon. Frame within a frame (his idea is that every picture has yet another interesting picture hidden within it). Bryan also covers the highly controversial topic of "Working your Subject". In Bryan's opinion, repositioning and trading out items in a scene is definitely acceptable if it gives you a better composition. Despite some people opinion that you don't get the true picture, Bryan suggests "the real truth of a photograph is in its ability to evoke emotion". Finally, after establishing all of these compositional "rules", he finishes out the section with a discussion of how to break all of the rules when necessary.
Next up is a quick discussion of using light, although this section is really just an abbreviated form of his discussion of light in Understanding Exposure. After that is a brief discussion of digital photography, and how Bryan uses tools like photoshop to achieve creative results. Bryan finishes out the book with a couple of pages on choosing your career path in photography.
As with Understanding Exposure, this book is definitely filled with wonderful idea...however, they all pale in comparison to the wonderful photographs that Bryan has chosen to demonstrate each idea. With careful observation, you can learn a ton from this book without reading a single word of the text simply by looking at the pictures.
In summary. I definitely recommend that everyone pick up a copy of this book. This book is every bit as good as Understanding Exposure. In fact, the only way you can go wrong in picking one of these books over the other is by not picking up a copy of each.
...click here to read more!
Friday, March 25, 2005
Can YOU see creatively?
Tuesday, March 15, 2005
Modifying the Logan 450 Matcutter
As I mentioned a few weeks ago, I picked myself up a Logan 450 mat cutter. While I was very pleased with how well it worked, there were a few shortcomings with it:
1) The squaring bar is very short. Squaring up a 40" mat board against a 3 inch squaring bar is not exactly highly accurate. I found that I could shift the board a few degrees in either direction while still having the board appear to be square against such a short bar. For the best accuracy, the squaring bar needs to be as long as possible.
2) The bar you use to set the border width only goes out to about 4.5 or 5 inches. While this is more than adequate for a majority of mat cutting applications, it is NOT suitable for A) cutting mats with VERY large borders, and B) cutting mats for collages.
The best solution (at least out of the box) for both of these problems is to use a measuring stick to mark out the desired cutting line BEFORE placing the mat on the cutting board, and then just eyeballing the cut to the line. However, for better accuracy, or for easily cutting mats in larger quantities, I needed a better solution. Enter my modified Logan 450.
After running through a great number of ideas in my head about how best to modify the board, I finally came up with a solution that gave me reasonable results with minimum expense and manufacturing difficulty. Also, a key requirement was that the modification not be permanent. I should be able to assemble and disassemble the extension board with a minimum of difficulty and with as much accuracy as possible.
Before I get to describing just how I made these modification, I first want to say that I don't suggest that you make these modifications to your own board. However, if you are handy with tools, and are able to do quality work, then feel free to give it a go at your own risk.
Now, ideally I should have been taking photos of the whole process as I made the modifications. Of course, hindsight is 20/20, so all I have are after the fact photos. I'll post those photos below, and give step by step instructions for how I did what I did. First, I suppose I should start with a photo of the finished product, just so you can see what we are working towards: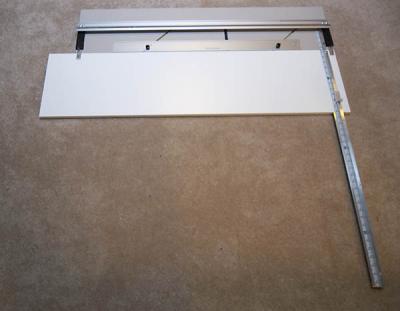
Step 1) We need a board we can attach to the side of the Logan 450. For this purpose, a typical laminated shelf of about 12" x 48" x 3/4" works well. 48" is slightly longer than the Logan, so you could cut off the extra 4-5". I wasn't sure what ideas for modification I might come up with in the future, so I decided it didn't hurt to leave the extra couple inches on there just in case.
Step 2) We need to keep the board from shifting along the joint. For this purpose, I used 2 pieces of 3/16" steel rod. Cut off 2 pieces about 1.5" long. Then I took a drill with a 3/16" bit, and drilled 2 holes in the edges of both the Logan 450 and the extension board. The holes need to be about 3/4" deep, need to go into the edge of the board perfectly straight, and the corresponding holes on each of the boards should match up perfectly, and the near edge of the extension board and the Logan 450 should be flush. See the hole marked A in the following photo (ignore hole B for now).
Step 3) Take the 2 pieces of 1.5" long 3/16" steel rod, and insert them into the holes on the edge of the Logan 450, as indicated by label A (again, ignore label B for now).
Step 4) Lay the 2 boards next to each other, as shown in the following picture, and then push them together. If you drilled your holes correctly in step 2, it should go together perfectly, and the near edges should be flush. After the boards are pushed together, there should NOT be a gap between them. If there is, you didn't drill one or both of your holes deep enough (or the steel rod is too long).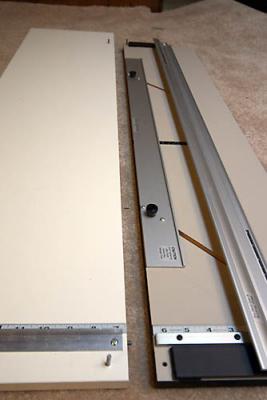
Step 5) Now we want to devise a way to keep those 2 boards locked together as tight as possible while still allowing us to easily pull them apart. For this, I took a piece of 1.5" x 36" x 1/8" aluminum stock, and cut off 2 pieces about 3/4" wide (well, to tell the truth, I actually cut them from a smaller, separate piece of stock that I bought earlier, but I later discovered I need the larger piece for something else, and the smaller one was just a waste of money). I then used a metal file to smooth down any sharp edges.
Step 6) Now, using the 3/16" drill bit, drill out 2 holes in the bar. On one of the edges, make sure the hole is as close to the edge as possible (without being so close as to make the edge thin and weak)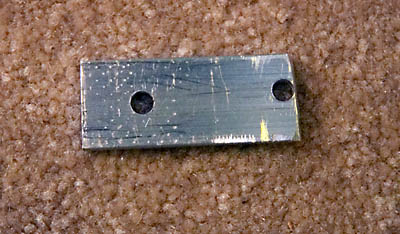
Step 7) Now, we need to position these 2 bars at each end of the joint, near each of the Logan 450's hinges. Once they are in place, you want to use the 3/16" drill bit to drill through the holes in the bars and into the 2 boards. See hole B in the photo from step 2.
A few things to be careful of here. First, don't drill the hole too deep into the board...you don't want to go all the way through. About 3/8" to 1/2" should be more than enough. Second, when you drill the hole into the Logan 450, you do not want to mess up and ruin it, so you need to get this right the first time. You don't want the hole to be too close to the edge of the board (you need to keep enough surrounding wood to keep the hole strong). On the other hand, if you get too close to the hinge, what you will find is that the hinge hits the aluminum bar ends up not opening all the way. This is the mistake I made the first time around. Luckily I was able to file away/round off/thin down the corners enough to fix this. So make sure you get it right the first time. Finally, when you drill the second hole of each pair (first hole is in the Logan 450, second hole is in the extension board), you want to make sure the hole is far enough over that you get a very tight fit. You might want to mark the center of the hole with the aluminum bar in place, then remove the aluminum bar and drill the hole just a very slight bit further away from the joint.
Step 8) Cut 4 more pieces of the 3/16" steel rod, each about 1" long. Insert them into the 4 holes, as shown by label B in the photo from step 3.
Step 9) Now, you should be able to slip the aluminum bars snugly onto the steel pegs.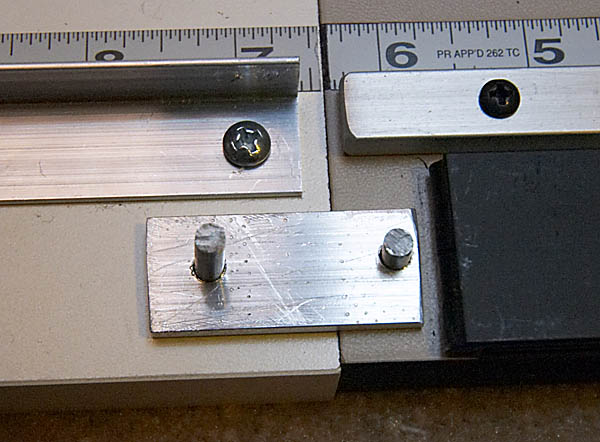
Step 10) Now that we have the 2 boards connecting together solidly, we want to add on the squaring arm. For this I took a piece of 3 foot long aluminum offset angle stock. I drilled 2 small screw holes into the bar so I could mount it to the board. As you can see in the photo above (step 9), I placed the angle bracket to be flush with the Logan 450's own squaring bar. Then, as shown in the photo below (by the blue lines), I used a large carpenters square (the larger the better) to make sure the bar (denoted by label C) was a) flush with the Logan's squaring bar, and b) perpendicular to the Logan's cutting bar/slot. Once everything was lined up, I drilled a few pilot holes in the wood and then (ensuring it was still squared) tightened it down.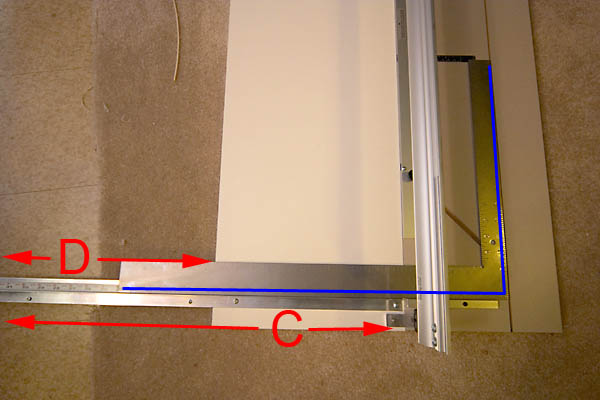
Step 11) As shown in the photo above, the squaring bar runs the length of the arrows labeled by C. However for the segment of that bar denoted by the D arrows, there is no lip for the mat board to rest on. So I took the left over 1.5" x 1/8" stock, cut it to the length of section D, placed it half under the squaring bar and flush up against the extension board, clamped it in place, and drilled holes through both pieces, as shown below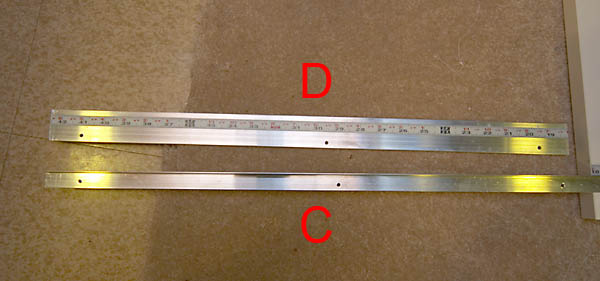
Step 12) I used some machine screws/nuts to connect the 2 bars together. For the first 2 holes, you can use 1/4" screws. However, for the last screw, I wanted something to support the weight of that end of the bars (to keep them from bending), so I used a 3/4" long screw. Once it's tightened on, the extra length acts like a stand for that end of the bar.
Step 13) Now that the whole mechanism is entirely in place, we need a measuring tape to run the length of the cutting bar. For this, you need to pick up a right-to-left adhesive backed measuring tape. This was the most difficult item to locate. However, you should be able to track one down at just about any wood working store. I located mine at the local Woodcraft. You can also order it online:
http://www.woodcraft.com/family.aspx?familyid=432
Your goal here will be to cut the tape into 3 pieces. You will need to VERY CAREFULLY measure the lengths of the tape before cutting. If you don't get your measurements accurate here, then you mat cuts will not be precise (especially important for cutting collage mats and other fancy mats). The lengths listed below are only approximate...BE SURE TO MEASURE THE CORRECT LENGTHS YOURSELF.
Piece 1: runs from about 2" to 6+3/8". For this piece, you will want to get it precisely in place against and Logan 450's built on squaring bar, use an exacto knife to carefully cut the vinyl surface around the perimeter of the measuring tape, peel off that rectangle of vinyl, and attach the adhesive backed measuring tape to that cut out area. The purpose of cutting out and removing the vinyl is to recess the measuring tape so it sits flush on the cutting board.
Piece 2: runs from about 6+3/8" to about 18+3/8". Peel off the back, and place this flush up against the squaring bar, and stick it to the board. You may first need once again to cut out a strip of the laminate surface so you can recess the tape flush. I didn't bother with that step. since my shelf was just a hair thinner than the Logan 450's board, it still ended up flush with the Logan (just not flush on the extension board)
Piece 3: runs from about 18+3/8" to about 42+3/8". Just peel off the back and stick this to the aluminum stock.
Step 14)The final piece of the puzzle is to create some type of device that can be clamped onto the squaring bar to act as a production stop. I found a little aluminum U bracket that was used as a security stop for home windows (to keep a burglar from opening an unlocked window far enough to get in). I needed to saw off a piece of this bracket, then replace its clamping mechanism with a thumb screw. Here is the stop device.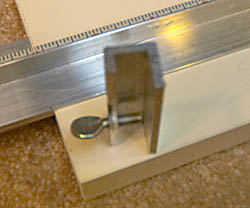
And here it is clamped onto the bar to act as a production stop at the 14" mark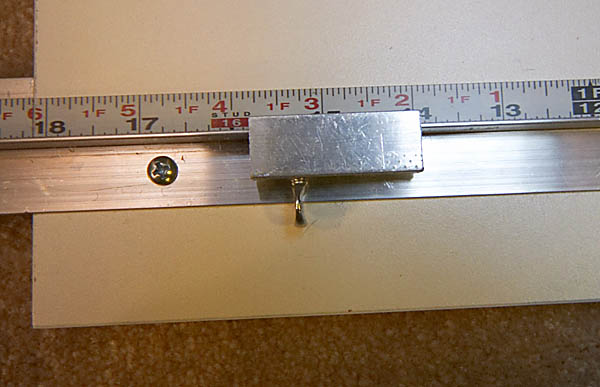
Finally, with everything put together at last, here is a photo of the 2 layered collage mat I was able to make.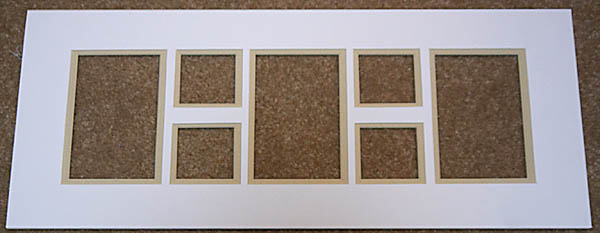
So there it is... my complete extension board for the Logan 450. Final cost (not counting the extra $3 piece of aluminum stock I unnecessarily bought and wasted):
$ 6.50 : Base board
$ 2.00 : 3/16 steel rod
$ 3.00 : 3 foot aluminum angle offset stock
$ 1.50 : sliding window lock
$ 6.00 : 3 foot 1.5" x 1/8" aluminum stock
$10.00 : adhesive backed right to left measuring tape
$ 2.00 : misc screw/nuts/bolts (if you don't already have them on hand)
------
$31.00 : Total for all materials.
...click here to read more!
Wednesday, March 09, 2005
Saturday at Sunrise
It's been a while since I just went out shooting pictures of random subjects, so I figured I was long overdue. I thought I'd head out around 11AM or so and search for some shots. However, my wife ended up having to work on Saturday, so it turns out I was up quite early. I peaked out the window about 30 minutes before sunrise and was pleased to see a nice, clear sky just waiting for the sun. I took that as my cue, hurried up and got dressed, swiped my bag, and ran out the door. I headed down to Hines Drive...the local county park which follows the river for about 15-20 miles. I started looking for a place to view sunrise. About a 1/2 mile in, I hit the big sledding hill. Its got a nice view...just about tall enough to see the horizon over the trees. My first instinct was to head up there, but then I thought "no...there's nothing much up there to make for an interesting subject against the sunrise", so I kept driving. Looking at several tempting spots along the way, I eventually hit Newburg Lake about 7 miles from home. It was frozen over, covered with a layer of fog, and had a couple of nice potential viewpoints to shoot from. I figured this was it.
Walking down toward the lake, I caught an interesting angle of a lamppost framing the crescent moon, so I took a shot (or three):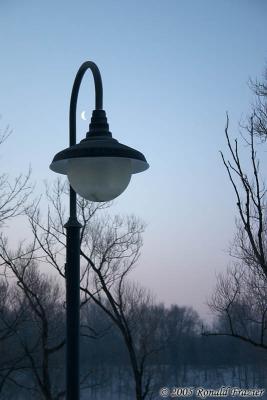
I then headed for one of my favorite little shooting hideouts on this lake...a little cement block thats hidden down a hill through some trees, but lets you get out a couple yards into the lake). On my way there, I threw on my P197 filter and captured the pine tree shot I posted yesterday. I then got to my spot and captured a few shots of the sun just starting to come over the horizon. I looked at one of the nearby trees/bushes and realized it's branches were covered by frost, so I fired off a couple of different shots against the sunrise


Next I went looking for some other subject but ran across another branch that I though looked pretty with the sun back lighting it, giving it that glowing frost look:
Going a bit further, I thought I'd take a few shots looking up the road towards the sun. It ended up being a bit difficult, as I was getting some nasty glare. I couldn't compose the scene exactly how I wanted, but I saw a jogger coming along and captured this one:
Next I jumped back in the car and started heading back towards home, hitting a few of the other locations I had scouted out. I liked the look of this little frozen over drainage ditch as it reflected the sun.
Lastly, I hit the sledding hill that I originally rejected. With the sun now up, but a few clouds rolling in, I looked around and captured this shot looking up the walkway.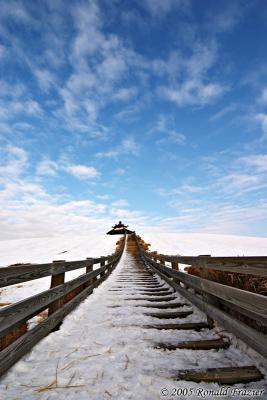
At this point, I got a little brave. I had an idea in my mind...a time lapsed exposure sledding down the hill. I knew there was a small risk I could wipe out and cause some serious damage, so I put everything in the car except for my camera with the cheap kit lens and my 3 stop ND filter. I found a half broken sled which some kid had abandoned. I dragged it to the top of the hill. Now, I was planning on going down the gentle side of the hill...the one all of the littlest kids use. I figured I wouldn't quite get going that fast, so I thought an exposure of about 4 seconds should do it. So I set up the proper exposure (and ran a test shot to verify). I then kicked off down the hill. Before I knew it, I was really picking up speed. I fired off 3 shots, but unfortunately I was going so fast and it was getting quite bumpy, and the shots came out as complete blurs. Not the effect I was looking for. I was now picking up even more speed and becoming really worried about rolling the sled and breaking the camera, so I did my best to gently extend my boots and slow the sled just a bit. I made it to the bottom safe and sound, camera fully intact (though covered with a dusting of snow), but the pictures weren't quite what I wanted. However, I wasn't about to press my luck, so I headed home.
After downloading my shots, a few hours later it was looking really nice again. The clouds were gone, and the sun was shining brightly, so I headed back out again. This time I headed the opposite direction. Found a spot, parked, walked around for about an hour, and captured the following 3 shots in the process:


I then headed home...this time for good. It felt great to just get out there for some pure fun once again.
...click here to read more!
Tuesday, March 08, 2005
Are Colored Filters Necessary with Digital?
I've accomplished a couple of things in the last week. I finished up reading my copy of "Learning to See Creatively" by Bryan Peterson. I'll be posting my thoughts on the book here in a couple of days, but I just wanted to say now that I thought it was an incredible book. I can't decide which one I liked better: this one or "Understanding Exposure".
And speaking of Understanding Exposure, I posted about a month ago that I was really taken with the idea of shooting in manual rather than Av/Tv modes. Well, I had another opportunity to try it out this weekend. The weather was beautiful, and I got in a total of 3-4 hours of shooting on Saturday. I shot just about the entire time in manual mode, and it once again worked very well. In similar situations before while using Av mode, I would alway be fussing continuously with the exposure compensation, taking multiple shots until the exposure was just right. With manual this wasn't the case. Just pick the settings once for the general scene and then shoot away with confidence that the exposure was correct. At this point, I think it's safe to say I'll be shooting mostly in M mode from now on. Without all of the tedious adjustments, it has just made photography all that much more enjoyable.
I also got a few gifts for my 4th anniversary last week. I wanted to start building up my collection of Cokin filters so I put about 6 or 7 on the list. I ended up with a P164 circular polarizer, a P197 Sunset 1 filter, and a P series Adorama brand filter case. The circular polarizer seems to work well. I have a nice Hoya brand circ-pol that I like, but it's a pain to use when the Cokin filter holder is on the lens, so I thought I'd try the one designed to fit in the Cokin holder. In my initial tests, it seems to produce results almost identical to my Hoya. We'll have to see how well it fares in actual use. The filter holder is really nice one. I has velcro straps so it can secure to a belt or belt loop, and it holds 5 Cokin P-series filters.
Finally, that brings me to the P197 Sunset 1 filter, and the topic of this post. With the advent of digital photography and photoshop, it is now possible to do many effects on the computer rather than with lenses. While some people will be quick to say that you no longer need a single filter for you camera, others (more realistic) will say that there are at lease a couple that are still useful. The polarizer (for removing glare/saturating skies) ND (for using long shutter speeds) and grad ND (for shooting bright skies with darker landscapes) are the 3 filters that most people will agree still serve a purpose when shooting digital. However, anything with color can be just as well done with photoshop, so that's what most people now do.
I admit, there is merit to saving your color filter effects for photoshop. First of all, you save money on filters. Second, you have more possibilities and creative control on a computer. Finally, real filters destructively adjust the exposure...if you use a red filter and later decide you want to see the scene in it's natural appearance, too bad.
However, there are also 2 points that give merit to the idea of using real filters. The first is the idea of getting it right in camera. This is an idea which was mentioned a number of times in Bryan Peterson's books. Do the work now so you don't have to do it later. It's hard to argue with that. For me, however, the even bigger advantage to using real (rather than digital) filters is that you can see in real time how things will look. I've always had a difficult time going through my photos on the computer and trying to figure out what would look good with some color added to the sky. Perhaps its because I haven't yet built up my artistic skill in the area of colorizing scenes. I find it difficult to image what a picture might look like if it were color cast with a grad filter in photoshop. Sure I could go ahead and just try it to see if I like it, but repeating that process with a bunch of images is extremely time consuming and tedious. On the other hand, when I tried out my P197 this weekend, I found it much easier to pop in the filter, compose the scene with the color in mind, and take the shot. It just helps me to better visualize the scene. At one point, there were a couple of pine trees that didn't really look interesting when I framed them through the viewfinder. However, when I popped in the sunset filter and tried again, suddenly I could see that it create a mood worth taking a shot of.
I'll post more about my Saturday photo shoot (including pics) tomorrow. But for now, I'll giv you this little shot with the P197 filter to hold you over:
So it would seem I've been in a rebellious mood lately. First I abandoned Tv/Av modes for M mode, and now I'm going back to hardware filters. Well don't worry. I doubt I'll be trading in my DSLR for film or a point-n-shoot anytime soon.
...click here to read more!
Tuesday, March 01, 2005
Winter Storms, Mat Cutters, and Other Updates
We've had some incredible snowfalls here in Michigan these first couple months of 2005. A week ago (the day before my last post) I witnessed something amazing. I was at my desk working on some photos when I heard a rumble. I thought to myself "that doesn't sound like a plane" so I ran to the window and opened it up. I thought I heard thunder rumbling off, but I figured "thunder and snow...can't be". About 30 minutes later, sitting in my living room I saw the greatest flash of light followed by a roar of thunder. Well, it seems I witnessed what is known as Thunder Snow. The was a first-in-my-lifetime experience (and everyone I asked said the same thing). It only made me wish I has been lucky enough to capture some sort of picture of the lightning in a snow storm. I did some looking around and it seems to be a rare enough event, as I couldn't find a single photograph of it anywhere. If you know of any lucky photos of such an event, I'd love to see them.
A few days later we had another snowfall. I didn't have a whole lot of time to photograph, but I figured I'd break out my extension tubes and give them a try during my lunch hour. I shot the following:
The above photo was shot with the kit lens at 52mm using one of the ProOptics extension tubes (I think I had the 13mm tube on at that point) and my Sigma 500 flash set in manual mode...I think I had it at 1/8 power. I must say I am quite pleased with the Sigma flash and ProOptics tubes (for the little bit of work I've done with them). I've yet to try the tubes on my 70-300mm APO Super Macro II lens to see just how close they let me get. We just got another snow storm today and are expecting even more snow all week. What a winter. In the next few days I'd like to make a better attempt to get out and shoot a few more snow pics, possibly some snow macros like the one above (ones which show off the texture of the snowflakes).
Last update, I said I would be committing myself to having a business plan finished by Monday (yesterday). Well....I'm happy to say I got it done. After looking around and doing some research on business plans, I must say I was quite overwhelmed by the amount of data that goes into one of those things. The samples I saw were often in the range of 30-50 pages and included all sorts of data that wasn't necessarily applicable to the sort of conditions I would be operating under. So I really started picking the plans apart and figuring out the relevant sections. I then outlined what points I wanted to cover in each section. Finally I started typing up the plan, starting with an outline and filling in the blanks (and rearranging in the process). I ended up with slightly over 5 pages of details. In all, I think it was a very valuable process. As I began I really found myself saying "what's the point of me even filling in this item" over and over again. But once it started coming together and I had all of these minute details together in one place, I started to realize how this document could end up being valuable to me.
Finally, my other news from last week was that I purchased a mat cutter. I did a lot of looking, and the Logan 450 seemed to be very highly recommended, so I went and picked one up. I found a good sale and walked out the door with one for $102 brand new. I also picked up 2 different sheets of mat board. I cut a few mats and realized "hey, this is quite easy". I was so pleased with how well it worked that I decided I was definitely going to cut all of my mats this way. I went up to the store a couple more times and bought a bunch more mats. I also tried my hand at cutting out a 7 picture, dual layered collage mat. I didn't do too bad for my first time around, but it was a bit slow going and I was just a little sloppy with the cuts. Hopefully both of those will improve my next couple of times around.
In spite of how well the Logan 450 worked, there were a few downsides. First was the difficulty in squaring up 40" mat board. You have this 40" long side, but the perpendicular bar you are squaring it against is only a couple inches long. It was hard to get very accurate there. I found I was just better off marking the mat board and eyeballing it to line up in the cutting grove. I also found that the 4 or 5 inch max border size you can cut (if you want to use the parallel bar) was a bit small for doing collages. I had to forgo the bar and (once again) eyeball the line into position.
Both of these problems would be solved with a better model (like the 750), which has a long squaring bar as well as an optional extension board for cutting larger borders. Unfortunately that model would have ended up costing me twice as much, plus another $100 or so for the extension board. Instead, I'm looking into ways that I can rig up the 450 on my own to provide both of those features for a cost of only about $20-$30. I'll post back once I figure out exactly how I want to do it.
...click here to read more!


