Before I begin, if you happened to read my posting a while back on the grid wall instructions and then went off merrily to build a set of your own: please don't yell at me after reading this post...I never said the original design was perfect.
When I built the grid walls last year and did some test setups, they seemed easy enough to put together. However, once I got to actually using them, I found a few problems.
1) While they aren't terribly time consuming to assemble, at a real show they are only one of a number of things that need to be setup in short order. Any time savings helps
2) The holes don't always line up easily, especially if the ground is unlevel, or (even worse) if you don't put all the panels and connecting legs/arms together in the exact same order/orientation each time. I had to use a hammer to force several of the bolts through the holes.
3)With the sections bolting together, there was no flexibility in orienting panels at different angles.
4) I wanted to open up a doorway in the rear of the booth.
5) Some shows don't guarantee a level ground. There is no way to easily adjust the leg height with the current setup, should you experience something like a curb running through the back of your booth
6) I had nowhere to work. I needed a desk of some sort, but didn't want to use up valuable space in the booth.
I set about to right some of these wrongs. To fix #1, #2, and #3, I decided to connect the panels together with zip ties instead of using the bolts. This also solved #4, but left me needing a different way to attach the legs. For this I used conduit couplers to easily attach a piece of conduit to the bottom corners of each panel instead of between panels/on the end(so I now have 6 legs per wall instead of 4). This also solved problem #5 in that I could very quickly cut another piece of conduit to form a new leg of any size without needing to lineup and drill bolt holes. As for #6, I cut out a section of the grid from one of the panels and added a fold out shelf in its place.
I'll get into more detail on the changes in a moment, but first a few pictures to get started. To do this as quickly as possible, I set up my booth frame without the roof and vinyl walls, so I'm sorry about the distracting background (try to stay focused on the booth, not my weedy backyard or my too-cold-to-swim-in-at-the-moment pool.
Here is the gridwalls with the doorway in back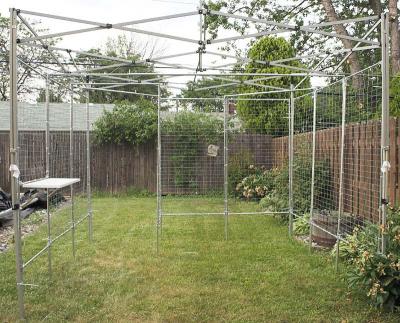
Here's a closer look at how I swung out the corner panel to create the doorway while not losing any wall space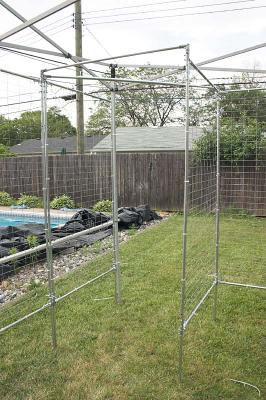
So now for the changes. The first step is to add on the new legs. To do this, I cut away a small strip of conduit where the 2 pieces butt together in each corner. This allowed me room to slip on a straight (ie: no angle) conduit coupler. I then cut 18 pieces (2 legs for each of 9 panels) of 16" long 1/2" electrical conduit, slipped that into the other end of the coupler, and tightened everything down. Here's what the result looks like.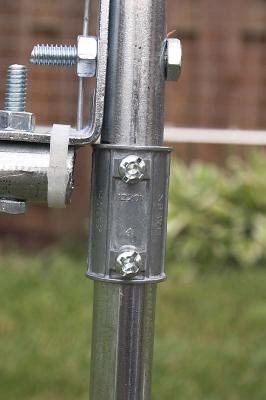
Notice that, if you put any zip ties in the corner, as I did on this panel, you'll have to move them over to the other side of the bolt so that they don't slip off into the newly cut area.
Also, cutting these same gaps at the top allows you to attach the crossbar supports: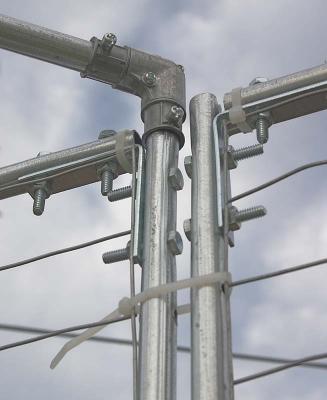
Now, sorry I don't have a better picture of this, but as you can see below, sometimes adding on crossbar is not possible because of the orientation of the screws. In this image, the right-angle connector on the left would not be possible to attach since the screw to tighten it would be inaccessible. To solve this, I attached a straight-on connector (like I used for the legs), cut a 1.5" long piece of 1/2" electrical conduit, and used that to join the 2 connectors together: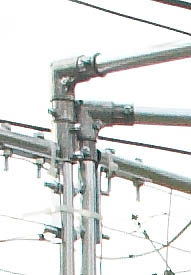
Now, connecting the panels together using zip ties is trivial, but in case you have no imagination, take a look at that last 2 pictures above and you can see the zip ties. Also, with the panels zip tied together, you don't even have to break apart each segment of 3 when you tear down. Just leave them connected to each other and fold the panels together.
Now, about that shelf. As you can see in the image below, I cut away a section of one of the grids, added another piece of conduit going across the pane, got a 10"x36" shelf, attached it to the new bar using hinges, and then supported it with some folding hinges attach to the side of the panel.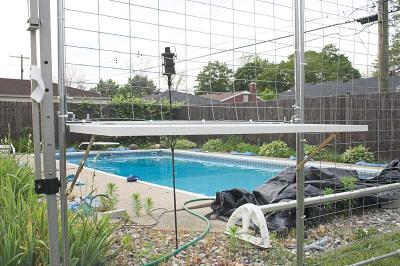
A better look at the primary hinges: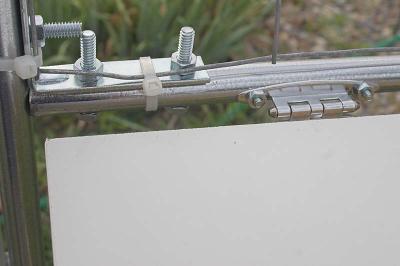
And the folding hinges: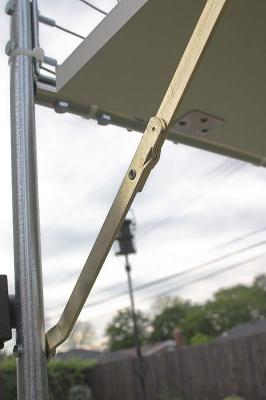
By now, my investment in the panels is probably somewhere around $225, but a bit of that is waste from my trial and error learning/redesigning. The new design actually saves on some conduit and bolts. I'd estimate the original panels using the new techniques could be built for around $150, plus another $15 or $20 if you want the shelf like I did.
As for the effect on setup time, the initial setup took me 4 minutes per set of 3 panels, plus another 3-5 minutes to connect up the crossbar supports. I should be able to shave another 1 or 2 minutes off that figure for each of the 3 sides, since the initial connecting with zip ties has already been done, thus there's no need to lie them down, line them up, and tie them. So total time for the gridwalls to setup (including supports) should be 9-14 minutes. Of course, this doesn't count adding on the legs (which I won't have to do now that I'm getting a trailer), but that shouldn't take more than about 20 seconds per leg (just insert the leg and screw tight with a cordless drill), so add about 6 minutes total if you need to do that (so expect about 15-20 minutes for complete setup).
Wednesday, June 21, 2006
Grid wall modifications
Subscribe to:
Post Comments (Atom)


No comments:
Post a Comment