It's been a little while since I updated here. I've been busy caring for a family member for much of the last week, and when I wasn't busy doing that I was trying to catch up on everything else I was falling behind on. But that all has very little to do with photography (other than that it was taking away my photography time), so it's really not important to this blog.
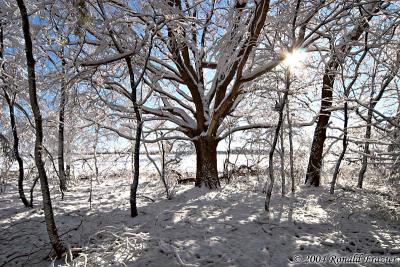
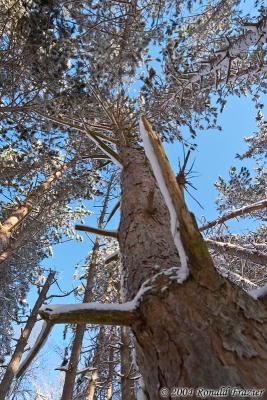
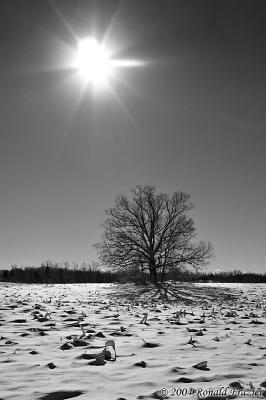
What I've been meaning to post here are some of my snow photos. Thanksgiving day brought our first snowfall of the season here in Michigan. The snow fell overnight, but by the time morning rolled around, the snow here in the city was pretty much already melted away. However, as luck would have it, we were going to my sister's house further north, and they happened to get about 6 inches of snow overnight, so it had not yet melted. I was sure to bring my camera, and my niece and I went out for a little bit of snow photography. This was my first chance ever to get out and shoot some snowy pics, and while several of the pics didn't come out quite like I was hoping, I managed to snag a fair number of keeper shots. Here are a few of my favorites: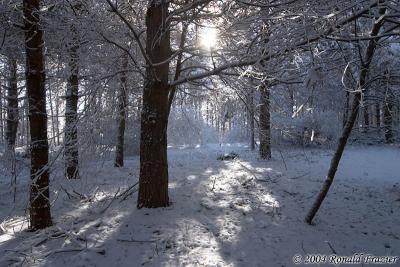
I also took a stab at converting a few pics to black and white. I've done this a few times in the past, and have always been a bit disappointed with the results. The shading just doesn't come out right (some things I'd expect to be light come out dark, and vice versa), and there is an overall lack of contrast (things end up more toward middle grey tones rather than black or white). While using a simple grayscale conversion or desaturate seems like the obvious thing to do, I leaves much to be desired.
So I decided to put a little more work into my grayscale conversions. I've read for quite some time about people using the channel mixer to do grayscale conversions, but I've never tried it myself. This seemed like as good a time as any. I've yet to develop any real technique for doing so...mostly I just played around with the channels at random until I found something I liked. I was really pleased with the results from this pics. They were considerably better than a simple convert to grayscale or desaturate.
Another technique I played around with was hue adjustment. In mixing the channels, sometimes you find a mix where everything looks good, except maybe one thing looks out of place...perhaps the sky. One trick for fixing this can be to add a Hue adjustment layer to change only that one color (such as blue) into a different color (green, red, orange, or whatever). While this would look silly in a color image, once you apply the channel mixer it can look ever better if you shift the color of concern to another color that is better or worse represented in the channel mix, making it brighter or darker.
I also played around with using local contrast enhancement. This technique involves applying an unsharp mask to the image with settings of roughly amount=20, radius=50, threshold=0. This gives you better contrast in small and medium sized areas (where you notice it most) without significantly affecting the larger areas. For example, if you have a large section of sky and want to increase the contrast in the rest of the picture, using a regular contrast adjustment will brighten or darken your sky at the same time as everything else. Local contrast enhancement (on the other hand) will leave your sky mostly untouched. You will get a little bit of lightening at the edges of the large areas, but with an amount of only 20%, it shouldn't even be noticeable.
After working with all 3 of these techniques, here is what I ended up with: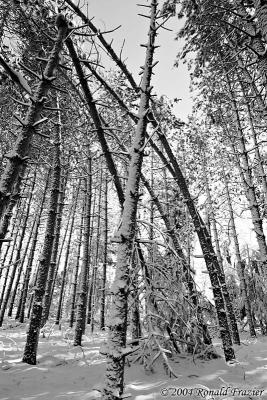
Finally, after I was already finished with these shots, a few days later I discovered another possibility for B&W conversion. First convert the image to LAB mode, then select only the L (lightness) channel, and THEN do a conversion to grayscale. This will drop the A & B channels and leave you with the grayscale L channel. While it generally wont give you as good of a blend as the channel mixer, it does give pretty decent results without any fuss. If you are in a hurry, this is probably a better bet than using a convert to grayscale or a desaturate...a decent balance of simple/quick vs. nice looking.
As I get to practicing this some more, I'll try to throw together a little walkthrough of the process.
...click here to read more!
Wednesday, December 08, 2004
First Snowfall
Sunday, November 28, 2004
Assignment 7 - Portraits & Self Portraits
Last Tuesday was our final day of class. It's a bit disappointing to have the class ending already (it was only an 8 week class), as I was really enjoying working on the different assignments. Even worse, I was planning on taking the followup advanced class, but our instructor had other obligations and won't be teaching there again for at least a couple of semesters (if ever). I guess the college never found someone else to teach the class, because it isn't scheduled for next semester at all. I'll need to find something else to keep me busy taking pictures...maybe look for some photography clubs in the area or something.
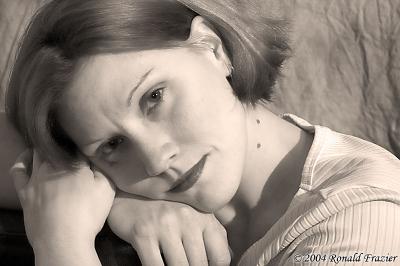
Anyway, our final assignment was to shoot some portraits (either posed or candids) as well as a self portrait. I really wanted to do something new, so I decided that I would make an attempt to doing some studio style portraits. First things first: I needed a studio.
I started by clearing an area in the basement where I could shoot. It was nothing more than a 10'x10' area. The next requirement was lighting. There were some glass block windows, but that wasn't nearly enough light to shoot. Luckily, I still had handy that very old photography lighting setup (with four 100 or 150 watt lamps) which I had used on assignment #1. Those, combined with a few ordinary table lamps and my onboard flash, should be more than enough lighting.
The last item I needed for my studio was a backdrop. I could have just hung up a bed sheet, but I wanted something with a little more character. I headed up to Joanne fabrics looking for a nice looking backdrop, but couldn't find anything which I liked. So instead, I grabbed a roll of 108" wide white muslin which wasn't too expensive per yard, but only had a little over 1.5 yards of fabric on it. That would have to do. I ended up walking out with $7 in fabric and a $2 box of royal blue RIT dye. I went home, looked up some websites on tie-dye techniques, and made an attempt at a homemade tie-dye backdrop. The first suggestion I followed just about ruined all hope...It ended up almost solid blue, with no white left and almost no variation in color. However, I didn't give up hope. I found another web site, and after another 2 or 3 attempts I ended up with something that looked really good. So off it went for it's final wash, but when it came out it had lost most of it's beautiful shading and ended up with only subtle color variations. I was quite disappointed, but by this point I had given up, so I just dried it, then crumpled it up in a pile to sit overnight (hoping the look of the wrinkles would make up for the lack of color variation).
The next day I took it and hung it up on the wall, set up the lighting, and started practicing. Not knowing the slightest thing about how to go about this all, I decided to shoot my self portrait first, so I wouldn't bore anyone else while I figured out the right lighting technique. After angling the lights, setting up a stool, putting my camera on a tripod, and shooting my first shot with the cable release (followed by several more shots to get the exposure just right), I came to a few conclusions. First, the backdrop looked very good under studio lighting. Second, I had a lot of work to do on improving the lighting.
I tried several different techniques of lighting. I started out with the camera perpendicular to the backdrop, and the main lights at my side at a slight angle: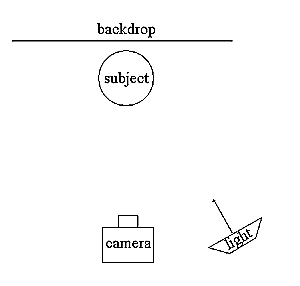
That gave me a very strong lighting at one side, but not a lot of fill light, and some pretty harsh shadows (and some pretty ugly shadows on the backdrop). I spent a good hour playing with different lighting techniques, including positioning the table lamps at opposite sides and behind/below to fill in shadows. Lots of things that didn't work. I tried hanging some sheets at the side to bounce light. That helped a little. The shadows being cast on the backdrop were still the biggest concern. The table lamps weren't filling them in quite the way I wanted. I then discovered the best trick: pull the subject forward away from the backdrop, and move the lighting to more of an angle so that the shadow falls enough to the side that it doesn't end up in the photo. Here's pretty much what my final setup looked like: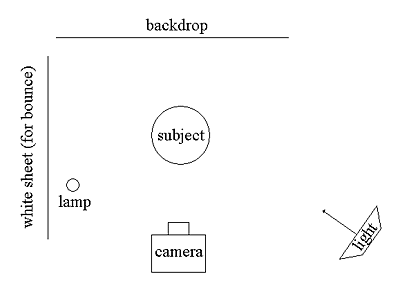
Here are a few of the self portraits I took throughout the process.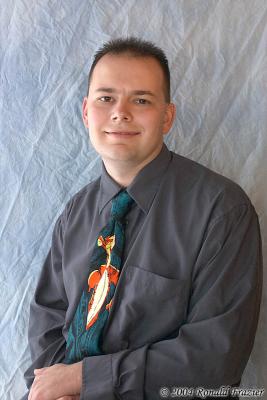

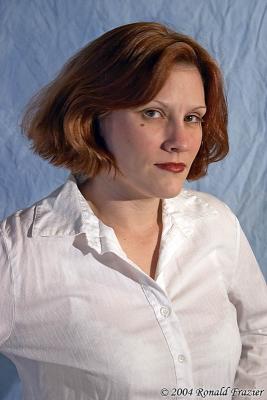
Now at this point I was fairly happy with my setup, so it was time to call in my subject. Since my wife hates being in my photos, I thought it would be fun to torture her by making her the sole subject of my photos. After picking out a couple different outfits, we got to work. Once I got her down there, where I could see the lighting interactively, I made some more adjustments (and in fact I adjusted the lighting slightly all throughout the shoot). However, the bigger problem I now faced was getting her into interesting poses. Here I was completely out of my league, knowing nothing about posing a subject, and I felt really dumb not knowing exactly what to tell her to do. None the less, we muddled out way through it all. In the end, she even ended up enjoying the whole process (especially once she saw the results). Here are a few of the resulting shots.

Finally, we posed for a few shots of us as a couple (though I forgot to throw my dress shirt back on and didn't realize it until later on). You can see this shot and a couple other shots of my wife in the assignment gallery:
http://www.pbase.com/ldkronos/capture_the_moment_assignment7
All in all, it was a very fun assignment and I learned a ton, though there's still tons to learn with respect to both lighting and posing the subject. Some better equipment would definitely be helpful. I should have an external flash by the end of the year, and if I decide to do more of this type of stuff, I've been looking into some better lighting equipment from Alien Bees.
...click here to read more!
Thursday, November 18, 2004
Assignment 6 - On Campus Photography
Assignment 6 was an in-class/on-campus photo shoot. We gathered in class as normal, and after a brief talk we were encouraged to break off (solo, pairs, or groups) and go do anything we wanted. I joined up with Wayne and Melanie and we started off by hitting the hallways. At first we were a little lost for what to do. There were a few people studying at tables or sitting on bench reading the paper. Didn't really seem like much there but we started that way. As we wandered down the hall, we peeked into the pottery classroom, and the instructor saw us and invited us in. The was the start of a great series of shots. We got a lot of pictures in there...people shaping pots on the wheel, working with clay, adding details to projects. Lots of interesting pictures. I though this one captured the essence of the class quite well: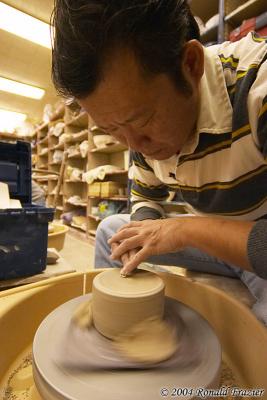
After that, we kind of had our courage up to go into more classrooms. Melanie found a piano class and got some pictures while Wayne and I were still working on pottery, but by the time we got there, the instructor didn't want anyone else in the class. So we all headed to the next hallway and found a clock making class. The teacher invited us in, so we took some more photos in there. I think this first shot was my favorite of the whole assignment: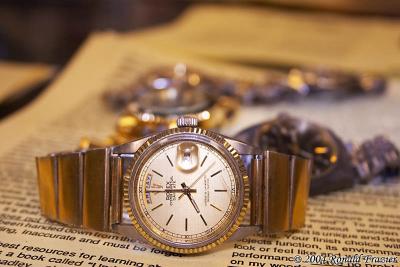
Also, this class happened to be held in a science lab, so I found this great shot: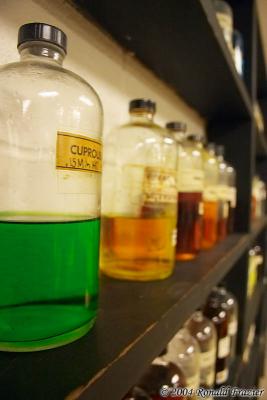
While Melanie stayed behind in the clock class, Wayne and I wandered out and found a chemistry lab. Not wanting to get in dangerous proximity to the chemicals, Wayne took a shot from the door and then left. I snuck a little closer, trying to maintain safety from the other side of the glass hoods. Then the instructor caught sight of me, and being somewhat interested in photography, he invited me in, asked a few questions about my equipment, and told me they were working with fairly harmless chemical so feel free to walk around. I took him up on the offer, and captured a few good shots (though I think the focus is in the wrong spot on this shot):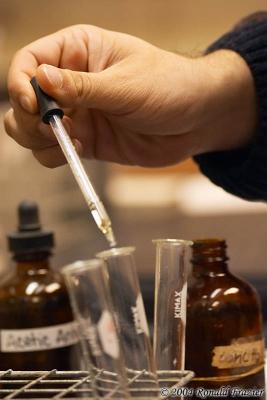
After leaving the chemistry lab, I wandered the hallways a bit looking for Wayne and Melanie, taking a few shots here and there along the way. I caught up with them, then Wayne decided to head back to class while Melanie and I headed outside for some shots. After taking a bunch of outdoor shots (a bell tower and some reflection shots off cars and windows) we went into the library. We took a few random shots here and there, then I went for the card catalog computer, looked up the call number for the photography books, found them, and took this shot:
We then went back to class to catch up with everyone else. The instructor had brought in and set up a bunch of his lighting equipment: a black backdrop, a lamp with a directional filter to use for backlighting, a high powered flash which had a preview lamp and was optically triggered, a light reflector, and his hotshoe flash (for those with Nikon cameras). He had been in class with a bunch of students working on portraits. I stayed for a few pointers and took a few shots. Melanie (who works at a photo studio) jumped in the hotseat and started giving us pointers for how they position poeple. While she was demonstrating, I caught this shot:
After a bit more of that, I went outside with the instructor and some other lady to see what they were working on, then I wandered off on my own. I took a bunch of random outdoor shots, caught up with Jake, and we took a walk through the gym. We found the racquetball courts, and tried to take some shots, but I didn't get anything worthwhile. I did find a room where they were holding a dance class, and fired off a few shots: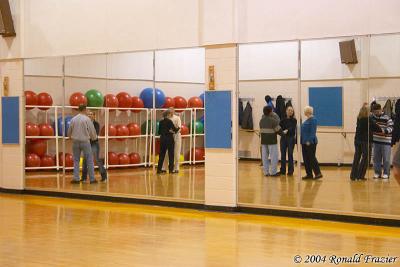
By then, my memory card was full (for about the 3rd or 4th time). I pointed my camera down to put in a new memory card when the UV filter on my Sigma 70-300 somehow just fell off, landed on the floor, and shattered. I should have taken a photo of the carnage, but I was so in shock, I just picked it up, stared at it, and threw it in the nearest garbage can. I'm not sure how it happened. That filter has been securely on that same lens for at least a month, so I'm not sure how it suddenly came lose. At least it was only a $25 UV filter and not my $70 polarizer. Class was almost over, and I thought that was a good sign to call it quits, so I headed back to class, packed up and headed home.
I have a bunch more photos from the assignment, but I didn't want to make this blog entry any longer than it already was. However, you can view the rest of the photos here:
http://www.pbase.com/ldkronos/capture_the_moment_assignment6
...click here to read more!
Monday, November 15, 2004
Assignment 5 - Interesting Lighting Situations
I'm a bit late posting this here, as assignment #6 is already due tomorrow. But better late than never, and hopefully I'll be more timely on posting #6 (maybe by Wednesday morning). Anyway, the goal of this assignment was simply to look for situations with interesting lighting. Things other than your ordinary sunny or overcast days, or your evenly lit flash lighting.
Almost as if mother nature were giving me a helping hand, the very next morning after class I was sitting in my office and looked out the window only to see that the black sky was just starting to clear off of the horizon. And by luck, it was still quite early (meaning the sun was low) and the clouds were blowing the opposite direction of what they normally do. These factors all combined to give me an amazing view, where the sky was still very dark but the sun was there illuminating everything (with just a touch of that golden hour coloring left). Turning my back to the sun, I found the brightly lit trees with a dark backdrop to be extremely dramatic. I ran out of my office with my camera looking for a place to shoot, and found this field in the woods by the lake worked nicely.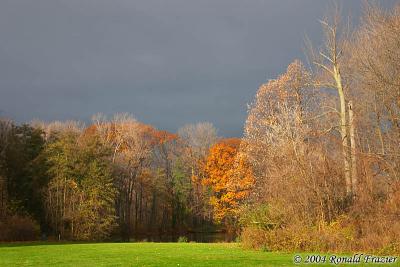
The next weekend, my wife and I decided to take an overnight trip to Niagara Falls photographing lighthouses there and back. After spending all day doing that, we about an hour away when sunset hit, and it was quite lovely. Driving on and on, I was looking for the perfect place to stop. I thought I had made a mistake by passing up the 2 different fields I wanted to photograph from, but I knew I made the right choice when I found this church.
The above image had a slight bit of editing. Due to the Digital Rebel's inability to show you a 3 color histogram, parts of the sky had saturated to solid yellow with my knowing it, but a little use of the burn tool in photoshop fixed this up reasonably.
After arriving in Niagara Falls and checking in at the hotel, we headed down to the falls for some late night shots of the falls illuminated. This first shot I though was fabulous, with the red light shining off of the sidewalk (which was soaked with mist from the falls).
I also like this shot of the falls lit by a glowing blue light, and framed between the dimly lit trees and the wall/fence.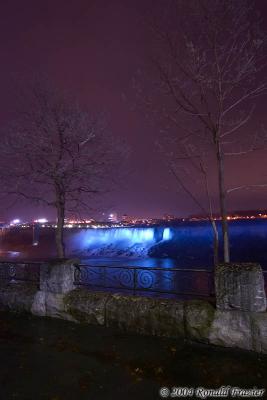
The next day, on our way home, I was shooting a picture of a butterfly near one of the lighthouses when I saw this fuzzy tree. In order to fully backlight it (to get those hairs glowing on the edges) the sky ended up overexposed, but once again the burn tool in photoshop brought out some color in the background (which appeared solid white originally).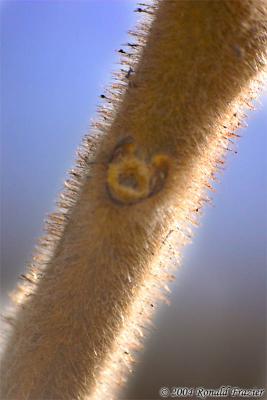
Finally, on our way home, we stopped in a small town for dinner. On the drive from the expressway to the town I saw this tree a corn field, and I knew the sun was getting low, so I figured by the time we were heading back out of town it would probably look quite dramatic. A short while later, it appeared exactly as I imagined it would, and I captured this shot.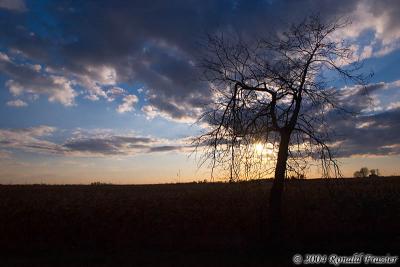
...click here to read more!
Friday, November 12, 2004
An Interesting Few Weeks in Astronomy
Wow, what an interesting few weeks it has been for those of us who look to the sky for photos. At the end of October we had the total lunar eclipse (which we won't see again for 2.5 approximately years). I posted my collage of shots from that night a few weeks ago. That in itself seemed like an interesting event, and made me wish I had something with a bit more magnification power, or maybe even a telescope with a camera mount. But the fun didn't end there.
Last week we saw the conjunction of Venus and Jupiter, when the earth and those planets are aligned, causing them to appear very close together in the morning sky. Not any sort of grand event that you would notice unless you knew what you were looking at, but it seemed interesting to me none the less. Unfortunately, I did exactly that...I didn't notice it until I read about it after the fact. The closest day of the conjunction was Friday morning, but I didn't hear about it until Friday night. However, the planets move quite slowly, and by Saturday morning they would still be relatively close together. So with that, I got up early (5:30AM) and got to shooting. Shot through a 300mm zoom (on my Digital Rebel, that's a 480mm equivalent), you could just start to make out several of Jupiter's 4 largest moons. I thought that was quite fascinating. But again, just like the lunar eclipse, it only made me wish I had some more magnification power. Anyway, here are the results I got: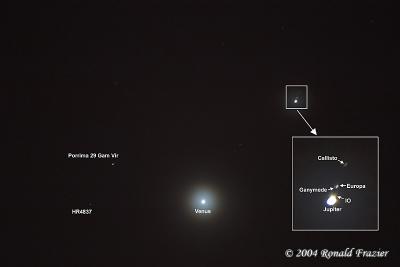
Just like shooting the moon, shooting stars is difficult, especially when trying to resolve the dimmer, tiny objects like the moons of Jupiter's. You need to get a lot more light onto the sensor, but long shutter speeds cause problems because of how fast objects move through the sky. More than a few seconds and you start to see star trails instead of stars. The above shot was done at f/5.6 at ISO 800 for only 2 seconds, and you can already begin to see the object are elongated.
Not to let the fun end there, the following week (actually, just 2 days later) we got to experience the strongest Aurora Borealis in...I don't know how long. Quite a while, from what I heard, but I wouldn't know since I've never seen them before. Of course, once again I found out about it just a little too late. The strongest occurrence was on Sunday night, and I read about it Monday morning (and kicked myself). I looked for it on Monday night, but no such luck. However, another flare on Tuesday caused the aurora to strengthen. I wasn't able to get out of the bright lights of the city, so I missed some spectacular sights, however I was able to see a faint glow in the sky. It took me several minutes of staring at it to realize I was in fact looking at my first aurora ever. I grabbed the camera for a long exposure to be certain, and this is what I got:
In retrospect, I shouldn't have taken such a long exposure. While the time lapse exposure does give a nice effect in showing a giant green blur in the sky, the aurora is constantly changing, so you lose all the detail. In that picture, you can just barely see the vertical stripes coming out of it, but in person, they were quite apparent. I should have opened up the aperture more (I could have gone 1 and 2/3 stops more) to get a faster shutter speed, and maybe even bumped the ISO up to 400 or 800. That would have given me an exposure around 2 to 5 seconds, and probably would have looked much better.
So, it was an interesting 3 weeks to photograph the sky. It makes me really want to get some better equipment, like an auto-tracking telescope. It also makes me wonder what will be waiting in the sky to be photographed next week?
...click here to read more!
Tuesday, November 09, 2004
A Broken Lens (and other things to come)
Well, the strangest thing happened to me: my Canon 50mm f/1.8 Mark II lens fell apart in my hands. No, I wasn't torturing the poor things, just manual focusing. The lens had started to develop a little catch in the focusing ring. After turning the focus ring about 90% of the way it would catch and not go any further. A little jiggle of the focus ring (just backing off slightly and then continuing forward) would solve the problem. I meant to have the lens looked at, but since it was still working and the warranty wasn't about to expire, I guess taking in a working lens to have it looked at seemed to be too much trouble. That is, until last week. I was doing some manual focus, and when it got to that catch, the center part of the lens just fell out into my hands. Imagine my shock. Here's what I was left with: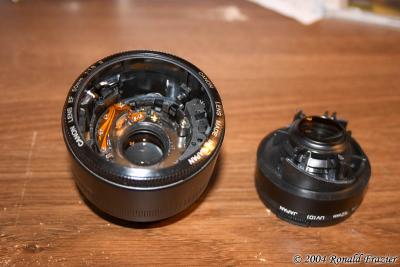
I tried taking it up to the local Canon authorized service center, but they were useless. They didn't even want to help me...just told me to send it to Canon because they didn't think Canon would pay them to fix it. Way to go to bat for your customer (you can be sure I won't be recommending them to my friends). So now I have to send it off to Canon for repair. That is, as soon as I get around to calling them.
I've also got a few other updates to post this week (when I get the time). I went on a lighthouse trip to Canada this weekend and stopped by Niagara Falls for the night, so I'll post a few photos from that trip. I've got a shot from the conjunction of Venus and Jupiter to share. Hopefully the aurora shows up tonight here in Michigan. I've also been meaning to post an update on the topic of LAB mode editing. Someone asked me for some pointers on how I made my moon collage, so if I get a chance, I'll post a quick little step-by-step tutorial. I'm sure there is something else.
...click here to read more!
Wednesday, November 03, 2004
Assignment 4 - Lighting Technique
The goal for this assignment was to practice with different lighting techniques and using flash for both primary lighting and for fill. I found this assignment to be a bit more challenging than the others. Flash usage is not one of my strong points, so it was fun to give it a try. At the same time, I don't have an external flash, so I was stuck using the one built into my rebel. As a result, I ran into some difficulties along the way. There were a few places I found where I wanted to use fill flash, but the distance was so great that the little built in flash couldn't reach it with enough power to produce any significant fill, so those shots didn't work. In other places I was again limited by the power of the built in flash, as the room was too big for me to bounce the built in flash off the ceiling (using an index card to bounce it) but the direct flash was too strong. In the end, I didn't get a whole lot of useful examples to take in, but I at least ended up with enough shots to demonstrate three different degrees of flash.
Flash as Primary Light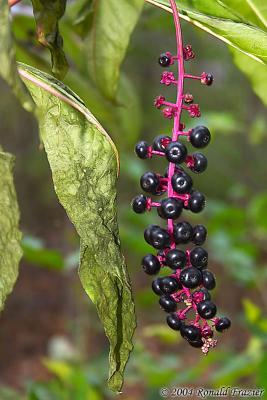
This first image demonstrates using fill flash as the primary source of lighting. I found this little plant in the woods and thought it would make an interesting subject. At first I tried to shoot it with no flash to see what I could get. I was able to easily get enough lighting to expose it at a reasonable handheld shutter speed. However, what I ended up with was a very distracting photo. Even though the leaves in the background had blurred, they were still quite bright and stood out (drawing your attention away from the foreground). With a bit of flash, I was able to light the foreground properly while shortening the shutter speed enough to darken the background to keep if from being distracting. In fact, the foreground lighting ended up better, since it accentuated the divots in each of the berries (which were almost invisible in the shot without flash). I also used a piece of translucent plastic from a fruit juice jug to partially diffuse the flash (though it wasn't enough...there are still some pretty obvious flash highlights).
Blending Flash and Ambient Light
In this example, I had to back up and zoom in to keep the flash from being too strong (though I only discovered that through trial and error). Luckily by the time I found the right distance, this kid became quite distressed about removing his costume and presented me with quite a nice expression. If you look carefully, you can still tell flash was used (glare in eyes, on tip of nose, and on teeth and fingernails). These could be photoshopped out quite easily (though that wasn't my goal for the assignment, so I left them in). However, looking at the rest of the outfit, it is lit quite naturally. You can see a subtle shadow around his neck from the green neck piece, but the flash fills it in and makes it more subtle.
Sidelighting with Subtle Fill Flash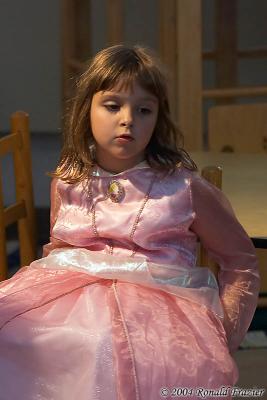
I'm not sure what this little girl was thinking, but she sat down in this wonderful lighting and then gave this very dramatic look. I'd swear she was posing for the camera, but that would mean she knew more about lighting and composition than me. I didn't want to get close enough to distract her, so I very quickly swapped out my 18-55mm lens and put on a 70-300mm one. I did the first shot without flash, and while it exposed properly, the shadowed side of her face ended up too dark. I popped up my internal flash, and from about 20 feet away it provided JUST enough flash to fill in the other side of her face ever so slightly. About the only evidence of flash might be the glare on the tip of her nose (though that may be from the sidelight...I'm not sure).
While I didn't uncover the most opportunities to use flash, I ended up with a broad enough sample to cover the different techniques. I've also never been a big fan of using flash, since every time I did I was less than satisfied with the results. However, the results I did get were enough to show me that I can take pictures with flash and still make them look good. Now I just need to get an external flash (to give me more distance and control) and to get out there and practice using it more (so that I can predict when, where, and how the flash will look best without using the LCD for trial and error).
...click here to read more!
Thursday, October 28, 2004
Shoot the Moon
Well, last night was the full lunar eclipse. We won't get another one until March 2007. Given this semi-rare opportunity, Wayne and I decided we'd go down to the park where there's a bit less light and see what kind of shots we could come up with. After a rough start trying to figure out why Wayne's camera wouldn't auto focus, we began shooting. I shot with a Canon 75-300 IS lens for most of the night. It was an interesting experience. Once the moon goes red, your shutter speeds jump into the 1 to 4 second range. At that speed, the movement of the moon becomes a real issue. Shots don't come out quite as clear. A faster lense or a camera with more noise free high ISO speeds is a must. Unfortunately I had neither, so I didn't get the shots I hoped for. I really had no idea what shooting an eclipse would be like, and I think I got my expectations a bit too high. As a result, I was quite disappointed with the shots I got, though after looking around they seem very similar to what most everyone else got. Regardless, I wasn't satisfied with how my shots look at full size, and I wasn't about to let 2 hours of shooting go to waste, so I shrunk them down to 25% and made the following composition (click it for a larger view):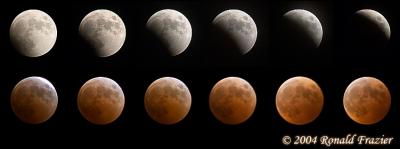
I've got about 2.5 years now to get prepared for the next one. Plenty of time to afford a larger, faster lens....or even a telescope.
...click here to read more!
Tuesday, October 26, 2004
Editing in LAB Color Space (Part I)
On Sunday I was working with Wayne from my Photography class. We were sitting at his computer, sharing our Photoshop techniques with each other. He was going through his process, demonstrating on a sample image, and when he went to sharpen, he switched into LAB color mode, applied unsharp mask, and switched back to RGB. Seemed odd to me, so I pressed for details. He didn't seem exactly sure why to do it, but he had read it in a book and knew it had some sort of advantange.
So I went home and started digging for information on LAB mode. It seems there isn't all that much info on it, and the info available is mostly several years old (almost like it is a technique that was forgotten). However, the available information seemed to indicate that there were advantages in working in LAB mode. LAB mode consists of 3 channels. Instead of 3 color channels (Red Green Blue) like RGB mode, LAB mode consists of a Luminosity channel, which contains the intensity information (brightness/darkness), and two color channels A and B, which contain information on color tinting (Red vs. Green and Blue vs Yellow) but no color intensity information. Because the color information is distinctly separated from the intensity (or luminosity) information, that makes it ideal for making adjustments in which we only want to adjust intensity without introducing any color shifting.
The way unsharp masking works on an image is to increase the apparent contrast at edges. It does this by making the edge of the dark object even darker, and the edge of the light object even lighter. In this process, all we want to adjust is the intensity, not the color, so it made sense that unsharp masking would be an ideal adjustment to be applied to the L channel of a LAB mode image.
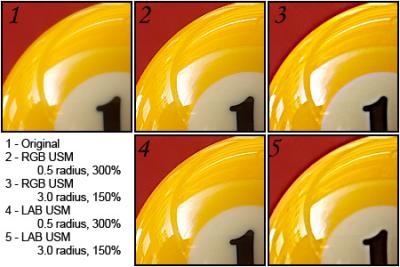
I started doing some experiments, and the advantages of LAB sharpening quickly became obvious. In sharpening, you inevitably end up with halos (the halos are what create the appearance of extra sharpness). Unfortunately, in places where you have differing colors you often end up with color tinting in those halos, and that is often very noticable. However, performing the same level of sharpening on the L channel of a LAB mode image results in halos with no color tinting. The images below demonstrate this.
Sharpening Comparison - 1x magnification
Sharpening Comparison - 4x magnification
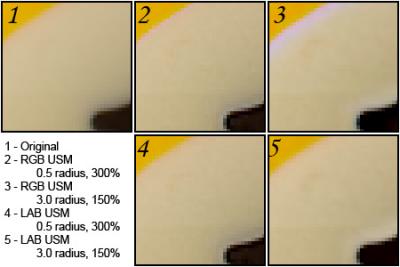
In the above images, you can see in frames 2 and 3, where the unsharp masking was applied in RGB mode, there is a purple tint to the halo where the white and yellow sections meet. However, in frames 4 and 5, where the same amount of unsharp masking was applied to the L channel of a LAB mode image, you can clearly see that the purple tinting is gone.
There are other advantages to working in LAB mode besides applying unsharp mask. Adjusting levels can often be done better here, its easy to remove purple fringing (chromatic abberation), sometime noise removal is easier, and you can even do some fun special effects. I'll provide some more information and samples in the next couple of days.
...click here to read more!
Sunday, October 24, 2004
Assignment 3 - Maybury State Park
If you've been following along, then before you ask: no, you didn't miss anything. Assignment 2 was simply to shoot something at different depths of field and different shutter speeds to see the effect. We weren't required to turn the assignment in, and it's all stuff I already knew about, so I just skipped it.
As I mentioned in my last entry, assignment 3 was part of our class field trip to Maybury State Park. There are lots of details about the trip in that posting, but now I'd like to share a few of the resulting photos.
The first thing we were required to shoot was a general area that included a clearing and a group of trees. The clearing seemed like the obvious thing to shoot, and I knew everyone would do it, so that's why I chose NOT to shoot the clearing. Instead, I went to some of the surrounding brush and found some interesting macro possibilities, so I took out my Sigma 70-300 lens, switched it to macro mode, and took the following shot: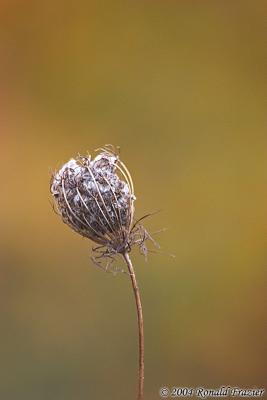
Not the greatest shot. The poor lighting mean I had to deal with high ISOs and slow shutter speeds. I should have bumped the ISO up a few more stops (to 1600) when I took this shot, but I wasn't paying attention to my shutter speed and didn't notice how far it dropped. As a result, 1/80 second handheld on a 300mm focal length (480mm with the 1.6x crop) didn't make for the sharpest picture.
After that, Instead of shooting a picture OF the trees he pointed to (which I was sure everyone would do), I went INTO the trees. A few decent subjects in there to shoot, but I thought the best was this little bridge: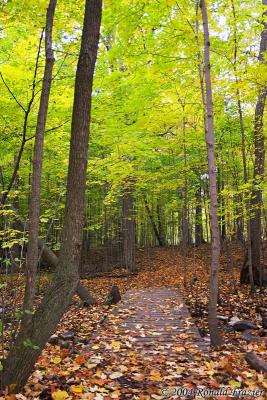
There are a few things I like about this pictures. The way the bridge leads to the path (which is covered by leaves...maybe I should have brushed the path semi clear of leaves). The 2 trees that frame the bridge. The way the one tree is crooked at the bottom, causing it to angle into the corner, and how the angled section is parallel to the bridge. It all comes together kind of nicely.
Our next subject was a particular tree we had to shoot. We could shoot it from near or far, alone or with other trees, close up, the leaves on the ground under it, or whatever we wanted. I ended up with 2 shots I liked of the tree.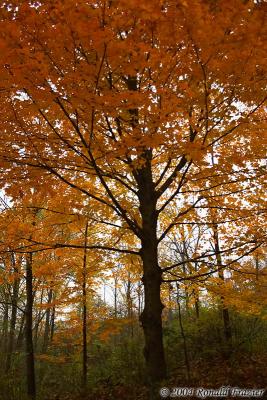
In this first one, besides the rich color, I like the silhouette of the tree with all the little bumps sticking out where each branch is (or was).
In this second shot, I like the way the tree trunk leads from the corner (where it is nicely defined) on into the center (where it fades into obscurity behind the colored leaves). I also like how a few of the branches form a sort of reverse L shape.
After that, we were allowed to wander and shoot whatever we chose. I have several other shots I liked. Here's one of the ones I think came out nice.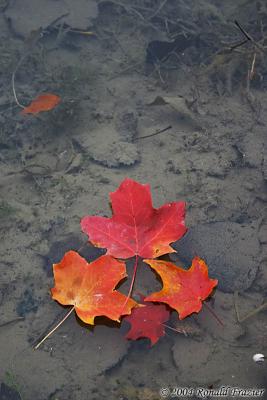
Two things about this shot. 1) Yes, I staged this shot. I picked up some leaves from the trail 10 minutes earlier intending to do something like this. 2) Yes, if I was going to go to the effort of staging it, I could have at least removed that stray leaf from the top left. I missed it at the time...such is the story of the life of the photographer. Stray leaf aside, I like the way you can see some other fallen leaves under water, dull and covered in a layer of silt. It kind of emphasizes the story of the leaves. In the final throws of life, they blaze such a beautiful color only to fall from their glory, destined to become the decaying muck in the lake bed.
Anyway, the rest of my favorite shots from the field trip are all in my gallery here:
http://www.pbase.com/ldkronos/capture_the_moment_assignment3
...click here to read more!
Wednesday, October 20, 2004
The Weather, Photography Class, and What I Take for Granted
The weather has been pretty bad for the last week and a half. When it hasn't been raining, it's been cold and cloudy. As a result, I haven't been out doing much shooting, thus I haven't updated here in a week. I don't mean for this blog to disappear so quickly. I've just been using the lousy photography weather as a perfect time to get caught up on a bunch of other stuff. In fact, I'm a little behind on my photography too. I've got some raw files I need to process from my lighthouse trip on October 10th. You catch up on one thing while falling behind on another. That's life!
Last night was week 3 of my photography class. Instead of a normal class, we took a field trip to nearby Maybury State Park. The instructor told us he was going to point out a few subjects that were required shooting (to see how different people shoot the same subject). The first place he pointed out was near the parking lot...a little field with a bunch of trees, a clearing with some picnic tables, and some logs from a campfire. He said there was a picture somewhere in there and we had to find it. And with that he set off down the trail towards the lake, with everyone following...except Wayne (who I met on the first day of class) and myself. We instantly made a break for that field, found our pictures without the distraction of the other students, and explored the surrounding area for about 30 minutes. We then decided to play catchup and started following along where the class had gone. We found a few shots, and JUST missed a woodpecker (we spotted it as soon as I took my zoom lens off, and it flew away just as I had gotten the lens back on and remove the cap). We then caught up with Melanie, who had dropped behind the group to take some photos on her own. She showed us the other subject we were required to shoot (a particular tree). The three of us then took our time wandering the trails, looking for the pictures we figured the others had missed. I'm sure we found a few. Wayne decided to head back, and Melanie and I continued on around the lake. It was getting dark, so we didn't get that many more pictures.
By the time we got back around to the front, Melanie needed to get some pictures of that first clearing, but by this time it was dark. Even though we were asked to refrain from shooting with flash, it was so dark there wasn't a lot of choice, so Melanie started shooting away. Meanwhile I set up my tripod and started taking long exposure shots, thinking nothing much of it. Then she started asking questions about what I was doing and how I was doing it. It was then that I realized how I take the things I know for granted. So I started showing her how to do long exposures at night. We took some shots at the longest exposure (30 seconds) and the largest aperture her lens could handle. I then looked at the histogram and, once again without thinking, started rattling off "well, your about 3 to 3.5 stops underexposed, so we'll need to use a bulb for about 4 minutes". Of course, she had no idea what I was talking about, so I had to explain how the histogram works, and how that ties in to exposure stops and calculating shutter times.
So I learned a few things on this trip. First of all, I take a lot of things for granted, and maybe I'm not really fascinated by some things I should be. It might be useful to stop and take a closer look at exactly what I've been doing. Maybe theres some fun to be had in there and I'm just overlooking it because it seems mundane. Another lesson I learned is to get out and start shooting different stuff at random more often. I knew what was at this park from going there several years ago, and I thought it was kinda plain...nothing much worth shooting. However, once I got into there, I started looking at that place from a photographic perspective and realized just how many things are there to shoot. I guess I've gotten into the habit of looking for those grandiose shots and forgot that there's a lot of beauty in the simple things we might overlook. Finally, and perhaps the most important lesson (thought that last one was good) is to not let the weather get me down. Go out and shoot anyway. I've been looking at trees which could use nice lighting and landscapes which could use blue or partially cloudy skies. I couldn't get what I wanted so I stayed home and did other things. If I would just get out more, I'm sure I'll find plenty of things to shoot. Despite the ugly skies and dimming light, I got quite a few good shots. Sure, there were some colorful trees reflecting off the water that would have looked better with a nice sky and some golden hour glow, but there were plenty of good shots that didn't involve any sky, and others where the sky didn't matter at all.
I'll be posting some pictures here in the next few days once I get around to processing them (need to get caught up on my other pics first).
...click here to read more!
Monday, October 11, 2004
Assignment 1 - About Myself
I started my photography class last week, and our first assignment (due tomorrow) is to take a few photos that tell something about myself, but to take them in a way that is different than we would have taken them before.
My first photo is a shot of my pool table. It's something my wife and I like to play, though I should probably be better considering I own a table. What is different about this shot is that I'm used to photographing things as I find them...animals, architecture, landscapes, etc. Setting up a staged shot is not something I've done before (other than maybe putting a flower in a vase). I tried doing an action shot, with balls rolling around with motion blur. However I quickly discovered I could not get the shot I wanted to create due to technical limitations (I don't have a flash that supports 2nd curtain synch). So instead I created more of a still-life type of shot. It took a lot of work to get it the way I envisioned it. After fussing with the arrangement of items for quite a bit, my bigger concern became the lighting. My basement isn't exactly the ideal lighting studio. I tried with the regular basement lights on or the pool tables lights on, but I realized the glare was very distracting. Next I set up a photography lighting rack (old equipment...I think it belonged to my grandpa). That gave me an illumination that I really liked much better, but even worse glare. Next I used some black posterboard to construct a shade that I placed between the scene and the lights. That got rid of the glare problem, but then I could very visibly see the light reflecting off of the ceiling rafters. To solve that, I began stapling white blankets to the ceiling in various ways (across the ceiling, hanging down like a curtain, etc). Eventually I found something I liked, and there was just one thing more to decide: aperture. After extensive debate over how sharp or blurred to make the background, I finally settled on my final shot. Click on the image for a larger version of it: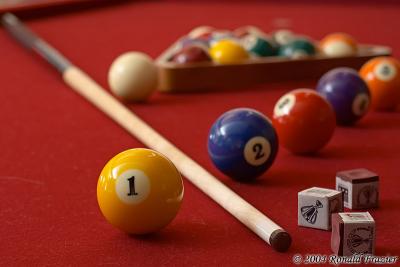
For my second photo, I went to take a new perspective on my passion: lighthouses. I've shot lighthouses in just about every manner conceivable. I've shot from high and low, near and far, down the pier, across the water, from a boat, straight up the tower, straight down from the top, from the light room, and even through the windows and portholes. However, in thinking over things, the one thing I realized I haven't done is put my lighthouses in any context. So I decided to show the lighthouse with the boats they are meant to guide, and thus I took another trip back to Lake Michigan on Sunday. I started at Muskegon and worked my way down to St. Joseph. I shot many boats passing by several different lighthouses (five, to be precise). I saw ships as big as a passenger ferry that runs clear across to Wisconsin. However, the best shot I found was this mini sailboat (if you even want to call it a boat) with a colorful sail drifting past the Holland Lighthouse. I thought the colorful sail made it a nice shot, but I also think it's size gives some type of context for the purpose of the lights. In modern times, large boats are guided by sonar and GPS navigation. The idea of a lighthouse is pretty much unnecessary for those boats these days. In this age, I thought that a lighthouse might be most useful as a guiding light for tiny boats like this one...ones that aren't loaded up with modern navigation equipment. Once again, click the image for a larger version: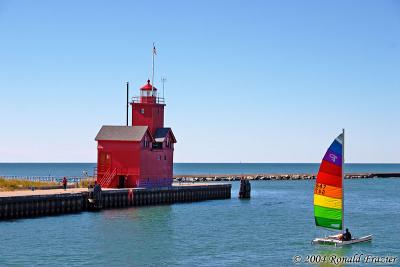
For my growing collection, I also got several other photos of this and 4 other lighthouses. It was a nice weekend, without a cloud in the sky (except maybe a few way off on the horizon to the north). Actually, the truth is, it was probably too nice. Without a cloud in the sky and the sun drifting further to the South these days, it made for a bit of a challenging day shooting these lighthouse, many of which contain white sections (which reflect like crazy and overexpose the shots)...not to mention the reflections off the water. Not a bad day, but definitely not my best photo trip.
...click here to read more!
Friday, October 08, 2004
The Elusive Internet-Predator-Turned-Private-Investigator
My question on Wednesday about the ethics of posting photos of children online generated a LOT more debate than I expected. Among the people who felt it was wrong, almost all of them had one concern on their mind: You never know if a child predator will find the picture and then hurt that child.
Now, I made it absolutely clear that I was speaking of photos with no identifying information (no names or locations), yet that wasn't enough to alleviate their fears. To me, that seems to be about the most irrational point of view you can have. Why would anyone think that a child predator would go to all the trouble and expense of tracking down a child they found online (when the only info they have to start with is the name of the photographer) when they could just as easily grab at random one of the many unsupervised kids you see every day? Isn't this just another case of "Internet Paranoia"? Sure lots of bad things happen to kids on the internet, but these are kids who provided personal information to the predator (either through web pages, or more commonly through chat rooms). You don't hear the same type of fear about having pictures of kids in newspapers, yet when you apply it to the internet suddently it become very scare for some unknown reason. To me, that just doesn't add up.
Another interesting point brought up in defense of posting photos was the possibility for the photos to do good. What if that child had been abducted and the parents found a photo of their missing child online. While neither scenario seems very likely to me, I have to believe that the potential for good is at least as great as the potential for bad.
All ethical questions aside, there is a weekend coming up and I'm not sure what I'm going to go shoot. I'd like to go hit some lighthouses again, but I don't know which ones. There is a lighthouse festival going on near Alpena. I've already hit most of those in the area, but it might be interesting to re-shoot them with better weather (it was overcast last time I was there). Yet I'd still prefer to get new ones. Not quite sure what to do!
...click here to read more!
Wednesday, October 06, 2004
Capture the Moment...but what about permission?
So yesterday was my first photography class. Seems like it might end up being a worthwhile class. First, digital cameras are allowed, so that means no need to confiscate my wife's Canon Rebel Ti for 8 weeks. Second, although we will obviously be getting a bit technical in the next class or two, we are going to focus mainly on technique and creativity. So the first class mainly consisted of introduction, and us going through a list of 15 "rules" (be ready, rule of thirds, get close, etc), along with some samples demonstrating the different rules. Mostly stuff I already know, but it was a good reminder because I often don't practice them (in the heat of the moment, it's hard to keep cool and think carefully about your shot).
So anyway, today I was at an event taking some pictures when I started thinking about the rules. One of the rules was "capture the moment", and that got me thinking. The moment wasn't about the event itself, but about the children watching the event. So with that in mind, I started shooting the kids...capturing the moment. When I got home and started looking at the pictures I found I had some great ones there, but I got to thinking...what about permission?
When is it necessary to get permission? These kids were in a public place, so certainly there is nothing illegal or unethical about taking their picture. However, what about posting them to my online photo gallery? I feel it is well within my rights to do so, but in an attempt to be sensitive to parents concerns about the dangers of the internet (sexual predators and all) what is the ethical thing to do? Ask permission (when I legally don't need it) and risk them saying no? Just go ahead without asking their permission?
I posed this question for discussion online here:
http://forums.dpreview.com/forums/read.asp?forum=1031&message=10581801
...click here to read more!
Tuesday, October 05, 2004
Equipment List
Updated: Dec 26, 2005
Camera Bodies
Canon Digital Rebel
Lenses
Canon 18-55mm EF-S Kit Lens
Canon 50mm f/1.8 Lens
Sigma 70-300mm APO Super Macro II Lens
Sigm 12-24mm EX Lens
Pro-Optics Extenstion Tubes (13mm, 21mm, 31mm)
Flash & Flash Accessories
Sigma EF-500 DG Super
Sto-Fen Omni-Bounce C
LumiQuest Promax System (80-20 Bounce + 3 Reflector Inserts + Diffuser)
Better Beamer FX-2
Filters
Hoya UV Filter(2x58mm, 1x52mm)
Hoya SMC Polarizing Filter(58mm)
Hoya ND8 Neutral Density Filter(58mm)
Cokin P-Series Adapter and Kit (58mm)
Cokin P120, P121L, P121M, and P121S Grad ND Filters
Cokin P197 Sunset Filter
Cokin P164 Circular Polarizer
2 Adorama P-Series Filter Pouches
Storage
512MB Sandisk Extreme Compact Flash
512MB Sandisk Compact Flash
256MB Sandisk Compact Flash
X-Drive with 20GB Hard Drive
Bags
Tamrac Expedition 7 with the following accessories
Accessory Pouch (for flash)
Large Lens Case
Water Bottle + Bottle Holder
4 Pocket Memory Card/Battery Holder
Cinch Straps
Against the Elements CL200 (Brown)
Quantaray Sport/Adventure Series Large (Black)
Miscellaneous
Velbon T-3500 Tripod
Plamp + 1 foot Plamp Extention
McClamp
Mini Tripod
Lens Pen
Sensor Swipe, Pec Pads, and Eclipe Fluid
1 Canon BP-511 1100mAh Battery
2 Generic BP-511 1400mAh Batteries
Homemade Shutter Release Cable
Books
"Understanding Exposure" by Bryan Peterson
"Learning to See Creatively" by Bryan Peterson
"Night Photography" by Andrew Sanderson
...click here to read more!
Let Me Introduce Myself....
This is my first entry into my new blog about photography. In fact this is my very first blog (though I did "blog" years ago before it was called "blogging"). I'll just start off today by explaining a bit about myself.
I first got into photography about 13 years ago. My brother had a Pentax P-30 (or something like that) and a few lenses. I used to borrow his camera quite a bit. I'd take it on vacations and to parks around town, shoot portraits for friends, shoot lightning in my front yard or from the roof of my house (but only when it was at a safe distance). I did the usual experiments (tyring B&W or slide film, play with lighting, multiple exposures, etc). My favorite part of photography, however, was photographing landscapes when we drove from Detroit to Seattle. That's the part that really got me hooked onto photography. At one point I had some really nice pictures and was contemplating selling prints at art fairs and stuff like that. Then about 6 to 8 years ago, other events in life caused me to gradually move away from photography (and then suddenly forget about it all together). I started to take interest again last year, and this year for the first time I bought my own camera.
My goal this time it to take the hobby I've had off an on for all these years and turn it into a (secondary) profession. At the present time, I'm doing a lot of traveling, taking pictures and building a collection of quality images. Within the next 6 months, I hope to be selling photographs at art fairs. Tonight, I start my very first photography class. It's an intro level class, so I might already be beyond the technical scope of the class, but my hope is to both meet other photographers and to have the assignments push me to shoot things I normally wouldn't bother to shoot. Maybe I'll develop more of a taste for shooting studio portraits or product shots. Who knows? The point is to just see where it takes me.
Not related to photography: I'm 29, married, 3 cats, no kids, 3 bedroom house, 2001 Blazer, 6 brothers and 1 sister, work as a programmer at a university, bachelors degree in computer science, play drums, video games, write/sell computer software and video games for fun and profit, enjoy board games, roller coasters, bowling, pool (billiards and swimming), mini golf, and often wonder just how long I can go on in one sentence. That just about sums it up.
I'll post my equipment list next. Heres a few links for examples of my photography:
My current digital photography
Film photography from years ago
...click here to read more!


