Yesterday I posted a review of the Tamron 1.4X and 2.0X teleconverters. As I mentioned there, I was quite happy with the test results, but I also wanted to compare them to the Canon teleconverters to make sure there wasn't a significant difference between the brands (and if there was, I could exchange them before my return period ended). Well, I got in touch with my friend Wayne Fisk, who happened to own both of the Canon teleconverters, and I was able to borrow them for a few hours to do a quick comparison.
Physical design
As it turns out, the biggest difference between the Canon and Tamron teleconverters is in physical design. When you first look at them side by side, you will notice the Canon's are considerably larger, with the 2.0X showing the biggest size difference. When you pick them up, the Canon's are also heavier than the Tamrons, but the biggest surprise is that the 1.4X models have the biggest difference, with the Canon being almost twice as heavy as the Tamron. Measuring both teleconverters together, the Canon teleconverters combined are about 1/3 lbs heavier and about an inch longer.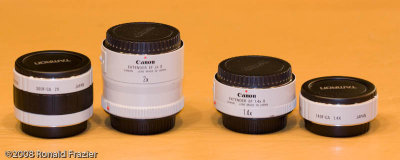
When you pull of the end caps, you will see more of a difference. While the back of the 1.4X teleconverters are nearly identical, the front sides are quite different. The Tamron had the front lens element recessed, while the Canon sticks out enough to protrude into the lens it is attached to. This is why the Canon teleconverters can only be used on select Canon L series lenses, while the Tamrons will work on almost any lens.
This also becomes a concern when trying to connect both teleconverters together for a combined 2.8X magnification. With the original Canon teleconverters, you needed to add an extension tube between the 2 to get them to connect. With the redesigned II series teleconverters, the 2.0X now has an indentation in the back to accept the protrusion from the 1.4X. This means you can only use the Canons together with the 2.0X closes to the lens, while the Tamrons will let you use either arrangement. Optically, it shouldn't make a difference. However, if you wish to use a lens that is slower than f/2.8, then you cannot use autofocus with the arrangement the Canons demand. As I stated in yesterday's review, even if you can trick the camera into autofocusing with more than the 1.4X, it doesn't seem to do much good as it has great difficulty (to put it mildly) achieving autofocus, so this doesn't seem to be an issue. However, just like the Tamrons, the new Live View contrast based focusing works perfectly with any teleconverter combination.
Back of both 1.4X teleconverters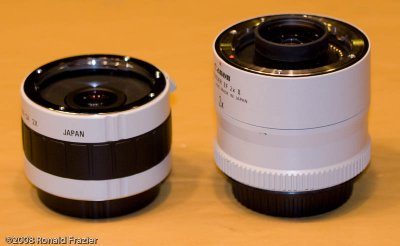
Front of both 2.0X teleconverters (the 1.4Xs look the same as these)
Back of both 2.0X teleconverters
The one other significant difference between the Canon and Tamron teleconverters isn't so easy to see, but if you look at the above photo carefully, you can see that on the Canon there is a thin black line between the metal mount and the white shell. This is the black rubber weather seal, which is intended to help keep water from leaking in in wet conditions. The Tamron teleconverters lack any sort of seal. However, it's worth noting that unless you have the Canon L series lenses and the higher end camera bodies, you probably don't have any weather sealing on the lens and body either.
Image Quality
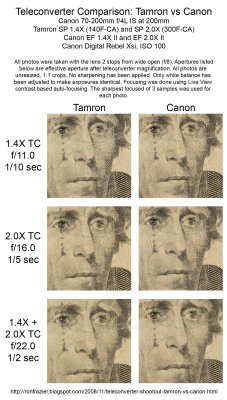
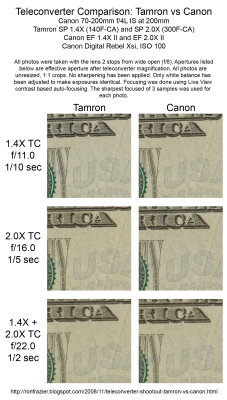
I ran each combination of teleconverters from each brand through a few different tests. The first test was done with the camera at a fixed distance from my target. In the second and third test images, I varied the distance from the target depending on the teleconverters used, in order to make the target appear the same size in each photo, no matter what the magnification.
In the end, I saw no significant differences between the Canon and Tamron teleconverters in terms of sharpness or contrast. In some photos, one brand will look better than the other, in others the other brand wins, but in every case you need to look very carefully to decide. In fact, even when I thought one brand looked better, often coming back to the result 30 minutes later would give me the opposite impression. In short, it is extremely difficult to see the difference between the 2 brands, and I'm often not sure there even is a difference. As far as I'm concerned, they are nearly functionally identical.
Click any of the 3 images below to see the full size comparison images.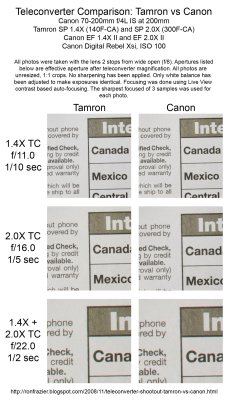
Summary
This quick test confirmed reports I had read that these 2 brands of teleconverters were almost identical. I'm completely satisfied that there is no real difference between the image quality of the 2 brands, and thus I'll be keeping the Tamrons. If you have a need for the weather sealing, then the Canon might be worth considering. For most users, though, I'd say the Tamron teleconverters represent a much better bargain, and thus I'd highly recommend them.
...click here to read more!
Monday, November 24, 2008
Teleconverter Shootout - Tamron vs Canon
Sunday, November 23, 2008
Tamron Teleconverter Review
Since switching from my Sigma 70-300mm lens to my Canon 70-200mm, I've been happy with the results I get, but I do miss some of the extra range in that last 100mm. Even with the 70-300mm, there were times when I couldn't get close enough to the subject. I've been thinking about getting a teleconverter for a long time. After hearing good things about the Tamron Pro (SP) line of teleconverters, I decided to get both a 1.4X and a 2.0X and see how they worked out.
Choosing a brand/model
In chosing which teleconverter(s) to buy, I did quite a bit of research. The options were to stick with the Canon brand or to go with several of the other 3rd party brands. The Canon brand teleconverters were known performers, yet they weren't without their downsides. As expected, the Canon brand is more expensive. They were slightly heavier than some of the other options. Finally, because of the design of the Canon teleconverters, they aren't compatible will all lenses (not even many of the canon lenses). They mostly just work with more expensive Canon L series zooms (with a few exceptions).
On the other hand, looking at the other brands involved some tradeoffs. Yes they are cheaper and a little lighter, but image quality, build quality, and compatability are all issues to be concerned about. After doing a lot of research, I've seen a lot of positive information about some of the teleconverters from Tamron. They make a few series of teleconverters, and it is the more expensive ones (the Pro or SP series) which are the good ones. From what I read, they are a nearly an identical match for the Canons in terms of quality. I even found a review from one guy who bought both and found his Tamron teleconverter was sharper than the Canon. I looked at some test samples and was very pleased.
In looking around, I found the best prices on Amazon. The price for the 2X is pretty much the same everywhere...$210, however Amazon gives you free shipping. At that price, that makes it about $80 cheaper than the Canon 2X teleconverter (actually only $55 at the moment, since Canon currently has a $25 rebate). The price on the 1.4X, is about the same ($210) almost everywhere. However, it is much better on Amazon...currently about $140 with free shipping. That puts it at about half the price on the Canon 1.4X teleconverter.
Initial impressions
The Tamron teleconverters were very nicely designed. They had the same light gray coloring as the canon L series lense. They were small and light. Each teleconverter came with a nice black vinyl storage bag with draw strings. Even better, each bag was just big enough to hold both teleconverters, so you can carry them together and they'll take up slightly less space.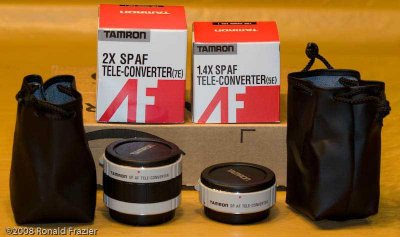
Tamron 1.4X and 2.0X Teleconverters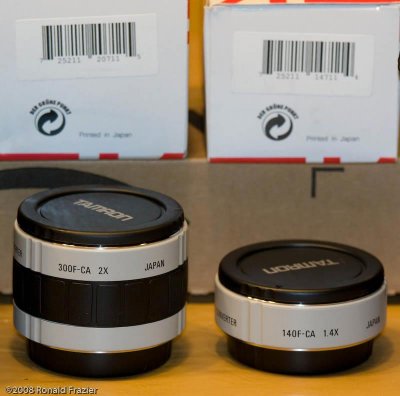
Model Numbers and UPC Codes
Basic functionality and performance
Giving them a quick try on the camera, they function just the way you would expect. The camera detects the teleconverter and reports the adjusted values for aperture (an f/4 lens becomes f/5.6 with the 1.4X and f/8 with the 2.0X). The EXIF data also properly reports the presence of the teleconverter by adding a +1.4x or +2.0x to the end of the Lens field.
When it comes to autofocus, you also get what you would expect. The lens focuses slightly slower to get a more precise focus in light of the higher magnification. Most cameras will only autofocus with an aperture of up to f/5.6. Thus an f/4 lens will autofocus with the 1.4X teleconverter, but not with the 2.0X. In order for the 2.0X to work, you'd need an f/2.8 or faster lens.
There is a way to trick the camera into autofocusing even without such a fast lens. You can place a small piece of clear tape over the 3 end contact pins of the teleconverter , which will break the contacts and prevent the camera from detecting the presence of the teleconverter. This means the teleconverter won't be reported in the EXIF data, and the f-stop reported won't reflect the teleconverter either. The plus side of this is that the camera won't refuse to autofocus. This seemed like a good idea in theory, but in practice it didn't seem to be of much use. I don't know if it was because of the lower light level or because the lens didn't focus slower to compensate for the increase magnification, but whatever it was, it seemed to have a really difficult time focusing. Even in bright light with plenty of contrast, the lens would just go from one extreme to the other, vary rarely ever finding the correct focus. So, even though you could get autofocus working, it was more or less useless.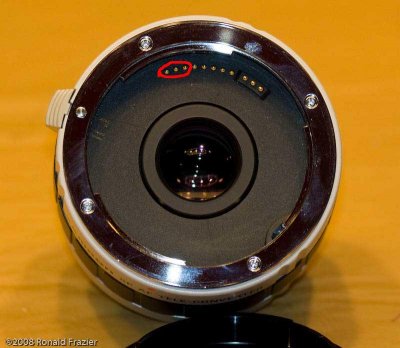
Pins to reenable autofocus
On the other hand, using the new live view mode (available on the newer cameras) with its new contrast based focusing, autofocus worked like a charm with either teleconverter (or even with both on at the same time). This was a very pleasant surprise.
Speaking of attaching both teleconverters at the same time, this too worked fine. However, due to the way the lens communication system was designed, the camera would only detect the teleconverter that was closest to the lens. This means that only one teleconverter will be reported in the EXIF data, and the reported aperture will only reflect that one teleconverter. Putting both the 1.4X and 2.0X teleconverters on an f/4 lens will turn it into an f/22 lens. However, the camera will report it as either an f/5.6 lens or an f/8 lens (depending on the order of the teleconverters). This also means that if you put the 1.4X closest to the lens, you can still use the regular autofocus with an f/4 lens (though just like when you trick it by taping the pins, regular autofocusing isn't very reliable using this method).
In short, everything about the way the teleconverters were designed and functioned was excellent, and behavior was exactly what you'd get from the Canon teleconverters.
Image Quality - Test Methodology
In order to test the image quality of the teleconverters, I ran them trough a number of tests. Each test was done using my best lens...a Canon 70-200mm f/4.0L IS. In every case, the lens was used 2 stops from wide open, which is about where the lens performs best. This resulted in an aperture of f/8 with no teleconverter, f/11 with the 1.4X, f/16 with the 2.0X, and f/22 with both teleconverters used together. In each case, I adjusted the shutter speed accordingly to compensate for the smaller aperture, so that each test case ended up with the same exposure level.
I picked 4 focal lengths: 200mm, 280mm, 400mm, and 560mm. These represented the maximum zoom you could achieve when using this lens with neither, either, or both of the teleconverters. I then shot at each of the 4 focal length using all 4 possible combination of teleconverter magnification: 1.0x (no teleconverter), 1.4X, 2.0X, and 2.8X (both teleconverters). When shooing at a focal length that was less than the maximum achievable (such as 200m when using the 1.4X teleconverter) I zoomed out the lens as necessary to get as close as possible to the desired focal length (ie: setting the lens to 144mm and adding the 1.4X gives the same magnification as 200mm with no teleconverter). When shooting a focal length that could not be archived with that combination (such as 560mm with neither or just one teleconverter), I simply took the largest magnification available with that combination and resampled the results to approximate the more powerful focal length.
Image Quality - Test Results
On the surface of it, I learned exactly what you'd expect. In any case, no teleconverter is better than the 1.4X, the 1.4X is better than the 2.0X, and the 2.0X is better than the 1.4X+2.0x used together. In other words, if you can get the composition you are after without using a teleconverter, then you are best off not using it. It's better to use the lens at 200mm with no teleconverter than it is to put on the 1.4X and then zoom out to 144mm or less. In such a case, you are better off removing the teleconverter and zooming in.
Comparing the results of no teleconverter to the 1.4X was very positive. There was a significant improvement in detail compared to simply resampling, and the loss in contrast was minimal. There was very little tradeoff here, thus the choice of using the 1.4X when needed is pretty much a no-brainer.
When comparing the 1.4X to the 2.0X, the decision was more difficult. There was a slight improvement in detail, but at the expense of a noticeable decrease in contrast. Combining the teleconverters gave an even slighter (barely noticeable) increase in detail compared to the 2.0X alone, with an additional loss in contrast. Thus, in contrast to the 1.4X being a no-brainer, using the 2.0X teleconverter (or using both together) takes a bit more careful consideration.
Below are the test results. Click each image to go to the full size images.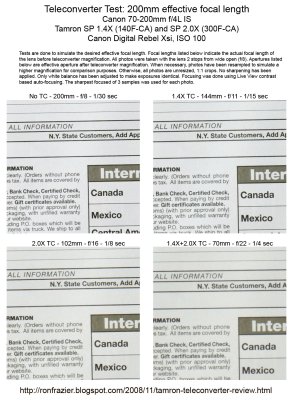
200mm test
280mm test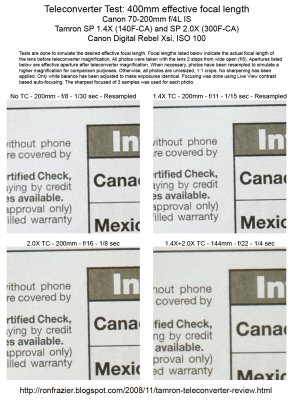
400mm test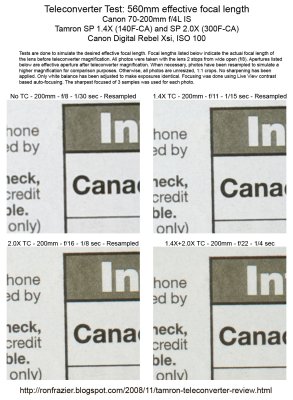
560mm test
Conclusion
I'm quite happy with the results. The improvement seen with these teleconverters is quite reasonable, especially given the price. I'd have no trouble recommending the Tamron teleconverters to anybody.
Of course, the real question is: how do they compare to the results from the Canon teleconverter? That will be subject of my next review, which will hopefully be ready by tomorrow.
UPDATE: I've posted a followup comparing the Tamron and Canon teleconverters and found them nearly identical. As a result, I'm very satisfied with the value of the Tamron teleconverters, and I highly recommend them.
...click here to read more!
Friday, October 31, 2008
I'm no longer accepting American Express
I've decided to no longer accept American Express credit cards at my shows. After long and careful consideration, I've decided it just isn't worth it. I originally signed up for American Express after hearing stories from another artist who said large sales increased after he started accepting AmEx. I was hoping it would do something similar for me, or at the very least, have zero impact. Instead, what it has done is increase my expenses.
When I first signed up for AmEx, I was allowed to sign up under a plan that would only cost me a small percentage of each sale. It was comparable to what I was getting for Visa/MasterCard/Discover, so I was happy to take it. In that first year, only got a few sales with AmEx. One was from a friend, and the other was from a lady who had nothing but an AmEx card on here (which she humorously carried between her breasts). That was only a $20 sale, but it was $20 I wouldn't have received otherwise, so I figured it was a good thing I decided to go for AmEx. For the rest of the year....that was it for AmEx.
By the second year, AmEx forced me to switch to a flat rate plan, which mean I would be paying $6 a month, but nothing more. I figured I'd stick with it. However, I started an experiment. Everytime someone payed with an AmEx card, I'd ask them a what if: "I'm just doing a survey of my customers. What if I didn't accept AmEx? Would you have had another way to pay?" For the rest of the year, in every single case, the answer was yes. So, it was looking like AmEx wasn't gaining me a thing. Yet, for some stupid reason, I didn't have the guts to stop carrying the card, so I continued to pay the fee.
This year was year 3, and I continued my experiment throughout the year, with exactly the same results. If I were to drop AmEx, it would cost me nothing in sales. However, this year, AmEx did something different. They started charging me a fee each time I had an AmEx transaction (on top of the flat rate fee).
Enough was enough. American Express gained me absolutely nothing in sales (other than $20 one time), and cost me quite a bit in fees. It made absolutely no sense to accept the card, so I cancelled my account with them. When I called, I thought I was going to have to spend a bunch of time, talk with a rep, and maybe get offered some sort of deal to continue carrying it. However, the automated system had a menu option explicitly for canceling (a rare feature with automated phone systems these days), and I was able to cancel without speaking to anyone.
It's sad that about the best thing I can say about my whole AmEx experience is that it was painless to cancel.
...click here to read more!
Thursday, October 30, 2008
Michigan Upper Peninsula Fall Colors
For the last 2 years now, I've been intending to take a trip to the Upper Peninsula to photograph the fall colors that are so talked about up there. However, each time, factors conspired against me and I never made it. A few weeks ago I finally got the chance to do it, and it was an incredible experience.
Planning the trip
My wife and I took 3 days off work so that we would have a 5 day weekend. I picked out a number of locations I wanted to see. Some of it was just popular locations. Others were somewhat obscure locations suggested by people on the naturephotographers.net forum. Finally, I had one location that was suggested to me by a patron at one of my art shows.
As far as where to go on which day, that was a matter of both color change progression and the weather. I monitored the current color status on a number of websites, including foliagenetwork.net, newsupnorth.com, and some reports from AAA (no link for those, sorry). Foliage Network seems to be the best of the bunch. Well, as the day approached, it seems most of the UP was changing at the same schedule, and pretty much the whole peninsula was being described as peak, so that was no longer an important factor in my planning.
The weather, on the other hand, was a different story. There was rain for the first few days over the Porcupine Mountains area, so I was planning on leaving that until later in the trip. However, the forecast then adjusted, and the entire time it was planning to rain there. We decided to take our chances and go there first.
Day 1 - The Drive
We were headed for the Porkies, which is about a 10 hour drive from home, so we didn't have much time for anything else. We were a bit slow getting out the door, so by the time we arrived at our hotel, the sun was just about to set. We photographed the sunset from the lake shore, though it wasn't much to write home about (however, it was quite cold and very windy). Nothing eventful for this day.
Day 2 - Porcupine Mountains
This day, I got up at 6 AM (sunrise is about 8AM) and headed up to the Lake of the Clouds (which is about 20 minutes from our hotel). When I got up there, it was pitch black out, and I couldn't see a thing. There wasn't even a moon to see by. I needed to get my flashlight out of the bed of the truck, then find the batteries in one of my bags, all in such pitch black that I couldn't see my hand in front of my face. That difficult process took about 5 minutes. Then I walked out to one of the overlooks. Luckily I had been here once 2 years earlier, so I had at least some idea of where I was going.
When I got out there, I was absolutely amazed at what it was like. Never in my life had I been outside in such absolute darkness, with no moon in sight, no sun about to rise, no cloud cover, and no major cities for a couple hundred miles (even medium sized cities were nearly 100 miles away). I was amazed at just how many stars I could see everywhere. All the blank spaces between stars were actually now a speckled field of 100s of extremely faint stars. I tried to take a few photographs, but it wasn't something I was prepared or experienced with, so it didn't work out very well. A bit later, at about 7:30 (after I had already been here for an hour) I managed to get a really nice 5 second exposure that silhouetted everything but the lake and the sky.
Lake of the Clouds at Dawn
After it started approaching sunrise time, and there was hope to actually be enough light to see a little color on the trees, I moved up to the rocky overlook where the other photographers (who were just now getting there...slackers) were gathered. A few minutes before sunrise, there was enough light to get the color with a long exposure, but the contrast with the sky was too great. I took a 6 photo series (ranging from 1/20 to 1.6 seconds) that I turned into an HDR image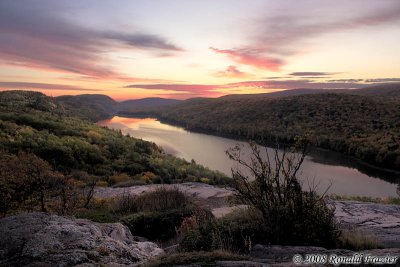
HDR Sunrise at Lake of the Clouds
As it got even brighter a few minutes later, I was finally able to really see the color.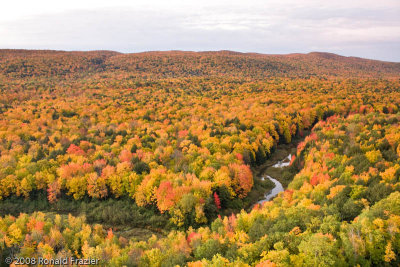
Carp River in the Porcupine Mountains
At that point, I figured my wife had to be awake, showered, and ready to go, so I headed back to the hotel to shower, eat, and head out. By now it was sprinkling out, which was how it would remain most of the day. We headed back up to Lake of the Clouds so that she could see it, and so I could do some more photography now that it was much brighter. I did a few panoramas. We then headed off through the park, hit the Overlooked falls and the Summit Peak tower. I took a some photos along the trail
Mossy Rock and Leaf
Then we hit the waterfalls along the Presque Isle River. 
Manido Falls
By now it was getting late (days are short, especially when locations are far apart), so we got something to eat and headed back to the hotel. It was cloudy, so sunset was uninteresting.
Day 3 - Bond Falls, Munising, and Seney
The next day it was cloudy so I didn't bother going out for sunrise. We took our time getting up and headed off towards Munising, making a brief stop at Bond Falls along the way. Here there was some color at the bottom, but up top where all the small cascades were, there wasn't nearly as much color and I wasn't able to get any good autumn shots up there.
Bond Falls
We headed off to Munising and checked into a hotel. My wife wasn't feeling good at the moment, so we took a rest and didn't do much for a few hours. Then we went up to Munising Falls and Miners Castle for a few easy sights to see.
Miners Castle
After that, she was feeling a bit better, so we took a trip down to some of the small lakes that are abundant south of Munising. We checked out Pete's Lake and Grassy Lake, but there wasn't much to see there. Then we found Red Jack Lake, which had some really nice reflections.
Red Jack Lake
Then we headed just around the corner to Council Lake, which is regarded by many as being one of the best lakes. There were some nice birch trees around the lake, but when I was there it was way too windy to get any sort of decent reflections. We went back to town, and then headed over to Seney National Wildlife Refuge to catch the sunset. We were a bit late in making that plan, and when we got there golden hour was half gone. We did the best we could with what time was left, and I think considering the light we found, it ended up working out for the better.
Seney NWR
Seney NWR
I also managed to find a number of stunning reflections of swamp wood that looked like various creatures. The most striking was this angelfish
Swamp Wood Angelfish
As the light faded we found a spot to get some nice photos of the color. Each time I was tempted to stay somewhere and photograph the sunset color, we reluctantly drove further only to be glad we did when we found another unique and interesting spot to photograph each time.
Seney Sunset
Day 4 - Wagner Falls, Tahquamenon Falls, and Mission Overlook
The next day, I got up early to see if it was worth driving anywhere for sunrise. I went outside and couldn't see a single star. I checked the satellite on the laptop and saw nothing but a thick layer of clouds in every direction for well over 100 miles. As it started lightening up, I double checked outside and it looked like nothing but solid clouds. Sure enough that there was nothing to be seen, I settled back into the hotel room. A while later I walked outside and was disappointed to see that somehow I had missed an opportunity to get some nice color.
Missed Opportunity
Let that be a lesson to never assume you won't get something worthwhile. Anyway, after showering and breakfast, we made a quick stop at Wagner Falls (where there wasn't much color at all) and then headed straight for Tahquamenon. The day ended up being mostly overcast, which fared well for photographing across water.
We hit the Upper Falls first, where there was a little bit of color, but not a whole ton. However, the lower falls had a wonderful amount of color, and was by far the more interesting of the two. Unfortunately, they weren't renting rowboats at this time of year, so we didn't make it over to the island.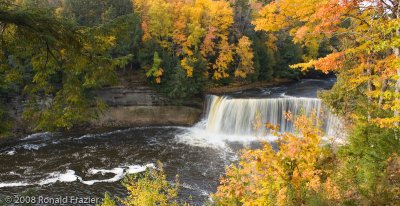
Upper Tahquamenon Falls
Lower Tahquamenon Falls
After that we headed off for our last destination. Someone had told me about the Mission cemetery overlook. We knew approximately where it was (within a mile or so), but weren't 100% positive. We headed down some of the back roads looking for it. On the way, there was a lookout point noted on my map, located at the top of a very tall hill. We diverted off to check that out. To make a long story short, they were some incredibly steep and twisty dirt/damp roads that were clearly intended for ORV's and not cars. Luckily we didn't get stuck, though my wife did get a bit panicked. We made it up to the top somehow, but all there was up there was a bunch of trees keeping you from seeing anything. It was a very interesting experience, but not worthwhile. Once out of there, we eventually found the cemetery on the west side of Spectacle Lake. Once there, the view was every bit as good as we were told.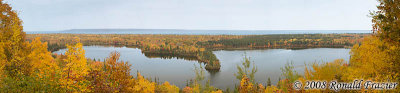
Mission Cemetery Overlook
When we finished with that, it was still a bit early, so we headed over to the Point Iroquois Lighthouse for a few photos (it was raining last time we were there).
At this point, we had hit everything that was on our list. We needed to be home no later than midday of the next day and we had about a 6 hour drive ahead of us. The best we could have done was to get in another 3-4 hours of photography (minus driving time), but even then we weren't sure what to see. Instead we decided to just head home early.
Day 5 - Nothing
We got home the night before, so nothing to report here except a day of relaxation (at least for me...my wife had a test to study for).
More Photos
What I've posted here were just a subset of the best photos from the trip. The rest of the keepers can be found here:
2008 Michigan UP Fall Colors Gallery
Final Thoughts
Going up there was a wonderful trip. I'd recommend it to anyone that wants to see some great colors. Overall, I was very satisfied with the trip. I would have liked to see some more color at several of the waterfalls, and as a whole, I would have liked to see more red trees, as they were in short supply (mostly yellows and oranges everywhere). Other than that, it was great
...click here to read more!
Wednesday, October 29, 2008
2008 was a bad year for sales
It's been a while since I posted much. I've got a number of things to post about. I'll try to get to them over the next few weeks. However, for now, I just want to touch on how my art shows went this year. In a few word: not too good.
This year, before things even got started, I could see the writing on the wall with the economy (especially here in Michigan), and I wasn't too confident that things would go so well. So right from the start, I tried not to get my expectation too high. That was a good thing, as most of my shows went quite poorly. My only consolation was that I wasn't the only one doing bad. At each show, it was the general consensus among artists that things were bad. So it's not me. That's good to know, though I'm not sure what to do with that knowledge.
I examined my schedule from last year, and decided I wasn't going to add any new shows. I decided just to take the best of last year and eliminate a the bad parts. There were 2 shows that were outright terrible. However, one of them (Livonia) I had made the mistake of prepaying for the year before, so I was stuck going anyway. The other one (St Clair), however, got eliminated. Another show (Wyandotte) was actually reasonably profitable the year before, but it was such a long, drawn out show, that the number of hours I end up investing was just huge in proportion to the profit I made. I reluctantly eliminated that one from the list. Finally, the Troy show was also a pretty decent one day show the year before. However, now that I had a new booth setup and it takes a little more time setting up, I wasn't confident yet in my ability to be able to finish during the small setup window available for this show.
What I was left with was Livonia, Northville, Sterling Heights, Shelby Township, and South Haven. Much like last year, Livonia was a disaster. This time I was smart enough not to pay for next year. I won't be going back. Northville and Shelby Township were my 2 best shows last year, but this year I barely got a tiny profit out of them. In Sterling Heights, my sales were less than half of the previous year. Yet, when you consider that the booth fee was the same, and gas prices were higher, my actual profit was only about 25% of what it was the year before. Very discouraging. South Haven was the only show to do well. My sales total was within $50 of the year before.
When it was all said and done, the 5 shows I did this year actually got me about $400 LESS than the 5 shows I did in my first year (2006). Ugh!
So where do I go from here? At this point, it's looking like 2009 may be even worse than 2008. With a presidential election coming up very soon, I think the outcome of that may have an impact on how next year turns out. In either case, I don't think we are going to see a massive turn around too quickly. However, it seems one candidate does have the ability to inspire people, and inspiration can be a wonderful thing in making good things happen. But other than that, I'm not seeing a lot of promise. I'll have to evaluate a lot of different things, decide which shows I might want to keep as my cornerstones, and which ones to replace. Perhaps I'll think about why it is that South Haven did so well and see if I can come up with other shows like it (easier said than done).
The one good thing I can say is that I've got a lot of my expenses out of the way now. Overall, I'm very happy with the booth setup I have (other than I'd like to make some new print boxes...an item on my list for this year that never got done). I've upgraded my camera and lenses this year. Next year I'm hoping I'll be able to keep expenses to a minimum and actually turn a profit for once.
...click here to read more!
Sunday, August 03, 2008
Interacting with customers in your booth
In the course of an art fair, many people will come into your booth. As they enter, they typically know very little (if anything) about what it is you offer. As the manager of your business, you need to decide how to introduce your customer to your work. Opinions on the topic vary greatly, ranging from sitting in a chair on the other side of the street doing nothing, to standing in the booth and greeting each person individually. There is no right or wrong way to approach the matter (though I do have my opinion). It really is someone of an art, and it also depends a bit on your comfort level and even your personality. So how do I approach the topic?
When most people come in, I wait for someone to make eye contact. The people that really just want to keep to themselves will usually try to intentionally avoid making eye contact, so you can take this as an indication that they don't care much to be bothered. Once they do make eye contact, I greet them (hi, how are you) and then I give them the 10 second introduction: "This is all photography done by me and my wife. I do all of the printing, matting and grooving, the canvases, and everything. If you'd like to know more about any of the photos I'll be happy to tell you about it."
It may seem a bit monotonous and repetitive, especially when you've heard yourself give it a few hundred times, but remember that they've only heard it once. To them it's fresh and welcoming. Plus, it tells them everything they need to get the gist of my business:
1) It is photography (not paintings...a common point of confusion).
2) I'm extensively involved in the product creation (not just selling merchandise).
3) I can tell you all about the products I sell.
4) I'm interesting in answering your questions (rather than just sitting in a chair across the street until you pull out your wallet).
If somebody was already in my booth when I gave someone else the speech, I assume they overheard and just let them browse without repeating myself. If they seem to get stuck on any photos (perhaps trying to figure out what it is or where it's from), or when they reach the end of the print bin, I usually greet them with "hi, did you have any questions about any of the photos?". Usually they'll say "no, I'm just browsing" but every now and then you'll get a "yeah, I was wondering what this photo is".
Sure, it doesn't make it as easy of a job when you have to be a salesman all day rather than just a cashier. I don't have any scientific data, but it sort of seems that I sell a little more when I talk to people a lot. I've managed to give people info about pictures (info I'm fairly sure they wouldn't have asked me about if I hadn't volunteered it) that caused them to purchase it. In one instance, traffic was a bit dead and I spent 15 minutes talking to one customer, discussing a dozen different photos in great detail. When we were done she was so excited about everything I told her and said "I want to thank you for spending so much time with me, and I'd like to buy this photo".
You might think 15 minutes is a lot of time to waste on one customer, but I had little else to do, and it really helps break the monotony of sitting there waiting for the next sale. If I can't be making sales, I'd rather have a conversation about my work with someone genuinely interested than to be sitting there noticing exactly how long it's been since my last sale.
...click here to read more!
Saturday, July 12, 2008
Fredrix Canvas Pliers
Late last year I started adding a few canvas wraps to my collection. They went over quite well, so I decided to add some more this year. When I made my wrap last year, I simply stretched the canvas using my bare hands. That accomplished the goal, but had 2 problems. First, it's extremely taxing on the hands trying to grip the canvas and pull it tight. Second, while it got decently tight, it was a little looser than I'd like. Since I would be doing more canvases this year, I decided to pick up a pair of canvas stretching pliers make the job easier and to do it better.
In looking at the canvas pliers out there, there was a huge variation in whats available, with prices ranging all the way from $20 to over $150. While there might be real benefits to the expensive pliers, I knew I wouldn't be doing all that many canvas wraps (at least not yet) so I decided I'd try whatever I could get the cheapest. I ended up finding the Fredrix 7400 Canvas Pliers for about $18 at Dick Blick
In addition, if you order online through Ebates, you can get a 6% refund on the cost. Instead of going to the Dick Blick website, you go to the Ebates website and go into the stores section, find the link to Dick Blick Art Materials and click on it. It will take you to the Dick Blick website where you can make your purchase. That's all you have to do. No need to send in any UPCs or wait for a rebate. They send it to you automatically. You need to signup for an Ebates account first, but it's free, and they offer you rebates for a ton of other stores (BestBuy.com, Target.com, etc).
If you don't have an Ebates account already, you can sign up by clicking the link for the Ebates Signup Offer at the top of the right column of this page (in the Resources section). Signing up through the link and making a purchase will also get you a signup bonus of $5 or more.
Putting the pliers to use
They did quite well at stretching. The jaws have a series of interlocking v-grooves to get a good grip on the canvas. In addition, each v-groove has a series of raised x-shaped bumps along it to give an even tighter grip. I had no problems with the canvas slipping out. The pliers also have a protrusion on the bottom jaw that serves 2 purposes. First it can be used as a hammer, presumably to hammer in staples that don't go all the way. I don't know how well that works, as I find it just as well to keep a tiny hammer nearby when stretching. Second, it can be used to give you extra leverage to help pull the canvas tighter. It works quite well for that purpose, though it does have a tendency to indent softer woods.
After stretching about 4 canvases, I ran into a problem. The hinge pin for the pliers is simply a pin that fits through one side, and a cap the fits over it on the other side. The 2 simply are pressed together, with no threads or weld to hold it in place. Well, after barely any use, the pin fell apart. I tried replacing it hammering it on or compressing it on with another pair of pliers, but it wouldn't stay in place for more than a single canvas.
I had contemplated sending it back for an exchange or return, but that would entail paying for return shipping. Instead, I found another solution using parts I already had around the house. I took a small bolt, a washer, and a 2 nuts and used that to make a new hinge pin. You can't put the nut on tight, since the pliers need to turn, and doing so will loosen the nut. Instead you need the nut to be on tight without actually tightening it down. The ideal solution would be to use a lock nut. However, I didn't have any of those around the house. Instead I just used 2 nuts. I put the first one on just finger tight, then I put the second one on and wrenched it down tight against the first one. It may not be beautiful, but it works just fine.
repaired pliers, and pieces of broken hinge pin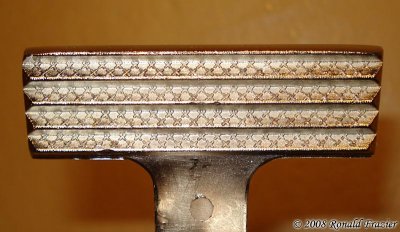
view of the jaw grips
close up view of the repair
Conclusion
This is a decent pair of pliers for a pretty good price. If you can accept the fact that your hinge pin may break on you (not sure how common it is...pretty common I suspect) and don't mind replacing it with about 25 cents worth of parts, then I can't see a real reason not to recommend these pliers. There may be some value in more expensive pliers (I have no idea), but for light duty use I'm not sure how much it is justified.
...click here to read more!
Friday, June 27, 2008
ProPanels - Velcro is the new duct tape
About a month ago, I received my new propanels to replace my old homemade panels made from electrical conduit + grid wire. I got to use them for 2 shows now, and I must say I like them a lot. They look so much more professional than the old burlap covers I made for the homemade panels. They setup so much easier, are more rigid, and a tiny bit lighter in weight. But the biggest thing I like about them is that Velcro sticks to the carpet. Even in just this short time, I've already realized that velcro (or more generically, hook and loop fastener...specifically the hook side) can be used for just about everything. In fact, I've already gone through a 75 foot roll of hook velcro and just ordered 2 more rolls.
Hanging artwork
When I got my panels, the first problem I needed to solve was how do I hang my work? I used to use curtain hooks that went through the burlap an over the grid wire. You can use the same on propanels, but they have no internal grid, so the hook is really just supported by the carpet. The problem here is that it will stretch the carpet out. From my understanding, that's not a problem because the carpet will return to normal after it sits. However I've seen it done and it looks a bit unattractive, because the picture leans out a bit and you can see it stretching away from the wall.
Another option is the hangers that you can buy with your propanels. They hang over the top and extend down as far as you need. I shot this down for a number of reasons. They cost a fair bit of money, they are a little limiting in how you hang photos, and they don't look as nice since you see the hanger running down the panel.
Instead, I thought I'd try a different approach: velcro.
Canvas wraps
Since I was going to be showing a number of canvas wraps this year, I figured "those are pretty light...what if I tried hanging them with velcro?". I went and got a roll of sticky backed velcro, attached it too back of the finished canvas wrap, and hung it. It worked like a charm. Easy to hang up and easy to take down. The sticky backing on the velro has excellent adhesion. However, just to be safe, I put 3 staples in each strip of velcro (one on each end, and one in the middle). The canvas is very secure. In fact, if anything I overdid it and made it too secure. It sticks to the wall so good, it takes a concerted effort to remove it (but still, no more than 5 seconds)
Here's a photo of the back on one of my canvases. As you can see, I put a strip of velcro across the top and bottom edge of the wrap, and then just a small peice on each edge. For as light as these canvases are, you could probably easily get away with only half as much velcro.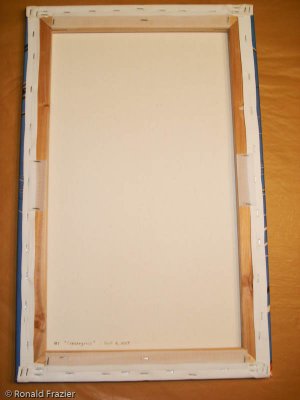
Back of a canvas with velcro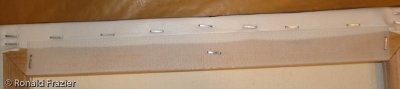
Closer look at the velcro
The thing I like most about this design is how easy it is to hangup frames in the booth. In 2 seconds I can have the frame right where I want it. In addition, the frame isn't going to shift when things get windy and the booth rocks...no more periodically straightening frames throughout the show.
Hanging wood frames
Well, I thought if this worked so incredibly well for wraps (which are just wood) they should work equally well for regular wood frames. My heaviest work is a 24x36 with acrylic instead of glass, so it only weights about 12 pounds. I did the same thing with my wood frames, and it worked like a charm. 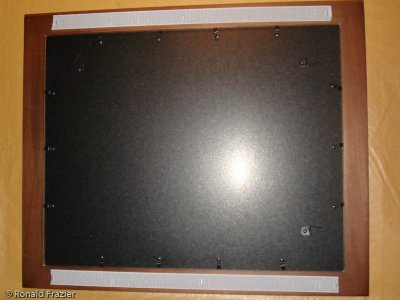
Wood frame with velcro
Pictured here is one of my 16x20's. It holds well with just the 2 sections of velcro. For my larger, more expensive pieces, I wanted to be extra careful so I put a lot of velcro on the sides as well.
Hanging metal frames
Now came the tricky part: hanging metal frames. With such a thin surface area to adhere to, and without being able to staple the velcro to the frame, I was extremely apprehensive about taking the same approach. After thinking about it a bit, I thought "what if I made a short piece of velcro and put curtain hooks through it". It would be just like the old way, except instead of piercing the hooks through the wall, I'd velcro the hooks to the wall.
In designing these, I had a few concerns. First, with the weight on such a small piece of velcro, I was concerned about it coming off. If I attached the hook up high on the velcro, the weight of the picture would in effect peel the velcro off from the top until the whole thing comes loose. If I instead attached the hook to the bottom of the velcro, the weight would pull the velcro down instead of peeling it off. Since the velcro doesn't easily slide across the carpet, that would solve that problem for all but the heaviest frames (much heavier than anything I display).
The other concern was that if I punctured the curtain hook through the velcro, the weight could cause it to tear through the velcro until it breaks loose. Of course, the velcro I'm using is quite tough, but still better safe than sorry. I decided to simply re-enforce the hole with a metal washer.
Making these hangers was quite simple. Cut 2 identical size pieces of adhesive backed velcro (one piece hook, the other loop). Take one piece and peel off the backing. Take a tiny metal washer and place it about 1/4 inch from one end. Then take the other piece of velcro, remove the backing, and stick it perfectly to the first piece. Once it's stuck together, it should be an extremely strong bond, and the washer should be firmly in place. Now take a curtain hook, puncture the velcro with the sharp end (making sure to puncture through the washer). You may need to use pliers to bend the hook some so you can put it through the velcro, and then bend it back to its original shape after it's assembled.
Now you've got your finished velcro hook. Just make a bunch of these, and use them to hang your frames (I use 2 per frame).
Parts needed (plus a curtain hook)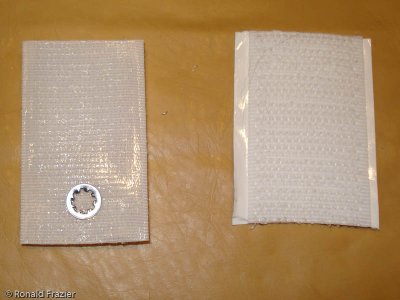
peel off the backing and place the washer
Carefully attach velcro, adhesive backings together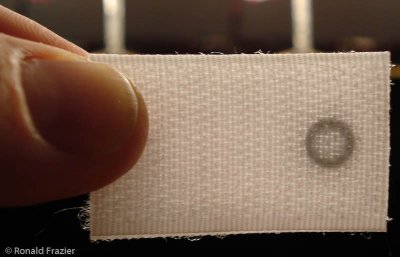
Finished strip, backlit so you can see the washer inside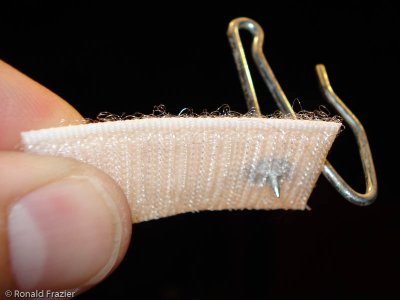
Puncture the hook through the washer (make the hook side is down)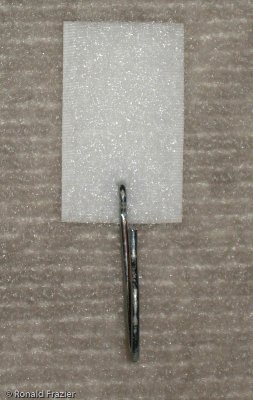
Finished piece on a propanel.
Getting these cut perfectly the same length so that none of the adhesive is exposed can be a bit tricky. What I found to work better was to make a dozen at once. Peel off a couple feet worth of loop velcro, stick a dozen washers to the back (evenly spaced every 2 inches), then attach the hook velcro to the back of it (peeling as you go, so that it doesn't accidentally get stuck to anything. When you are done, you have a 2 foot long strip. Cut it every 2 inches, near each of the washers.
Hanging everything else
Next I figured if I'm using Velcro for the heavy things, why not the light things, too? Anything that I wanted to put on display was promptly stuck with velcro. Price signs, credit card signs, information plaques, etc. Anything in my booth...if it was attached to my propanels, it was done with velcro (with one exception...my shelves where attached by shelf brackets, but I'm sure I could figure out how to velcro those too if I had the need).
Where to get velcro
I found my velcro cheapest on ebay. Look for 1" wide, adhesive backed, 25 yard (75 foot) rolls. If you buy 2 rolls together, you should be able to get them for about $20 a roll shipped. The first order I got 1 roll of loop and 1 roll of hook. I hardly used the loop, but I finished off the hook rather quickly, so my second time I ordered just 2 rolls of hook.
If you don't want to order through ebay, the company that I bought from sells direct. Their hook-and-look can be found at http://www.baerfabrics.com/hook-and-loop-fastener.asp
...click here to read more!
Monday, June 23, 2008
Next show only slightly better
I had another show this week. This time it was the Northville Art in the Sun show. The gist of it is, I did a bit better...made a small profit, but still nothing to get excited about.
Setting Up
This was attempt number 2 at setting up my new booth. Unfortunately, this show only had a morning setup (no option to setup the night before). On top of that, my wife ended up having to work at the last minute, so I was doing things on my own. And on top of that, I only had about 4 hours of sleep.
Then on my drive in, I literally missed hitting a deer by about 2 feet (the driver next to me hit the second deer). In fact, I would have hit the deer I missed had I not mistakenly thought the lane I was in was ending and thus cut over 1 lane. The scariest part was that I didn't even see the deer coming. When I realized I shouldn't have cut over 1 lane, I looked in my passenger mirror to make sure the lane was clear, and as soon as I looked back forward, the deer was already in front of me. I slammed on the brakes and she just barely got out of the way. As I'm trying to stop, the deer carcass from the other car is sliding down the hiway at the same speed as me, spinning in circles as it slides. I was just hoping it wouldn't slide into my lane before I stopped.
Well, despite being alone, and then very freaked out, it didn't work out so bad. I put a few parts on backwards, and a few other mistakes, but I got everything together fine.
The show
Traffic was a LOT better than Livonia. Not even any comparison. There were a few dull spots, but mostly it was good. The slow periods mostly corresponded to the rain. A medium rain came in about 1 hour before the end of day 1. Then there was lightening about 15 miles away and reports of hail at another nearby city. Some strong gusts of wind came in. An artist a few booths down selling wooden bowls was in the middle of securing her canopy side walls when the wind grabbed it, hit her display, and destroyed $700 worth of work. Everybody started packing up. After being one of the few holdout artists, I decided enough was enough and closed up 30 minutes early (the first time I've ever done that at a show).
Day 2 was very similar. Similar traffic (perhaps slightly better). Similar gusts of wind, and threats of rain, but nothing much came of it. Happily, since no rain came, my tent was able to dry out, which means I now don't have to unpack it at home to let it dry out.
The sales
Well, it was better than last time. At least I made a profit (though remarkably tiny, after deducting booth/app fee, materials, and gas). I figured I worked 22 hours this weekend for about $3 an hour.
I wasn't the only one doing poorly. Everyone else had similar complaints. I saw very little artwork in patron hands. The number of people I saw walk past carrying photos from other photographers...well, I didn't need 2 hands to count them. The market just wasn't there
Conclusion
A slight turnaround, but still disappointing. But it was a fun experience. At least now I know I can setup the whole display (9 foot trimline included) all by myself (with just a tiny bit of help putting on the legs). I figured out some cool new ideas for my setup. I've got 5 weeks until my next show and a number of ideas to consider implementing before then. Hopefully then things will turn around a bit.
...click here to read more!
Thursday, June 19, 2008
Starting off year 3 with a terrible show
Once again I'm off to a bad start for the year. Last weekend I did the Livonia Art From the Heart show, for the third year in a row. It ended up terrible...I lost money. However, it was good practice with some of my new equipment, so not all is lost.
History of Livonia Art From the Heart
Just to recap a brief history, Livonia was my first show ever, and ended up as my best show the whole first year. The second year was a LOT worse. I actually lost money that time and it was my lowest sales show of the year. However, at the time I did the show, I had not yet experienced a better show, and so (not knowing what was out there) I was too quick to just write it off as a bad year and thus signed up for year 3 on the spot (in order to get a $50 discount). Well, year 3 turned out just like year 2.
Way fewer artists this year
When I received my welcome packet a while ago, the first thing I noticed was the layout of the show. The isles looked like they had way fewer booths than last time. This time there were less than 100 booths, whereas (I believe) the prior year had about 150 booths. Obviously a lot of people were upset about 2007 and didn't return.
When I arrived on Friday night to to check in, the thing I noticed was that they were hand writing in several people onto the show layout chart and filling out their signage by hand. In contrast, most everyone had them prefilled in and computer printed. It's possible these were alternates called in at the last minute. However, given the decrease in the number of booths, I don't think that was likely...I suspect they actually accepted everyone who applies. The only other thing I could think was that they were actually accepting last minute entries.
One benefit of the fewer artists was that our booth space was increased from 10x13 to about 15x13. That would have been useful had I realized it before I finished setting up...I could have put up another awning and put some more work on the outside wall. Oh well.
Friday night setup...in the rain
When I arrived to setup on Friday night, it had just started raining. On the plus side, we missed the lightening that was originally forecast, and the rain was only relatively light...no downpour. Normally I would have been upset about the rain, but this year I had my new Trimline canopy. If it were as good as its reputation, I'd have nothing to worry about. Another upside to the rain was that we were one of only about 6 people who chose to setup on Friday night, so there was no fighting for parking spots.
Even though I bought the trimline at the end of last year, I never used it because I wanted some more practice setting it up. The only setup I had done before, I got as far as assembling the frame and top, but no walls or awnings. Well, I never got around to practicing, so essentially I was doing my first whole setup of the tent on the spot. I ran into a few small snags, but nothing I didn't quickly figure out. I'll write more about the booth in another post.
Once we got the canopy up (including walls), we were much relieved, as we were able to finish our work in the dry interior. We setup the pro-panels (which we also had never setup before), hung a few frames, and then decided we were exhausted enough to head home and leave the rest for tomorrow morning.
The show
Saturday was entirely uneventful. No rain, no major traffic, no snags. Nothing interesting to report on at all. Sunday started out the same way. Then there was a minor surge in traffic that made it hopeful that things would start picking up, but it ended as quickly as it started. A few more brief surges happened over the next few hours, but it never went anywhere.
There was a storm scheduled to come in right around the time we were to close (5PM), but it arrived early. At 1:30PM the storm hit. I closed up the booth, but there was lightening, so I figured it was safest to retreat to the car. The rain lasted only about 15 minutes. I returned and reopened.
The early exodus
Right after the rain, artists immediately started packing up. Our row held the line (we only lost one booth), but the next row over lost all but 3 booths. About 3PM I decided to take a walk around the show to see (what was left of) the other artists. It was sort of embarrassing how quickly I walked the entire show. There was hardly anything left.
It got a bit windy, and one of the artists who was packing up had her easy-up canopy roll on her. She made the mistake of leaving it up with no weights and no stakes holding it down.
The results
When it was all said and done, I made about $190 in sales on a $200 booth fee, so I lost $10 plus materials, gas, credit card fees, and time. What was most interesting was that even my cheap $5 gift cards couldn't save me. I sold a set of 5 and a single card. Three of the prints I did sell were discounted prints on my clearance shelf (I had too much inventory for my bin and wanted to move some of the older prints).
Another artist near me only sold a bit over $500 worth of stuff, and $325 of that was due to to a single large canvas sale. A jeweler near me only made $35 on Sunday.
Done with the show
I was a bit stupid for signing up again, but now I know better. I've found better shows, and there's no need to hope for a turnaround on this one. I'd rather spend my time trying out new shows than come back to this one, so that's another show off my list for next year.
Next up...the Northville show this coming weekend. Also up this weekend....a forecast for scattered thunderstorms :-( On the upside, maybe all this rain (if it keeps up) will make for a wonderful display of autumn colors this year. That upside is 4 months away. I must be desperate for good news.
...click here to read more!
Monday, May 26, 2008
Color Correction with the Datacolor Spyder 3 Studio
In getting ready for another year of art shows, I'm addressing some issues I faced last year. One of those issues is a lack of color consistency throughout my workflow process. Last year I learned all about color profiling and got OK results by using generic paper profiles from various sources. This year, I've decided to address the issue further. After researching various options, I decied to try out the Spyder 3 Studio from Datacolor. So how has it turned out? So far so good....
A brief history of my color workflow
For years, color correction was a non-existent topic for me. What I got out of my Canon i960 was mostly close enough for my satisfaction. If not, I'd tweak the photo in Photoshop to give me what I wanted. That "worked" well enough (only because my definition of "close enough" was pretty lax) until it came time to upgrade printers.
When I got my Canon IPF5000, I decided if I was going to spend over $1500 on a printer, I was going to do it right and learn how to use color profiles. I used generic color profiles from a variety of sources. That worked a lot better, but I found myself results still lacking. For one, none of the prints matched my monitor exactly. Second, I still found every profile gave me (at best) slightly different results. Some of the profiles that I got straight from the paper manufacturers were outright terrible.
Making the move to custom profiles
Over this last winter, I decided that from here on out, I needed to do things right and get custom profiles made. I had debated about paying to have them made, but I decided against it for a few reasons. The thought of paying out money for something like that just didn't strike me right. I'd rather pay more up front and then have the flexibility to create profiles whenever I wanted. I tend to like to experiment with different papers, and this gives me the option to create as many profiles as I want on a whim without wasting money. Any new paper I want to evaluate can be evaluated using a properly made profile, so theres no need to waste money, or to decide on a paper based on non-representative results.
I looked around at various options. The i1 Color from X-rite is well regarded as the leader in color management solutions, but in the $1000+ range, it was a bit out of my budget. I was looking for about half that price. I found a few solutions, including the x-rite ColorMunki and the Datacolor Spyder 3 Studio. From reviews, both seemed to do a good job, but the ColorMunki seemed to be a bit too basic for my tastes.
I decided to go with the Spyder 3 Studio. I found it through Amazon.com for only $545 shipped. It included both the Spyder 3 Elite (for profiling your monitor) and the Spyder 3 Print (for profiling your printer/paper).
Profiling my monitor
The first step of the process is getting the colors on your monitor corrected, so that your workflow begins with a known configuration. Otherwise, getting the print to match your monitor is both next-to-impossible and pointless. I installed the software for the Spyder 3 Elite and gave it a go. It was relatively painless. However, when I was done, I ended up with what I thought was a terrible monitor profile. The screen had a definite magenta cast to it. I repeated the process and got identical results.
At this point I was feeling like I had purchased junk and was about to say screw it and just make my monitor look good again. However, I remembered that it sometimes takes your eyes a while to adjust to different lighting, and thought maybe I should give the profile a chance to sink in. After about 10 minutes the color started to look really natural. Moving to a different light source and then coming back, I could see the magenta cast each time, but my eyes quickly readjusted. After a few days of working with it, somehow my mind has gotten adjusted to the new color settings, and now, even after coming in from a different light source, I can't really notice the color unless I'm consciously looking for it. Almost instantly, it looks like pure white to me.
I don't believe I saw any tips like this in the program. It would probably be useful, to set new user's mind at ease.
Profiling my printer
Now, with the monitor calibrated, it was time to move onto the printer. I started with my Canon HW Satin paper. I printed a basic 225 patch target and scanned it in. The scanning is a bit time consuming and tedious, but the included guide makes it easier and less error prone. After scanning in all the patches for the target, it generated a profile and I went to print a test page. When I hit the soft proof button, it showed very little change, so I figured that was a good sign. When I then printed it out, what I got was quite surprising. For the first time ever, my print looked virtually identical to what I saw on the screen. This was really a breakthrough moment for me.
Next I moved onto the "paper" that previously gave me the most problems: the Breathing Color Chromata White Matte Canvas. Breathing Color doesn't have a profile available for the iPF5000, but they do for the iPF8000. Being that the 2 printers are nearly identical (same ink set, same print heads) the profile should have worked fine, but it didn't. It had terrible contrast and saturation, so I had to correct for that in the printer's export module configuration. I was hoping the Spyder 3 Print could do better.
I printed out the 729 patch color target plus the 238 patch extended gray target. Scanning the nearly 1000 patches took me somewhere in the range of 30 minutes. As I got a little way into it, I was noticing that the results for each patch as displayed on the screen was quite terrible. Like my previous profile, they were all low in contrast and saturation. When I finished, I soft proofed my test print and it was horrible...much like what my uncompensated prints with the old profile had given me. I backed up and experimented a little with the advanced options, but nothing could give me a soft proof that had acceptable results.
Once again, feeling disappointed and thinking I had wasted money, I decided to see just how bad it is on actual paper. I restored the profile to all of it's default settings and generated my test print. Once again I was shocked when, despite the terrible looking proof on the monitor, the actual printout look great. It was virtually identical to the monitor, and also virtually identical to the HW Satin print.
I then threw together a sampler page of my own photos and printed it out, and the results were virtually identical for every single image. Everything from a black and white to the most saturated sunset all look wonderful and accurate.
Conclusion
This is far from a thorough test, but so far I am extremely pleased with the results I've received. It's really opened my eyes to exactly what is possible. In fact, I feel quite stupid for having tolerated what I did before. If you have the money to spend and aren't completely satisfied with your current output results, I wouldn't hesitate to recommend this product.
...click here to read more!
Saturday, May 03, 2008
Getting ready for another year
2007 ended up being a pretty decent year for art shows. After getting off to a bad start, things turned around and I had several of my best shows yet. However, in the process of all of that, with the preparations and improvements being made, I didn't have a lot of time for much else. After finishing my last show in September, I decided to take the winter off, and I haven't done much photography since then. Now that time for shows is approaching again, its time to get started back in the swing of things.
So far, I'm scheduled for 4 shows I did last year, and have applied to a 5th. A 6th hasn't put out the app yet. The other 2 I decided to drop. One show (Saint Clair) I actually lost money after travel expenses. The other (Wyandotte) was actually pretty profitable last year, but it was a very long show. It was four days, 11 hours each, plus another 2+ hours for driving each way, setup, and teardown. In the end, it didn't end up being all that profitable for the amount of time I put in, so I decided to cut that one too.
I haven't applied to any more than that, and I'm not sure whether or not I want to. The economy has been pretty bad, especially here in Michigan, and I'm a little concerned about how thats going to impact sales. Traveling to shows out of state isn't feasible for me at this moment. Plus, I was so busy doing shows last summer, I missed out on doing a lot of other stuff. I'm thinking of a more relaxed schedule for the year.
I've got a lot of things to get into place for this new year. I need to get new ink, and paper. I'm planning to get new panels for this year to go with my new 9ft tall canopy. I was planning to build a new print bin. I planned on switching out a lot of my framed prints for canvas wraps instead, since they are lighter and easier to manage. A lot of stuff to get done in the next 6 weeks.
I just picked up a new camera, since my old one broke twice on me last year (the mirror, which I repaired, and the lens, which I couldn't do anything about). I'm learning how to use some of the new features of it.
I'll have more details on some of the stuff I'm doing soon.
...click here to read more!


