Not a lot has gone on recently. Since my last show, I have no more scheduled shows this year. I was planning on applying for some fall shows (and there are 1 or 2 shows for late November/early December that I may still apply for), but I think after doing 5 shows this first year, I'm going to call it a good first year and wrap it up until next spring, for a few reasons.
First, between working a full time job and doing everything for my shows, I haven't been able to get a whole lot else done. I've fallen behind on some things around the house, so I'm catching up on some of that.
Second, I've also been on 4 photo trips this summer (Hocking Hills, Ohio; Maine; Michigan's upper peninsula; lighthouse of western Lake Michigan). I'm also looking to take one more trip (a fall color tour). Yet I've only had the opportunity to pull a couple of good photos out of it. I've got a number of good shots in there, but I haven't had time to pick out the best ones, post-process, print, and mat them. So I'd really like to get caught up on that.
Also, I'm looking to work on my presentation during the fall and winter months. There are a few things about my booth I'd like to change. The primary 3 are larger prints, matting, and framing.
Larger Prints
On the larger print front, I'd like to do exactly that. My largest matted prints are 11x15 matted to 16x20, and then I have four framed 12x18s matted to 18x24 (but nothing in that size unframed). I have nothing at all bigger than that. I'd like to do a few photos printed at 16x24 or 20x30 and matted accordingly (maybe 4 or 5 inch borders). I'd also like to go though my archives and see if I can pull out some more panoramic shots and print up a few of those at a nice size.
Matting
As far as matting, I made a decision originally to buck the trend of plain white mats. I though I could do better with some colored matting which was chosen to match the photo. So far, my colored mats have outsold my white mats, so my approach would seem to be successful. However, I'm starting to think there is a problem with my logic, and that my conclusions are flawed. People that like colored mats are usually going to choose to buy colored mats instead of the white mats, so that explains why those sell. However, the people that do NOT like colored mats probably just walk right out without realizing that I also offer them in white. In addition, even if they do look through and see the white mats, the plain white, single layered mats aren't all that nice looking, so that might not agree with them either.
So I'm thinking about a few options here. The first option is to find a nice looking white or off white that has some type of a subtle texture or pattern to it, and offering all of my prints in that same color. The other option, is to pick out 4 to 8 nice looking neutral tones (whites, blacks, grays, and browns) and use that for my matting.
I'm not really sure what approach to take here, so it's going to take a bit of playing around to figure it out.
Framing
This is a biggie. So far most of my framed prints have been done with cheap & simple aluminum frames (black or silver) bought from Michael's for 40% off. When I started I was thinking simple was better, but now I really don't think it makes all that nice of a display.
I've started to think that the framing really needs to be complementary to the photo itself. Other than my plain, standard frames, I have a set of lighthouse collages that I have displayed in a nice frame that, to me and others I've asked, gives a beachy or nautical feeling that is complementary to the lighthouse subject. Indeed, I've been mildly successful at selling these photos framed.
In addition, I've been looking around at the shows I was in and a couple other shows. I found a few other artists doing VERY well, and the first thing I really noticed was how well their framing matched their subject matter. One artist was selling African wildlife photos, and had some interesting frames. Zebra photos were in frames that had a subtle, stripe-like texture to it. Elephant photos were framed with roughly textured frames, much like an elephant's skin. Iridescent blue birds were in frames that had a thin, iridescent blue stripe embedded in the wood. Most of the frames gave that feeling. Another artist I checked out recently was selling old world European photos in very luxurious looking frames. They were incredibly eye catching, yet not at all distracting from the photo. They looked like they'd be right at home in a million dollar house.
Another benefit to redoing my frames is that I can switch things up a bit. First, I've had several photos on display that have sold nothing (or maybe just 1 print). I'd like to switch up those photos, and maybe get a display of more cohesive photos. In addition, the majority of my framed photos are in a different size than the mat sizes I sell. My mat sizes are all 8x10, 11x14, and 16x20, but the majority of the framed sizes are 12x16 (with a couple of the other sizes thrown in). This creates a minor problem in that people usually see the 12x16 and 11x14 as being the same size, and pointing out the difference just seems to cause confusion.
So now, in the last week, I've started seriously looking around online at different frame vendors to see what they carry. By the end of the month, I plan to start ordering frame samples, and hopefully by the end of October I'll start the process of ordering larger prints and frames to match.
Other Improvements
There's a lot of other small details to work on over the fall and winter. I'd like new pricing cards for the framed prints, nicely printed and laminated, displaying photo title, a short description, and a list of sizes and prices.
I need to find a better way of doing the mailing list signup. Right now I just have a signup sheet on a clipboard, and if I don't ask people to signup (which I don't do very often) they don't even notice it.
I'd like to have a work desk for behind my booth so that I can do my work back there instead of the shelf at the front of the booth. This will give me a few advantages. First, removing the shelf from the booth will give me a little extra wall space. Second, I wont have to turn my back on the entire booth to write up a sale. Third, I can keep my sales slips, tools, accessories, bags, etc in there, and more organized, instead of having them all tucked away in a few Rubbermaid containers. Overall, it will hopefully make me more organized.
I might try to work on some new display bins that give me some additional room, are free standing (instead of sitting on a table), and can close up to double as the storage area for my matted prints. This will make it easier to quickly put the prints away each night and then pull them out each day without having to order and arrange them.
Conclusion
To sum it all up, I'm looking at undoing a lot of stuff I did this year and starting many things over with a fresh perspective. My hope is that, in the end, I'll have a fresh and much more professional looking display for next year. I have 12-14 decent shows I plan on applying to for 2007, and then I'll fill in whatever gaps are left with whatever smaller shows are available.
2006 gave me a lot of ideas and experience. Hopefully 2007 will bring me a bit of profit.
...click here to read more!
Friday, September 22, 2006
My fall & winter plan: make improvements
Tuesday, September 05, 2006
South Haven - a moderately successful show
This weekend we did our fifth show - the South Haven All Craft Fair. I've heard from a number of artists that this was a pretty good show in past years, so I gave it a shot. I may not have come away with a fortune, but I did make back all of my expenses + a hundred or 2 extra on top of that. As a side benefit, I also came away with a number of additional shots added to my portfolio, all rolled into the same costs.
Since Last Weekends Failure of a Show
As I reported, the previous weekend, I had a pretty miserable failure, walking away with a small net loss for the first time so far. I realized that my biggest failing point for that show was that the market for big ticket items just wasn't there. Even a $20 print was out of the price range of many, it seems. I noticed the same situation with the show before that (in Warren). In both shows, I honestly believe that if I had something to fall into the $5 price range, I could bring in a lot more sales. A few bucks here and a few there could add up to a decent amount, turning a bad show into an OK one.
Determined not to repeat this failure, I spent the week working out ideas for products in this range. The best option seemed to be photo gift cards. I went to a few different stores, picked up a few different options, and went with what I felt worked best. I then bought 200 of those blank cards. Next, I picked out about 130 of my best photos that spanned my entire work for the last 2.5 years but never made it into my official portfolio. I then added to that all of the photos in my official portfolio. The resulting 160 photos I then had printed up, one copy of each. I assembled the cards and stuffed each one into a quart size ziplock back.
I now needed someplace to display the photos. I searched online (using Google Local) to find "store fixtures" or "store display" businesses in my area. I called each one up and asked if they had any used spinning wire floor racks for holding 5x7 cards. I finally found one that had one in stock. On the upside, he wanted $20 for it, versus the $100+ they seem to cost brand new. On the downside, it was missing 1 of the 4 card holders, and the card holders were a little too small to hold 5x7 envelopes (which are actually 5.25x7.25). I thought it was a deal, so I bought it anyway. I took it home, tried bending each of the wire bins, and was able to fit 5 or 6 cards easily in a bin.
The last element was pricing. Each card cost me under $1 each in materials. I decided to try $5 each or 3 for $12.
Friday Night
Finally, onto the show. We left at close to 2PM to make the 3+hour drive across the state. With accidents and construction along the way, along with the heavier holiday weekend traffic, it took us a bit over 4 hours to get there. When we arrived, we quickly found our spot, pulled in, unloaded, and setup.
After we left there, I could see a beautiful golden peachy sunset just down the road. We headed down there but it was paid parking and private property. We decided to head for the lighthouse, but didn't realize at first that we were going the wrong way. The once we got straightened out, we didn't realize we were on the wrong side of the river, too. Finally, we worked our way around and down to the lighthouse pier beach. Unfortunately, by this time the sunset was all but gone.
My wife wanted to just sit in the car and wait while I take my couple of pictures and was done. However, just because the sunset was gone didn't mean I was done here anytime soon. I could see a sky full of clouds with a gap near the horizon. I knew this boded well for some spectacular afterglow. After convincing her to grab her camera and head down with me we waited. Before long, the clouds started to glow more and more. Before we knew it, they looked like they were on fire. We were there to capture what several locals told me was the best sunset of the summer, and we captured it behind the town's lighthouse.
I realized that what we captured would be sellable, however, I didn't realize just how golden it was. We stopped at Walgreens on the way to our hotel and ordered up a few prints to pick up the next day. I got a few 4x6's and an 8x10. Luckily, I had brought some extra white 8x10 and 11x14 mats and foamboards, along with all of my extra blank photo cards and ziplock bags, with me for just such an occasion.
After that, we headed to our hotel, which was 20 minutes to the south. Hotels in South haven were all considerably more expensive, so we opted for a considerably cheaper hotel with a short drive.
Saturday
We picked up our prints and headed to our booth. The show was scheduled to start at 10AM, and after everything else, we got there about 9:30AM. Unfortunately, the show already started picking up a lot of customers. We had a hard time parking and had to walk quite a ways. When we got there, we discovered part of our awning had torn. One of the velcro straps had ripped right out of the stitching, another part had been cut/torn, and one of the support arms had bent a tiny bit. In addition, inside the booth, my print bin (which was luckily empty) had tipped over. What I still can't decide is, was this damaged caused by the wind, or did some other artist hit my awning with their vehicle or trailer after I left? As far as I knew, there was no significant wind overnight. For the future, I need to find a way to drop the awning at night (currently, dropping the awning interferes with zipping up the front wall).
After taking care of this small problem, we got on with the show. Saturday brought plenty of traffic but little sales. I sold a couple of my regular prints and a handful of gift cards. In addition, I sold out of my sunset photos and enlargement.
By the time day 1 was over, I was plenty disappointed with how things were progressing, but I wasn't the only one. Lots of artists found themselves doing much worse than they did in previous years. At one point, I was starting to believe my prices on prints were too high. However, after looking around the show, I found most other photographers had sold about the same number of prints as me. The only difference was that they made less off of each sale. I felt reassured that my prices were good. I left, hoping for a better day tomorrow. On the way back to the hotel, we stopped at Walgreens again and ordered some more sunset prints and enlargements (9 4x6s, 2 5x7s and 2 8x10s).
Sunday
We picked up our latest batch of prints and got to the show early enough to not have to park far away. Upon opening our booth, we found that condensation on the roof had apparently seeped through to the underside. Any shaking of the booth resulted in a mini rain shower inside the booth. We ended up having to wipe of the underside of the roof to remove the water now before it became a problem later. I'll need to find something to do about this (waterproof spray, or something).
The show was off to a much better start. Almost right away, people started buying up cards of the sunset. Within a few hours, I was nearly sold out of sunset cards, so I sent my wife up to buy another batch of 4x6 prints. I ended up selling half of that batch. I also sold a variety of other cards and prints throughout the day.
When the show finished, I decided that as we tore things down, the last thing to be torn down would be the card rack. I wanted it to remain on the sidewalk to catch the stragglers as they left. That idea paid off, as I ended up making another $30 or so in card sales while we tore down.
Conclusions
When all was said and done, we had made back all of our expenses plus a few hundred in profit. While not enough to quit my day job, for my first year, I consider those type of shows to be a pretty good success. It was also a nice reversal on my trend of declining sales at each successive show.
The card sales made me almost twice what it cost to buy the rack, all the materials and prints for my entire card inventory, and the cost of replacing the inventory sold at this show. From here on out, keeping my card rack stocked up will be a minimal investment of time and money, but should hopefully net me a tidy profit each show.
Considering I didn't do too bad, and that many returning artists said the show often does much better than it did this time, I decided to pay for the show next year, guaranteeing me the right to return and have my booth in the same spot. I've already got a couple who told me they'll be back next year to see what new local shots I have.
Lessons Learned
1) Inexpensive product options can pay off. In fact, I think almost all of my profit from this show can be attributed to card sales. Without them, I think I would have only broke even on the show.
2) Local shots pay off. To reclassify things another way, I could also say that all of my profits were attributable to the sunset photos we took Friday night. Of course, it's difficult to say how many of those sales were due to it being local and how many were due to it being something people experienced firsthand and wanted to have a memory of. I guess I'll figure out the answer when I see how well the same print sells at the show next year.
3) Research the local area better to find out what items are big attractions and might sell better. I discovered that there is a very popular tall ship that has merchandise in all of the gift shops and sells pretty well. Had I known, I would have taken pictures of it ahead of time.
4) Related to the previous item, after you research the area, make plans to go there ahead of time and collect some local photos to sell at the show. I planned to do this around setting up the booth and at night after the show ended Saturday. With everything else going in, there wasn't time to do that outside of catching the sunset.
5) I'm getting a little better at being a salesman. In a few instances, I was able to talk people into buying a $5 card they seemed ready to walk away without. Not a major accomplishment, but it's definitely a start.
6) I need to fill out my card collection some more. I only picked what I felt were my best photos to turn into cards. However, on several occasions, I had someone ask me about a particular scene which I've photographed but not had in my card collection. The card collection is the perfect place for carrying all of those obscure shots that aren't worthwhile to carry in your enlarged print collection.
7) I need to find a better way to organize my cards. People look at them and assume each bin has all the same cards. Very few people look behind to see there is a variety of cards (3 to 6) in each bin. I partially resolved this on Sunday when I added little tags to each card bin saying "In this bin: location X, location Y, location Z". Adding those tags helped quite a bit, but it could still probably be made more obvious.
...click here to read more!
Tuesday, August 29, 2006
Another bad show
This weekend I had another bad show. This one was in Port Huron. It was my worst show yet. I had the least sales. I made back several times my inexpensive booth fee, but since it wasn't a local show, I had to pay for gas, lodging, and food. I made enough sales to cover everything but the food, so it wasn't a huge loss, but still a loss.
Setting up
This was my first show that did not have night before setup (it was in the middle of a road, and the road wasn't closed until the morning of). I was a bit nervous about getting everything done in the morning. We're still getting the process worked out and optimized, and it takes us almost 3 hours to setup, after which I'm usually a bit tired. This show, setup ran from 7AM to 10AM, so not only would I be setting up right up until the start of the show, I'll also be doing it a bit tired (I'm not at my best early in the morning), and then I'll be exhausted once the show starts.
Well, we managed to get everything setup in time, and as a bonus, it was pretty cool out so I didn't work up much of a sweat.
Booth layouts were a bit different this time...11 feet deep and 15 feet wide. I had no back space, but 5 feet of side space. I rearranged my grid panels to compensate by removing the middle panel of the left wall (previously I removed the rear middle panel. I think I liked this layout better since it gives you an entire back wall to work with, and the back wall is more visible to someone looking into your booth. I thought it made for a better display.
In addition, I also had some extra electrical conduit and right angle connectors that I had brought for the purpose of setting up an awning to sit under. I made these for the previous show but never got a chance to set them up. We gave them a try this time and turned our 5 feet of side space into a covered sitting area.
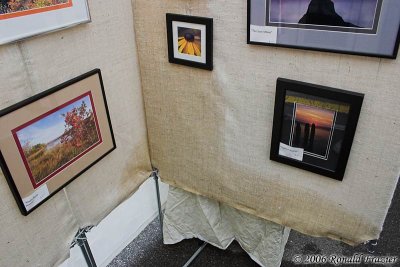
Here are some pictures of the booth all setup. You can see my wife sitting under the awning on the left.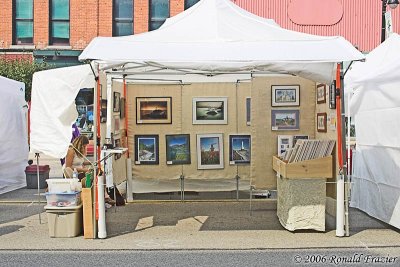
One thing you will noticed is that my panels are now covered. I never got around to writing about it, but about 3 weeks ago I spent about $80 on burlap fabric and thread and spent 3 good long evenings behind the sewing machine. End result are some nice looking fabric covers for my grid walls. I'll try to post about these at a later date, but just thought I'd point it out for now.
First Day
First day was slow. It appeared to be on the verge of rain all day, but none came during show hours. However, I only managed to make a couple of sales. After the end of the first day, the rain was very obviously coming, but it looked like the worst was going to be to the north and south of us. To be safe, I packed all of my matted prints away in waterproof containers. However, with the framed prints on the wall, since they are more time consuming to put back up, I decided to take the chance and leave them on the wall. After all, I had already tested the booth through storms at home and had no leaking problems. I wasn't really too worried. I just took off a few prints that were close to the front corners, where I wasn't able to zip up the zippers for the to foot or so due to the awning.
I returned to my hotel, and then the rain came. I wondered often how things would turn up. Would my new PVC contraption be as good at keeping the roof from pooling water as I though it would? Would everything hold up? How would the other artists fare?
Day 2: The Discovery
The next morning, the show was scheduled to start at 11am. I only had about 20 minutes of setup work to do, but I arrived 90 minutes early anyway, just because I had nothing else to do in town. When I got to the booth, my first observation was: no pooling on the roof...so far so good. As I got closer, I realized the awning, which I had left up (not expecting it to be an issue) had collected a massive pool of water in it. I drained it before realizing I should have taken a picture of it. However, it was still raining, so when it collected some more water, I took a picture: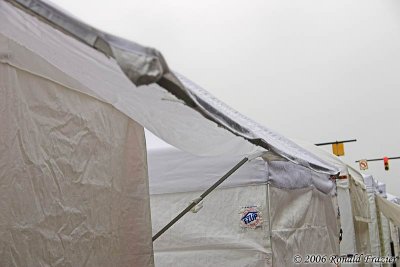
When I got inside, there was a lot more water in there than I had expected. The first thing I noticed was that my work shelf was covered in water. Luckily I had cleared it of everything (business card, calculator, sales slips, etc) the night before, so nothing got damaged. Here is the water on the shelf:
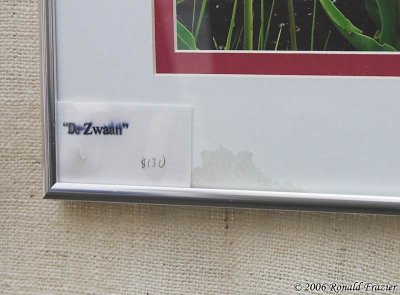
Next I noticed it had got on one of the frames and soaked the price card, but fortunately nothing made it under the glass:
Then I realized the back wall was quite wet, and that a couple of the photos had taken some water damage to the matting:
Another corner had taken on LOTS of water, but luckily none got into the frame:
In addition, there was a nice size pool of water in the print bin, so I'm lucky I had taken the matted prints out to protect them.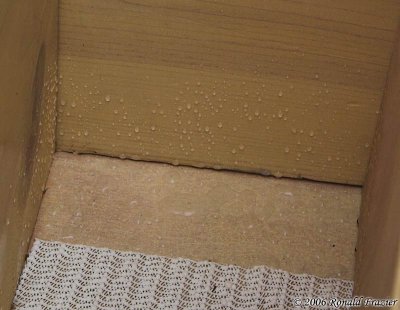
Now I had to figure out just what happened. Where was the water coming from? The first thing I noticed is that the water was running down the tent frame and dripping off at the low points.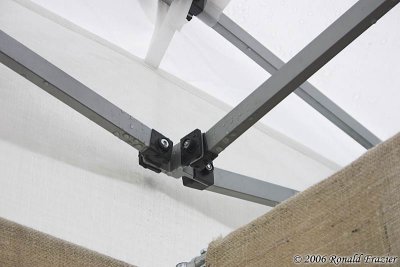
That explains why certain areas of the walls (namely the center of each of side wall) took on most of the water. However, that was the least of the problems. The entire inside of the roof was covered with water. Whenever a breeze shook the tent, water dropped down everywhere. Where this water came from, I can't exactly be sure. It could have came through the seems, but it was everywhere. My best guess is that it just wicked through the top. Not good.
Next thing I noticed was that the roof velcro along 2 of the sides had come unfastened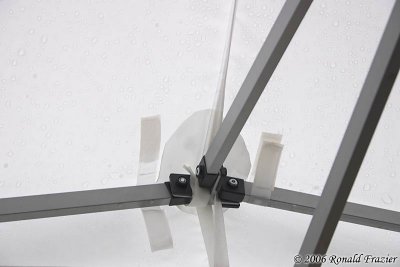

Cleaning Up
So now came the fun part...putting humpty dumpty back together and cleaning up his splattered innards. We started by using one of the waterproof box lids like a squeegee and wiping and shaking all the water off the entire bottom side of the roof. Once that was done, we got to work drying off all the frames. However, in the middle of each side, water continued to drip off the tent frame, so we cut open some plastic back and taped them up the to catch the water and divert it off the back side of the panels. We did a similar thing above the entire print bin. Now, with that obstacle overcome, we were able to clean everything up and getting our booth back in order.
We weren't finished with the cleaning until 11:15...15 minutes after the show began. However, it was still raining, and as such, there weren't any more than a tiny handful of attendees at the show yet. I took the opportunity to take a walk around the show and see how everyone else was coping. Lots of people were having water problems much worse than me, so I considered myself lucky. A few people set their displays back up, only to have to take them down again because their roof continued to leak.
One thing I was finally able to find were people using hoola hoops. Even though I already had come up with a PVC solution, I decided to take some hoola hoop pictures for those of you who haven't yet worked something out:


The first photo shows someone using hoola hoops in the center of each side. Although it seemed to work for him, as the second picture shows, the corners are VERY close to pooling. The third photo shows someone using hoola hoops in the corners instead. I'll leave it to you to figure out which way works best.
Working Day 2
The rain continued to fall until about 2:15pm, so half the show was lost there. After it finally cleared up, attendance picked up a bit and the show was moving once again. Or at least the customers were moving....but not the merchandise. By 3:30pm I still hadn't made any sales, so I was a bit down.
That's when it happened. A customer came in and said "You had a picture of Mount Rainier". Suddenly I remembered...I had spoken to someone yesterday about getting a picture of Mount Rainier for her mother, but she said her mother was at the show with her, so she'd be back for it. Well, she sent her sister back to pick it up in her place, but that was good enough for me. I showed her the options, she picked out the print, size, and color she wanted. I wrote up the receipt, imprinted her card, and got halfway done with filling out the credit card slip when she said....wait a minute, I just need to check with my sister on something. She stepped out of the booth to where I couldn't hear her, called up her sister, talked for 2 or 3 minutes, and then came back and said she was going to have to forgo the purchase because they came up with a different idea instead.
I was furious. After being so down about how things had gone the previous day, then the rain, then no sales most of the day, I was feeling a bit depressed. Then this customer came in, lifted my spirits way up, and then pulled the rug out completely from under me. I was calm enough not to explode or say anything nasty. In fact, I didn't say anything at all. I couldn't even look her in the eye as she apologized several times for backing out. I just gave her the cold shoulder. I realized later that was a bit of a mistake...what if she later changed her mind and decided she really DID want that print. I probably blew that opportunity. I should have played it cool and said something about "well, if you do change your mind, I'll be here until 5 tonight". Oh well, lesson learned.
I'm still not sure why she backed out? I tried asking when she first said no, but didn't get anything other than "We're going with a different idea". Did she not like the print her sister picked out? That didn't seem to make sense, because when I showed her the options, she instantly knew which one she liked, and there seemed to be no hesitation about it at all. Did she end up seeing my print and deciding "I have my own pictures, and now that I see what you've done, I get my own printed and mat it up like that much cheaper"? One of life's mysteries.
Later that day, I did end up getting one sale, and it was another lady who was back to buy a print from the day before. At the last moment, she decided to get a different print than the one she came back for, but at least she didn't back out of the sale.
The show ended, I packed up, and got out of there.
Conclusions
The show sucked for me and a lot of other people. I've got some ideas from this show and thinking things over, but it's deserving of another post all on its own. So I'll just wrap this one up for now, simply saying that I need to work on waterproofing and better protecting my work from the rain. The best option would be a better tent, but with a string of relative and actual failures lately, that's not really financially an option at the moment. What I need to do is get some waterproof spray and seal the roof, get some snaps to try and use in place of the velcro, and figure out a good secondary line of protection just in case thing leak again.
...click here to read more!
Thursday, August 17, 2006
Protecting my booth from rain
So far I've been pretty lucky. I haven't had any rain at any of my shows. I'm hopeful that it stays that way for quite some time, but "hope" is never a very good disaster plan. The smart thing is to prepare for rain and be ready if it shows up.
Now, you might be thinking "wait..you've got a tent over your head, so what are you worried about?" That's true. The tent does offer me a large degree of protection from the rain, but it's not foolproof. The biggest problem is the shape of the EZ-up style canopies. They use a pyramid shaped roof, but the only support points of the pyramid are at the top-center and the 4 corners. The end result is that, unless the top is pulled and kept completely tight (which is near impossible to do), you can get sagging in the roof, which can lead to puddling and then eventually (if you are unlucky) collapse.
Take a look at the following photo. The red arrows show the places where I've seen puddling occur when I setup the tent at home in a rain storm.
I never let it happen, but I expect when the puddling gets large enough, the canopy could rip away from the sides, exposing the framed artwork directly to rain. Then to make matters worse, once one side collapses, the roof would lose some of it's tension, and then the other 3 sides would be at increased risk of collapsing.
Lots of people online have discussed propping up the canopy using all sorts of objects, ranging from foam funnoodles, to hoola-hoops, to pvc piping. Of course, the one thing all of these discussions have been short on were pictures. I've been trying to find a photo of just what these setups look like. I've looked around at a half dozen local shows and haven't seen anyone using anything like that either. So, with only vague descriptions, I set out to try and create something to do the job, as well as document it here so that others have at least something to refer to.
I setup my tent in the backyard with the legs fully collapsed, so that the canopy was as low as possible. This made it easy to get inside and play around with different ideas without having to use a ladder. After playing around with several ideas, I figured out a way I though would work. My plan was to use PVC piping. I spent about $5 and bought:
(2) ten foot long 1/2" PVC pipes
(4) 1/2" to 1/2" PVC couplers
(4) 1/2" PVC right angles.
Before on continue on, let me first say that you should do your own investigation and measurement before you continue on. What works for me may not work for you, depending on the dimensions and design of your canopy.
First, I took each ten foot pipe and cut it into a 5 foot section, two 2 foot sections, and discarded the remainder. I then assembled it into a C shape : 2 feet, right angle, 5 feet, right angle, 2 feet. I then needed some way to connect this to the framework inside my canopy. I decided that I could cut a slot in the end of the pipe and slip it around one of the supporting beams in my tent. However, the supports of my canopy frame were 1/2" wide, which would hardly leave any material left to provide strength. This is where the couplers came in.
I took each coupler, used a 1/2" wide piece of matboard to help me mark a 1/2" slot on the end of one side of each coupler, used a hand saw to cut down halfway into the coupler (don't cut any more than halfway), and then used a pair of needle nose pliers to grasp each cut piece and snap it off. The end result looks like this:
Then you put one of those on each end of your C-shaped assembly, and you get this:
And here a better look at the end after it's connected
Now, you put each of the 2 assemblies inside the tent and attach it to the frame, and it looks like this:
The following pictures gives you a better idea of just how it hooks onto the frame:
That's it. Just those couplers holding onto the frame, the canopy holding down on the assembly, and it stays wedged in place. It would probably also be a good idea to tie, zip tie, or velcro wrap the centers of each assembly to the center post to help keep it in place even better.
Now, take a look at the outside when it's done:
In the following before/after pic, take a close look at the shape of the shadow that runs across the canopy. In the before shot, you can clearly see the shadow dipping down into the valley where I reported the pooling occurs. In the after shot, the valley is gone, and the shadow no longer dips.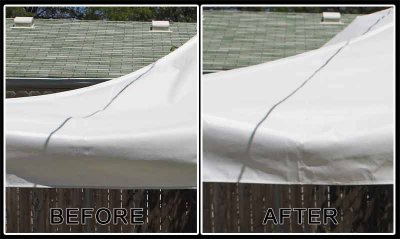
Just as an initial test, I pulled out the hose, started spraying down the canopy, and no water collected anywhere. Everything ran right off, no problem.
When you've got everything working,and you are happy with the entire setup, then you can use PVC cement to connect the pieces together permanently. I haven't done that yet, because I might play around with things a bit more just to make sure I've got the best arrangement.
When it's all done, you've got a solution to the puddling problem which takes up very little space in your vehicle and only adds about 60 seconds to your setup time.
...click here to read more!
Thursday, August 03, 2006
Initial Impressions of Adobe Lightroom
As I mentioned a few weeks back, Adobe has purchased Pixmantec and put them to work helping on Adobe Lightroom. Well, the beta of Lightroom is now available for Windows, so I gave it a try.
Overall, I like the way it works a lot. I've been using RawShooter Premium for some time and really love the way it works. Lightroom seems to have most of the functionality that RawShooter provided, plus has some additional features. The built in Library cataloging features is quite nice. I especially like the much improved adjustments. The new curve sliders feature is very nice, as is the split toning, and color-specific saturation. Feature-wise, I'm VERY impressed with Lightroom
The one thing I absolutely hate is that it crawls as slow as a turtle. Yes, I understand it's a beta and still in development and thus unoptimized (I'm a computer programmer by day, so I understand how this stuff works), but knowing that still doesn't make it any less painful to use at the moment.
Plus, I'm seriously worried about just how fast it could possibly be when finished. The Bridge and CameraRaw features of Photoshop CS 2 are fully optimized, production features, yet they are STILL slow as a can be. Lightroom does it's raw conversion using a new version of the CameraRaw plugin which features even MORE adjustments than before. I seriously don't see how Adobe is going to be able to make it do more than before, yet be significantly faster (unless they were just incredibly lazy with optimizing the previous version).
RawShooter, on the other hand, is a little speed demon. Previews build in a half second, adjustments effect the preview instantly, and full size conversions only take about 3 seconds. I would LOVE to get that type of performance out of Lightroom, but I'm seriously worried that it's NOT going to happen.
For now, I'm only using Lightroom to process my photos from Maine, and I'm only using it to make adjustments to those photos. I'm not going to import my whole catalog or bother keyword tagging any of the photos. I don't want to get too caught up in it and put too much time and effort in until I find out how it turns out.
...click here to read more!
Wednesday, August 02, 2006
Upgraded to the Logan 650 Framers Edge
Back in March of 2005, I mentioned that I bought a Logan 450 matcutter, and then I followed up with instructions for modifying the matboard to add a squaring arm with production stop.
Problems with the Logan 450 + modifications
After using that extension board for a while, I found that it wasn't always spot on accurate. Either the squaring arm would shift over time, or the extension board would be just a tiny bit loose, but loose enough to throw off the squaring slightly. I also found that getting the original 3" squaring arm perfectly lined up with the extended squaring arm was quite difficult, and as a result cutting tall but narrow sections of matboard was difficult.
After a while of dealing with all of this, I just gave up and reverted back to hand measuring all of my mats before cutting. Of course, the problem here was that the process became very time consuming, and there was a loss of accuracy in the process.
Another issue I discovered as my first show drew closer, and my rate of cutting ramped up considerably, was that using the 450 was a bit uncomfortable. The way the you had to depress the cutting blade with your fingers, but at the same time ensure that you keep the angle tool firmly on the slide (since it's not attached in any way), cause a bit of stress on my hands wrist. It was quite uncomfortable.
Finally, since both the cutting tools are NOT attached to the slide, they have a tendency to wobble or angle every now and then, resulting in cuts the bow a little bit.
The Logan 450 served me quite well as a budget cutter in my startup stage, but now that I'm getting more serious, it was time to get a bit more serious of a tool.
Picking out a new model
I had looked around at some of the other popular and highly recommended brands, such as Fletcher and C&H, but decided that with a cost of $1000 or more they were a bit out of my league. The Logan 750 was a step above my 450, and included the built in squaring arm (which solved a few of my issues) but it used the same basic mechanisms as the 450, so it wasn't a very considerable improvement over my current situation.
Instead, I opted to go right for the Logan 650 Framers Edge cutter. It's quite heavy duty in construction, the squaring arm is very rigid, and (most importantly) both cutting tools (straight and bevel) are securely attached to the slide (which means they don't come loose or tilt, and it makes the cutting less of a strain on the hand and wrist).
The Logan 650 normally sells for over $450, but I was able to get in on a really great deal (I had an old 30% off coupon from my local shop) and got it for $320. That was a price I couldn't resist.
Unpacking and setting up
My only complaint with the way things were packed was that the included instructional DVD was jammed in there in such a way that it was warped enough that I wouldn't dare consider putting it in any DVD drive.
UPDATE: I must add that I'm quite impressed with Logan's response over this matter. Without me even contacting them, I've been emailed twice by employees of Logan Graphics (Brian Buell - Director of Sales, and Connie Miley Cook - Director of Marketing). They both saw my blog, noticed my complaint, and offered to ship me out a replacement DVD.
When taking everything else out of the box, I was alarmed that there were screw marks on the squaring arm, indicating that it had already been installed once. At first I thought maybe I had received a refurbished unit. However, when I went to install it, I realized that there were precision adjustment screws to fine tune the angle of the squaring arm and ensure a perfect 90 degree angle. I then realized that the unit had probably been calibrated at the factory, and was thus relieved (actually, I was impressed). When I put everything together, a quick check confirmed that indeed, the squaring arm was perfectly square, and the parallel bar was perfectly parallel. So far so good...I was completely satisfied.
UPDATE: Brian Buell also let me know my assumption about it being assembled at the factory was correct. Here is what he said:
"Yes we do install and calibrate the squaring arm along with everything else. In fact, each machine is built from the base board up from one person, tested, then re-tested and packed by another QC person. So technically the machines are used during testing before being packed."
Putting to actual use
I've only been using this for a couple days now, and I've only cut a very small number of bevel cuts, so it's probably not fair to comment on that part of the tool. However, from the little bit I did use it, the bevel cutting seems to be perhaps a bit better then the 450. I'll post an update when I've used it more.
On the other hand, straight cutting (ie: cutting full sheets of matboard down to size) was MUCH easier. Absolutely no pre-measuring was required, and almost every single cut came out perfectly square. I had a few mistakes early on where the cut came out slightly off (and by slightly, I mean very close...well within acceptable tolerance for an 11x14), but as I got better at the process, I didn't have any more problems. In the course of a few hours, I was able to take all the bevel edged remnants I had from window cutting my 11x14 and 16x20 mats, and trim down into over 100 8x10 and 11x14 mats. That cleaned up a big pile of clutter I've had sitting around for several months now.
Next I took about a dozen sheets of foam board, and in about 10-15 minutes was able to trim them all down to 8x10s, 11x14s, and 16x20s. It was VERY quick...just a small fraction of the time I spent previously.
Conclusion
So far, I'm very satisfied with the Logan 650 framers edge. Just based solely on the straight cutting improvements, it was well worth the money. After I get to work on some bevel cuts soon, hopefully I'll discover that it was an even better investment. At this point, I have no regrets and would highly recommend it.
...click here to read more!
Tuesday, August 01, 2006
Here's what's been going on
Just wanted to break the silence here for a moment, since I haven't posted in a couple of weeks.
Right after my last post, I left for a weeklong trip to Maine. We drove from Detroit to the far end of the Maine coast (Lubec), and then worked our way back. We hit 21 lighthouses (18 in Maine, 1 in New Hampshire, and 2 in Canada), spent a couple of days at Acadia National Park, and did a mini tour of Stephen King related sites in Bangor. I was a bit disappointed with the weather. Once we got to the coast, the first 3 days brought us tons of fog. If you moved inland enough to escape the fog, the skies were perfectly clear with few clouds, making for harsh lighting. After the fog was gone, the cloudless skies continued for the majority of the trip. I was able to get a few good shots in the early morning fog and after sunset on the second day, and there was also a halfway decent sunset at one of the lighthouses the next day. However, overall I was less than satisfied with the results I came home with.
Last week, other things came up preventing me from getting much done other than doing some preliminary sorting of my Maine photos. Among those issues was having to put my cat Friskie to sleep. Forgive me for a brief deviation from photography into this personal issue (though what good is a blog if I don't post about my cat).
Friskie was my first of 6 cats, and he outlived the rest of them. I picked Friskie out from the litter only an hour or 2 after he was born. Here's a picture of me holding him when I was 11 years old and he was probably only a week or 2 old. .
.
Friskie was a big cat. His weight peaked at just over 20 pounds. The following photo was taken 4 or 5 years ago, sometime after he started losing weight. He probably weighed 16-18 pounds at this time: .
.
Four years ago, Friskie was diagnosed with partial kidney failure. He started going through occasional 2-3 day periods of not eating, and each time he lost a little more weight. Past experience has shown me that the sooner a cat loses its weight, the sooner it dies. To combat this, we increased his feeding schedule to help maintain his weight better and we had some success with this. His rate of weight loss slowed considerably. Of course, the downside to this is that it puts an increased burden on his failing kidneys. It was a case of damned-if-you-do/damned-if-you-don't. We did what we thought was best and were able to keep him alive and very happy for the last 4 years. In fact, he was the most playful he had been in quite some time. You haven't seen anything until you've seen an 18 old cat running at top speed around the house chasing down and tackling my wife's 3 year old cat.
However, in the last few months, his behavior took a downward turn and he was no longer interested in playing or getting attention. His day consisted solely of eating and sleeping. This last Wednesday and Thursday, he started eating very little, and by Friday I couldn't get him to eat anything at all. I've grown accustomed to this scenario over the years, however this time his behavior was different. Instead of being uninterested in food, he seemed very anxious to eat but couldn't find anything he wanted to take more the 2 or 3 licks of. By Saturday he was meowing for food nonstop almost the entire day. We tried several different flavors of 5 or 6 different brands of cat food, along with a variety of human food (tuna, salmon, sardines, chicken, roast beef, lunch meat, baby food, ice cream, etc), but he wouldn't take more than a few licks of anything before returning to meowing for food. By Sunday, he wasn't even meowing anymore, and instead spent the morning laying around with no energy.
Friskie was almost 19.5 years old. He was the friendliest and happiest cat I'd ever seen. He was my companion for nearly 2/3 of my entire life. I was lucky to have such a wonderful friend for so long. .
.  .
.  .
.  .
.
...click here to read more!
Thursday, July 13, 2006
Adobe purchases Pixmantec...discontinues RawShooter
In the few years since I've been shooting digital, I've shot almost exclusively in RAW mode. Initially I used my favorite tool of the time, Adobe Photoshop, to convert each raw image. However that's a bit poorly designed from a raw workflow aspect. It was at that time that I learned about (and soon purchased) the C1 raw converter. It was a really nice tool, which made it VERY quick to browse through raw files, pick out your favorites, adjust them, and then convert them to TIFFs. It worked well, however it had some definite room for improvement. Unfortunately, the manufacturer never cared much to push any major updates (just bug fixes and compatibility for new hardware), and then half the product line was consolidated, many people were upset about support packages they bought that were more or less useless, etc.
It was not long after that when I heard about Pixmantec's Raw Shooter. Apparently several of the C1 developers were dismayed at the company's lack of interest in further developing the product and their angering of many customers, so they broke off and wrote their own product...Raw Shooter. This was exactly what the next iteration of C1 should have been. A bit better adjustment controls, MUCH better workflow (flagging, prioritizing, etc), MUCH faster conversion processing times, and several other features. This became my second raw workflow purchase and before long C1 was little more than an unused icon on my start menu.
Well, I just received an email today alerting me that Adobe has purchased Pixmantec and is going to be incorporating their technology into Adobe Lightroom. On the down side, this means they will be discontinuing RawShooter. Yet another product I purchased which was then abandoned. However, the good news is that Adobe will be offering RawShooter premium owners a free copy of Lightroom 1.0 when it becomes available. At least I'm not being left out in the cold on this one. That's very generous and thoughtful of Adobe. It makes me quite happy because Lightroom (from my casual readings every now and them) is turning out to be quite an interesting product...hopefully a much better product than RawShooter. If it maintains the same ease of workflow but provides better integration into Photoshop, I'll be one very happy camper.
So, I'm initially disappointed about the news, but I'm hopeful that the eventual reward will be much greater.
...click here to read more!
Third show over - another bomb
I had my third show this weekend in Warren, MI. The show ended up being another bomb. Over the 2 days, I only sold about $300 worth of stuff, so I at least covered my booth fee, materials, gas, plus a small profit (probably about $100). At least I didn't lose anything, but that's certainly very little reward for a whole weekend of work.
Even though I've done bad these last few shows, I'm not particularly concerned. I know the problem here is that I've picked these shows all with absolute nothing to base my decision on. I've now got a list of about a dozen shows that I've heard are pretty decent, but they've all passed or I missed the deadline. For this year, I'm just going to tough it out. I've got 2 more shows planned, and then I'm going to try and hit a half dozen more shows this Sep-Nov. The idea is to gain more experience and exposure, pick up more tips from other artists about setup, sales, and good shows, get more inventory built up, and get a better idea of what works and what doesn't. Then I can hit the art show scene full on next year and hope for much better results.
Here's the summary, with less play-by-play than my first 2 shows.
Unlike the last show, traffic was not a problem this time. Although it was nowhere near packed, there was a lot more people that last show (probably 3 times as many). The problem with this show was that fewer people were buying things, and for those that I saw carrying stuff around, most of that stuff was tiny stuff that fit in small bags. While you can't say for certain, typically that means little $10 items. I checked out a couple of the most popular items I saw, and they were indeed around the $10 mark.
This show was handled a bit more poorly than previous shows. For starters, several of the artists were on ground that was half dirt patches. With the wind kicking up dust, those artists found it a bit difficult. During the show, there were no workers going around volunteering to watch booths while you took a bathroom break. You were pretty much on your own. There was also no Saturday night event for the artists. For the raffle, they gave out $20 gift certificates which could be used to make purchases from the artists. However, they failed to provide any information to the artists about this. When I had a customer come in with one, my initial response was "is this for real"? However, it was a nice older lady, and I figured she wasn't likely to be trying to pass off a phony $20 gift certificate, so I took it without question.
A few good thing I will say about this show. First, setup was easy...we were able to drive our trailer right up to the booth, so we didn't have to cart anything. The same was true for anyone in an outside booth (though the boothless artists in the pavilion had to wheel their stuff a short distance, but not far). The second is that the booth plots were roomy, with about 3 feet extra in back and on one side. Coordinating your setup with other artists (pushing your booths to opposite ends of your plots) gave a 5-6 foot area behind and to one side of the booth.
The booth was already feeling quite warm by early Saturday morning, so we ended up opening up the back and side walls. The artist behind me then took her rear wall, and draped it from her canopy top to mine, so we had a nice covered awning in back. Then the neighbors to the side did the same. It gave us all a nice shaded area. We had our own mini pavilion.
I finally figured out a layout for my booth that I'm pretty comfortable with. I took the back middle panel out and put it in the center of one of the side walls, dividing it into 2 areas, with my print bin in the front area. The only problem is that my print bin is almost at capacity, so I'm going to need a second one pretty soon, but I'm not sure where I'd like to put it. It's important to keep my booth feeling roomy and not cramped.
I'm happy to say that I did win an honorable mention ribbon for my West Point Impressions photo. I received a ribbon but no cash prize (cash was only for the top 5 in each category).
During tear down, it was a bit windy (but not bad). One artist who was new (not that I'm a veteran or anything) had borrowed his booth (one of the lower end easy up styles) from a friend. He had tied his concrete weights to the booth and suspended them about 4 feet off the ground (a big no no, especially with a booth that flimsy). A little push from the wind sent the leg at an angle, causing the frame to bend and the front of the booth to fall to the ground (at least it didn't happen during the show). Myself and 2 other artists rushed over to give him a hand standing the booth back up, untying the weights, and getting things back under control. We told him not to hang the weights in the future. I then showed him my newly purchased ratcheting cargo straps (which by the way worked great for holding the weights to the booth) since they are much easier to setup and tear down than tying/untying knots.
Anyway, that's how things turned out.
A few things I learned:
1) I definitely need to get some very inexpensive items. I've already picked up some notecards to work on before my next show. I'd like to find some good greeting card options before then too.
2) Keep an eye out for other artists, and be ready to lend a hand when they need it.
3) I need to start focusing on tying up some of the loose ends of my business, like building an email list, getting descriptive tags on each item, etc.
4) I need to get my panels covered soon, so that I can open up the back of my booth without people being able to see right through the grid walls.
...click here to read more!
Monday, July 03, 2006
Online ordering available
I spent the last 5 days or so (or at least, what time I had available) working on getting online ordering available from my website (http://www.ronfphoto.com). I thought I'd just post a little about what I did there.
It starts with your standard process: view each image, when you find one you like, click the buy now button, and then choose your print size. From there is where it deviates a bit from what most other photography sites I've seen do. Typically, everyone sells prints online unmatted. However, I feel having the prints matted provides a much stronger product offering.
Of course, the problem becomes how to show them online in their matting. You could take a photo of each photo in each matting combination you offer, but that can get to be time consuming and tedious each time you add a new photo to your collection. You need to setup the print and your camera, adjust it all so it's at the proper angle and so that there aren't any glare or reflections on the print, load it into your photo program, do any color correction, cropping, transformation, etc. It really can get to be a lot of work. And then what happens if you later want to offer a different color matting on a photo. Start all over.
I set out to solve this with a bit of my computer programming know-how (after all, web development is a large part of my day job). I started by taking a piece of each color matboard, scanning each one into Photoshop, cropping it down to a 200x200 pixel image, touching it up so it can be tiled seamlessly, and saving it to a jpeg file. Then I created a database table to catalog each mat color with a unique id#, color description, file name, and core color.
GEEK ALERT: the following paragraph contains some web development techno-jargon which may not mean a whole lot to you!
Next in the HTML for my web page, I took the photo's IMG tag and wrapped it in 4 DIV tags. The first (outermost) one represents the width of the outer mat. The second one represents the bevel of that mat. The third and fourth tags represent the width and border of the inner mat. The 2 mat DIVs were CSS styled to have enough padding to give them their appropriate dimensions. The web page (which is actually a PHP script) then dynamically generates a series of CSS classes for each mat color. Each CSS class simply specifies to use the corresponding jpg file to tile the DIV's background. I also generate a corresponding CSS class for each mat color which defines border colors that will give the bevel DIVs the appearance of white core or black core bevels. Finally, I have javascript code which, when given a pair of colors (or a color and no second mat) assigns each of the 4 wrapping DIVs to have the appropriate CSS class to give the appearance of the desired matboard (or matboard combination).
END GEEK ALERT.
For each photo I have defined an "Artist's Pick" color combination(which I think best accents the photo), a simple single layered white mat option, and a pick-your-own custom mat option.
Now we are back to the ordinary shopping experience. After you make your selections, you can add the photo to your cart. The cart stores all of your choices in a database, calculates prices and totals, and handle discounting options. The discounting option was bit complicated to work out in a reliable and flexible manner, but I eventually got it working...I'll leave it at that save you from having to sit through another geek alert.
When you are done and go to checkout, you are presented with 2 options. The first is to order online, which sends all of your cart data over to paypal, where you can pay with either a credit card or a paypal account. The other option is a mail-in order form, where you can pay by credit card, check, or money order. This option gives you an order form with all of your photos and pricing filled in. You simply print the order form, fill in your name, address, etc. and payment information, and mail it to my PO box.
Now I just have to sit and wait for my first order to come in...any blog readers want to volunteer (you know one of my photos would look perfect in your living room) :-) I'm always nervous when rolling out new features like this. I did extensive testing but I'm still paranoid I overlooked something critical.
Now that this is done and out of the way, I can get back to working on my prints. Maybe I can get everything all done and ready in the next day or 2 so that I don't have to stay up until 1AM the night before this weekend's show. It's feeling really good to have my initial shows out of the way and to start to fall into a regular, less panic-filled routine each time, as all the additional pieces of the puzzle gradually fall into place. Maybe one day soon, getting ready for a show will be as routine (in a good way) as getting up for work each weekday. Probably not, but one can always hope.
...click here to read more!
Tuesday, June 27, 2006
PVC and cement corner weights
I've had a few questions about how I made my weights for the corners of the booth. I got the basic idea from Larry Berman: http://artshowphoto.com/pages/weights.htm
Except where he used lead, I used concrete. All the parts can be bought from Home Depot or your local home improvement store. Total cost should be $30-$40.
Materials
(1) 10 foot length of 3" diameter PVC pipe
(4) 3" PVC end caps
(4) cabinet door handles (plus bolts/nuts to secure them)
(4) 6" long, 1/4" eye bolts
(4) 1/4" fender washers
(8) 1/4" nuts
(1) 60 lbs bag of concrete mix
PVC cleaning solvent/cement
Instructions
Cut the PVC pipe into (4) 2.5 foot sections. With each section, drill holes and bolt the handle in place halfway along the length of the pipe. It's important to use bolts, rather than the wood screws the handle probably came with. Take a PVC end cap, apply the cleaning solvent to the outside of the end of the pipe and the inside of the cap, do the same with the PVC cement, and put the cap on the end of the pipe. You'll want to give the cap a 1/4 turn as you slide it on, and then keep pressure on it for about 60 seconds to help it seal in place (otherwise the connection has a tendency to slide apart).
Repeat the above process with each of the other 3 sections of pipe. When you are done, you should have 4 hollow sections that look like this: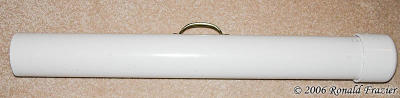
You'll want to let it sit overnight to bond. The next day, take each bolt, apply a nut, then a fender washer, then another nut. Using 2 wrenches, tighten the 2 nuts together so they are tight. You should now have 4 assemblies that look like this: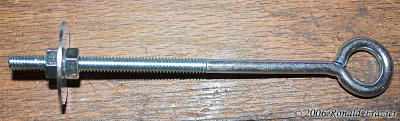
Now you'll want to mix up your bag of concrete. Follow the instructions on the bag. When it's properly mixed, you'll want to start filling each of the tubes. As you are filling it, you should stop 3 or 4 times, pick it up, and shake it up and down a bit to help the concrete settle in compactly. When you get it filled about 4 or 5 inches from the top, insert the eye bolt assembly, push it down so that it doesn't stick up too far, and then continue filling with concrete. You'll want to use a rubber glove so that you can pack the last bit down with your hand (or just do what I do and use your bare hands, as long as you don't mind getting a little messy). Now set the filled weight somewhere where it can stand upright without any chance of falling over. That's important...otherwise you'll have a nice mess on your hands.
You should now have something like this (minus the rope):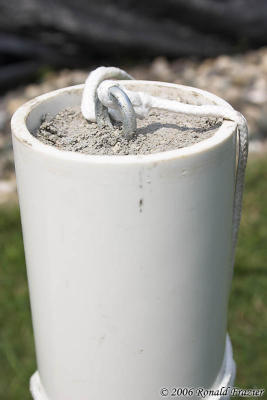
Repeat the process on the other 3 tubes. You should just barely have enough concrete to finish filling the 4th tube. Clean up and let the weights dry for a couple of days.
When you are done, each weight should weigh around 20 pounds. If you'd like more weight than that, you can opt to use 4" PVC pipe instead, which should give you about 35-40 pounds per weight and require two bags of concrete mix.
Now, all you need is a way to attach it to your canopy. I currently just use a section of rope...tie one end through the eye bolt, wrap the other end around the canopy and tie it tight. The problem there is, 1) it's difficult to get it tight, and 2) it's a pain to climb up on a ladder in order to tie it down.
When I was at a show this weekend, I found a better solution in use by another artists. Get 4 moving straps with hooks on each end: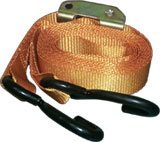
Hook one end through the eye bolt, hook the other end around your canopy frame, and then crank it until it's tight. Ideally, you want to have it tight enough so there is no slack or give, but you don't want to make it so tight that it lifts the weight off the ground or starts to bend your canopy frame.
...click here to read more!
Monday, June 26, 2006
Report on my 2nd show
My second show is over. I had a booth at the 3rd annual Lathrup Village Art in the Park show this past weekend. I made a few sales, got a small taste of defeat, made some friends, got some ideas for my booth, tested out some changes I've made, added a few images to my inventory, refined my salesmanship a little, and a bit more.
Again, like my last show report, this will be a bit long. I want to cover the feedback I received and share some of my sales tactics. However, I'll break it into sections for easy skimming, and I'll have a summary/conclusions/lessons learned at the end.
Friday
In the 2 weeks since the last show, I was too busy working on improving other aspects of my business to even get around to getting all of my sold inventory replaced. I did manage to get it all printed up, but matting didn't take place until Friday morning. It was a marathon of cutting until noon, and it wasn't even done by then.
I haven't had a chance to blog about it yet, but last Wednesday I bought a cargo trailer to make it easier to get back and forth to shows. I wasn't able to get it loaded before now, so I interrupted my mat cutting and started loading up the trailer. Getting that done, catching up on a few important things around the house, and then getting dinner ready kept me busy until 4:30PM, and then it was off for the show on the trailer's maiden voyage (well.....except that I bought the trailer used, but lets forget about that).
We (my wife and I) got to the show, got the registration info, and I learned that my booth had been moved. I was happy to learn that the new booth was in a more central location to the show. We setup and were delighted with the time saving gained, and more importantly, the reduced effort required due to the modifications I'd made to the grid walls. However, the back of the booth was right against a parking lot, so we had no back space to utilize, so we setup the grid walls in the standard arrangement. After getting the booth and walls setup, we started hanging pictures only to realize I had left half of my hooks at home. We ended up hanging as many pictures as we could and then headed home. Total setup time was 2 hours.
I went back home, sat down to watch TV and relax for 15 minutes, then it was back downstairs to finish cutting and matting. I wrapped up just before 2AM, but I had only been able to cut 1 of my time consuming collage mats.
Saturday
I slept well that night and my wife ended up having to wake me at 6:30. I was feeling better than I had for the last show, plus I was able to keep my head away from the door frame this time. So far so good. I went downstairs to cut at least 2 more collage mats, got those put together, lugged all my prints up the stairs and into the truck, took a shower, and left. My wife wasn't feeling well, so it was to be a solo day for me.
After forgetting to take a more efficient route there, and then contending with a closed expressway ramp, I finally made it to the show. I learned that another artists had convinced the show coordinators that letting cars park directly behind our booth was a very bad idea (he's seen cars hit the booths before) so I now had backspace to utilize. I opened up one of the back panels, hung the remainder of the framed photos, placed all the matted prints in the bin, and then spent the first 1/2 hour of the show fine tuning the arrangement of photos.
I then took my seat in the back of the booth and waited...and waited....and waited some more. A few people came in, but the show was pretty dead. When people did come in, I felt like I was in the boonies sitting way back there. Greeting them from the back seemed very impersonal, but coming up front to greet them each time made me feel like I was acting desperate. I didn't like that, so I got started rearranging some more to try and clear the photos out of the back cove, and then I moved my chair there. Now I felt much better...I was tucked out of the way of customers browsing my booth, but still close enough to easily greet them.
Now it was back to waiting...and waiting. My sister came up to visit me, and although she bought something, I don't consider that a sale to credit to the show. Then I waited some more, got a visit from my mom, and then from my wife and mother-in-law, then waited some more, and then FINALLY it was time to close up day one with (for all practical purpose) not a single sale.
During the day, although I didn't have a sale, I did have a number of people tell me they would definitely be back the next day. Yeah, I know how that goes, and although I responded pleasantly, I wasn't holding my breath. I also had a few pleasant conversations with some people about photography and my work. One guy had seen one of the photos I had just worked on in the last week from Pictured Rocks:
"The Malachite Moat" (Miners Castle, Pictured Rocks)
He informed me that there had been a collapse a few months back, and one of the 2 rock pillars had fallen into the lake. Although I was disappointed to learn that, I quickly realized I had my first REAL collectible photo...something that captures a moment that will never come again. I realized I could use that as a selling point.
After closing up, I had debated whether or not to go to the artists reception. Last show I had been too shy to talk to anyone and had just ate my food and split. I decided I'd just run in for some food, so I went in grabbed a table by myself, went and got a plate of food, and then made the bold move of sitting down with someone else instead of by myself. Soon we were joined by 3 other artists (2 of them photographers). We had a good time, and what I intended to be a 10 minute event turned into 2 hours of conversation that only ended because we ran out of time.
I went home cheerful about the friends I had made, but bitter with the taste of defeat. I had 2 choices about how to spend that evening...relaxing and getting some much needed rest, or doing my best to try and improve the show for tomorrow. A less dedicated person might have chosen the rest and said "what's the point", but I looked for something to do.
At the previous show, customers had asked me if I had any Grand Haven or Holland lighthouse photos, and although I had both in my catalog of 13000 shots, I didn't have any ready and printed up. In the 2 weeks between shows, I had picked out this nice shot of the Holland lighthouse and got it ready for this show: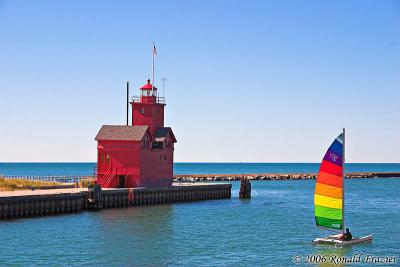
"A Beacon for the Bold" (Holland Harbor Lighthouse)
However, no one ended up buying that photo. Instead, I had more people this show asking me for Grand Haven photographs again. I realized I had missed an opportunity, but I wasn't going to miss it again. I pulled out my catalog of photos, picked out 2 nice grand haven sunset/twilight shots, and worked them into this: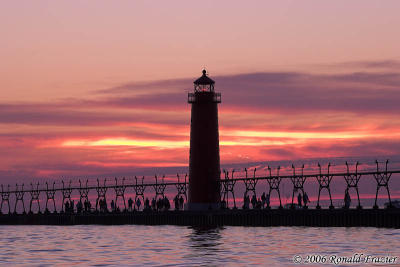
Havenly Sunset
The Twilight Tower
I printed up 1 copy of each in both 5x7 (8x10 mat) and 7x10 (11x14 mat) sizes, and went to bed just before 1AM.
Sunday
Sunday morning, I had a bit more time to sleep, so I didn't wake up until almost 7:30. My wife helped me pick out mat colors for the Grand Haven photos I had made, I cut the mats up, and then was ready to sign them. I needed to come up with names for them. My wife gave me an idea that helped me come up with the name of one ("The Twilight Tower"), and then she came up with the other ("Havenly Sunset", a playful mix of "Grand Haven" and "Heavenly Sunset").
My wife was feeling better today, so we had breakfast, hooked up the trailer, headed back to the show, grabbed some bagels and danishes, opened up, and were ready for a fresh start when the show began at 11am.
It was another slow morning. There were a few small bursts but it quickly died back down. For the first 45 minutes, nothing much had happened. I had a few customers I thought might have been interested, but I just couldn't get them to buy.
Then at 11:45 AM, a couple came in. I talked with them a bit, explaining where several of the photos had come from. The husband liked my photo of "The Malachite Moat", so I shared with him the story I had learned yesterday about the collapse of the tower and how it doesn't look like that anymore. Then the wife liked an 8x10 from Copper Harbor: "A Calm Morrow". I told her about the photo, and then used one of my new tactics by explaining how it was part of a set (one is sunset, the other is sunrise in the same spot the next morning) and how there was a discount on the second print. She seemed willing to buy the pair, but now her husband stepped in and said he really liked my photo of "The Malachite Moat" and that she should get the one she originally liked, and he should get his photo. Not to be too pushy, I let them debate it on their own for a few moments before stepping in and reminding them that a third print is an even bigger discount...just $10 for the third 8x10. They bought all 3...my first sale of the show.
Next, one of the volunteers from the show who had seen me at my last show in Livonia showed up to pick up a set of 4 small framed flowers she had her eye on a few weeks back. A short while later, a mother and daughter had shown up and had their eye on one of the new 11x14's I had just made last night. They seemed very interested but wanted to wander around the show some more first. Then another lady came in and bought both of the 8x10's I had just made up last night. After that, the mother and daughter had returned. Rather then picking up the Grand Haven pic, she went for an 11x14 of my squirrel instead. And then her daughter realized the squirrel was a very good match for a photograph she had just bought from one of the other photographers. It was my only copy of the 11x14, so she let the daughter have it and got herself the 16x20 instead. Then she debated some more and decided to also get the Grand Haven shot she had originally like. Another 3 photo sale. Working on those photos the night before had paid off.
Now a couple came in, looked at my lighthouse collages, thought about getting one for their dad, and then were just about on their way out. I wanted to keep them talking to me and in the booth so I asked if their dad was a really big fan of lighthouses. They stopped, told me a bit about his interest and how they thought about getting one, but then which one do they get, or do they get both, but that's too much money...etc etc. After discussing it for a few minutes, they finally bought both framed prints.
At some point during the later part of the day, another lady came in and loved the "Havenly Sunset" photo I had just made the night before. However, she wanted it in a larger size, but I hadn't had a chance yet to get it enlarged. Remembering my mistake from last show, where I failed to tell I couple I could have a larger print available by the next show, I told this lady I'd definitely have the photo ready by my next show in 2 weeks. Hopefully she'll show up. If she does, I'll be ready.
That was it for the end of the show. We packed up the trailer and headed home.
Thoughts and Conclusions
When it was all said and done, I had sold $405 worth of photos on a booth/jury fee of $145. After gas, materials, and other expenses, I probably cleared somewhere around $200. Not too great for a whole weekend of work, but at least I wasn't in the red. Most of the other artists I spoke with had had similar results.
There were definitely a few lessons this show.
1) Having the cargo trailer made this a heck of a lot easier. Packing up and getting home was virtually stress free.
2) As one of the artists had joked to me at the Saturday night reception, there was a reason we were there that day even if it was a dud. At the time, we both thought it had been for the food. But for me, I now know the reason I was there was to learn about the collapse at Miner's Castle. That gave me a great selling point for that photo.
3) You never give up. All day long, one of my neighbors kept saying you just have to stick it out, because you never know what will happen. At the end of the first day, my other neighbor had asked me if I would be returning the next day. It would never even occur to me to skip out a day early. I paid for the show, I'm going to get what I can out of it. Good thing I did come back, as I made some sales and got some good salesmanship practice.
4) Pay close attention to what your customers ask for. If you can get it, then do so. It paid off with the Grand Haven lighthouses. On Sunday, customers were asking for a few different lighthouses. By the next show, I'll see if I have any decent shots of those lighthouses I can add. A few customers also asked for various styles of landscapes. Over time, I'll build a large enough collection and be better able to have what customers are looking for.
5) Have a functional website ASAP. My website is up, but not yet ready to handle orders. I've had a few people come in and ask for a card because they like to order gifts for people every now and then and they liked my work. I gave them a card and explained ordering will be available in the next week or so.
6) I need to get a fan (although it wouldn't have helped for this show, since I had no electricity) and to make an awning for the back of my booth.
7) Keep a notebook that you write down thoughts and important details in during the show. I did this last time and it helped. I did it again this time, and it reminded me of something important that came up during the show which I had since forgotten about.
8) Perhaps its not a great idea to signup for shows that haven't been around a number of years. I won't let that stop me for the moment, but I'll see what other people say and I'll keep an eye on how other new shows do. If I see a pattern, then I'll stop applying to them.
9) Have postcards for your upcoming shows available in your booth. I had a number of people who seemed interested, including the lady who had the print in a size I didn't have. I gave each of them a business card and a postcard for my next show, so hopefully I'll see one or 2 of them there.
...click here to read more!
Wednesday, June 21, 2006
Grid wall modifications
Before I begin, if you happened to read my posting a while back on the grid wall instructions and then went off merrily to build a set of your own: please don't yell at me after reading this post...I never said the original design was perfect.
When I built the grid walls last year and did some test setups, they seemed easy enough to put together. However, once I got to actually using them, I found a few problems.
1) While they aren't terribly time consuming to assemble, at a real show they are only one of a number of things that need to be setup in short order. Any time savings helps
2) The holes don't always line up easily, especially if the ground is unlevel, or (even worse) if you don't put all the panels and connecting legs/arms together in the exact same order/orientation each time. I had to use a hammer to force several of the bolts through the holes.
3)With the sections bolting together, there was no flexibility in orienting panels at different angles.
4) I wanted to open up a doorway in the rear of the booth.
5) Some shows don't guarantee a level ground. There is no way to easily adjust the leg height with the current setup, should you experience something like a curb running through the back of your booth
6) I had nowhere to work. I needed a desk of some sort, but didn't want to use up valuable space in the booth.
I set about to right some of these wrongs. To fix #1, #2, and #3, I decided to connect the panels together with zip ties instead of using the bolts. This also solved #4, but left me needing a different way to attach the legs. For this I used conduit couplers to easily attach a piece of conduit to the bottom corners of each panel instead of between panels/on the end(so I now have 6 legs per wall instead of 4). This also solved problem #5 in that I could very quickly cut another piece of conduit to form a new leg of any size without needing to lineup and drill bolt holes. As for #6, I cut out a section of the grid from one of the panels and added a fold out shelf in its place.
I'll get into more detail on the changes in a moment, but first a few pictures to get started. To do this as quickly as possible, I set up my booth frame without the roof and vinyl walls, so I'm sorry about the distracting background (try to stay focused on the booth, not my weedy backyard or my too-cold-to-swim-in-at-the-moment pool.
Here is the gridwalls with the doorway in back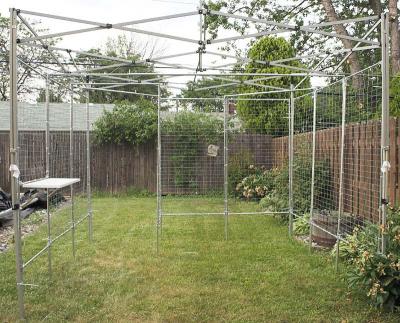
Here's a closer look at how I swung out the corner panel to create the doorway while not losing any wall space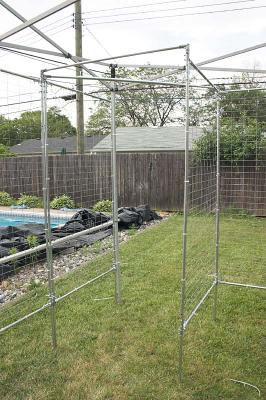
So now for the changes. The first step is to add on the new legs. To do this, I cut away a small strip of conduit where the 2 pieces butt together in each corner. This allowed me room to slip on a straight (ie: no angle) conduit coupler. I then cut 18 pieces (2 legs for each of 9 panels) of 16" long 1/2" electrical conduit, slipped that into the other end of the coupler, and tightened everything down. Here's what the result looks like.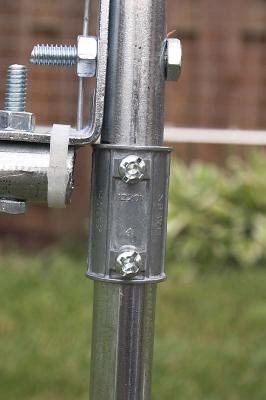
Notice that, if you put any zip ties in the corner, as I did on this panel, you'll have to move them over to the other side of the bolt so that they don't slip off into the newly cut area.
Also, cutting these same gaps at the top allows you to attach the crossbar supports: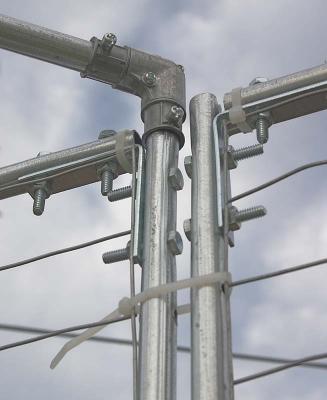
Now, sorry I don't have a better picture of this, but as you can see below, sometimes adding on crossbar is not possible because of the orientation of the screws. In this image, the right-angle connector on the left would not be possible to attach since the screw to tighten it would be inaccessible. To solve this, I attached a straight-on connector (like I used for the legs), cut a 1.5" long piece of 1/2" electrical conduit, and used that to join the 2 connectors together: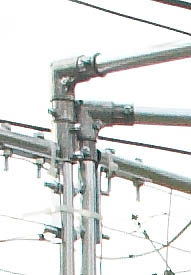
Now, connecting the panels together using zip ties is trivial, but in case you have no imagination, take a look at that last 2 pictures above and you can see the zip ties. Also, with the panels zip tied together, you don't even have to break apart each segment of 3 when you tear down. Just leave them connected to each other and fold the panels together.
Now, about that shelf. As you can see in the image below, I cut away a section of one of the grids, added another piece of conduit going across the pane, got a 10"x36" shelf, attached it to the new bar using hinges, and then supported it with some folding hinges attach to the side of the panel.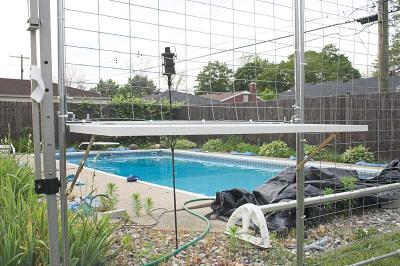
A better look at the primary hinges: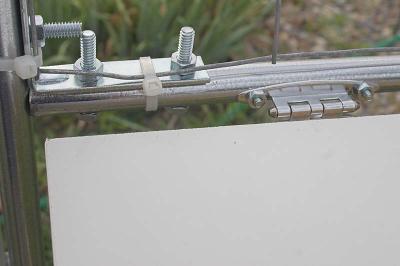
And the folding hinges: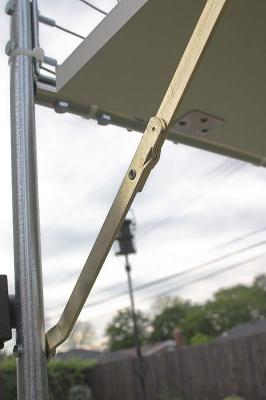
By now, my investment in the panels is probably somewhere around $225, but a bit of that is waste from my trial and error learning/redesigning. The new design actually saves on some conduit and bolts. I'd estimate the original panels using the new techniques could be built for around $150, plus another $15 or $20 if you want the shelf like I did.
As for the effect on setup time, the initial setup took me 4 minutes per set of 3 panels, plus another 3-5 minutes to connect up the crossbar supports. I should be able to shave another 1 or 2 minutes off that figure for each of the 3 sides, since the initial connecting with zip ties has already been done, thus there's no need to lie them down, line them up, and tie them. So total time for the gridwalls to setup (including supports) should be 9-14 minutes. Of course, this doesn't count adding on the legs (which I won't have to do now that I'm getting a trailer), but that shouldn't take more than about 20 seconds per leg (just insert the leg and screw tight with a cordless drill), so add about 6 minutes total if you need to do that (so expect about 15-20 minutes for complete setup).
...click here to read more!
Monday, June 19, 2006
Sources for materials and equipment
As promised, here's a list of some of the places I buy my materials and other items I use, and how they come in handy for me.
Rock N Roller R12 cart
http://www.sweetwater.com/store/detail/R12/
I paid $229 with free shipping. This cart is an incredible workhorse. You can effortlessly wheel equipment across just about any surface. You can configure the cart 7 different ways to haul just about anything (click here to see a video of it ). I'll post more about this cart in a coming blog entry.
Matboard & Foamboard
http://www.framingsupplies.com/
Great prices on boards. A 25 pack of bainbridge archival 1/8" foamboard is just over $100 shipped. Matboard prices are also very good, with a wide assortment of standard and rag matboard from Crescent. One trick...when you order too much stuff, the shipping gets really expensive (due to the large size). If you need to order more than 25 sheets of matboard or foamboard at a time, it's best to break it into quantities of 25 and place separate orders.
Clear Plastic Sleeves
http://www.framedestination.com/
Excellent prices on 100 packs of plastic sleeves. You use these to put your matted (but unframed) prints into. It's a much better alternative to shrinkwrapping (faster, cheaper, and looks better). Most stores sell plastic bags with the adhesive on the flap, which is bad because it can stick to your print and damage it when you insert it into (or remove it from) the sleeve. However, these bags have adhesive on the bag instead of the flap, so your prints are safer.
Clear Plastic Sales Bags
http://www.veripack.com/
These are clear plastic bags you can insert your prints into for a customer to carry them away in after the sale. Clear bags are better because they can show off your work as the customer carries it around (potentially, another show patron could see the print, ask where they bought it, and you could have another sale). I use the polyethylene flat bags in 1.5 mil thickness. You want to make sure the bag is big enough to for the customer to get a good grip on the bag. I'd recommend a bag with a height at least 8 inches (if not more) greater than the print it will be holding. You also want to make sure a couple inches wider than the print so you can get it in easily, especially if the customer buys multiple prints. I use the 18" wide by 28" high bags, which is enough to hold a couple of 16"x20" matted prints. This size bag in quantities of 500 cost $55 shipped.
Bubble wrap
http://stores.ebay.com/pakoutlet
I paid $21 shipped for a 24" x 150' roll of bubble wrap. Other places sell at better rates per foot, but only sell in much larger quantities (500 foot or more), which is more than I need for the moment. This was the cheapest way to get started. I use this to protect the framed prints during transport and when a customer purchases one. Cut a piece of bubblewrap long enough to wrap around the frame, trim it a few inches wider, fold it in half, and tape up (with clear packaging tape) 2 of the 3 open ends. You now have a padded sleeve to slide the frame into.
I think that about covers the majority of my supplies. If I can think of anything else, I'll update this. If you know of a better source for any of these items, please post them in the comments section
...click here to read more!
Sunday, June 18, 2006
Quick update
I just got back from a 4 day trip to Chicago and around the Indiana/Illinois/Wisconsin sides of Lake Michigan. I got a bunch more photos of lighthouses. I haven't had much time to go through them yet. I'm still getting ready for my next show. I'm trying to make some changes to my gridwall setup. Thats partially complete. I need to make a few more pieces and then do a test assembly. I also found a lightly used 5x10 trailer to buy. I'll be picking it up on Wednesday. I'll be posting more details on lots of topics soon.
...click here to read more!
Wednesday, June 14, 2006
Booth photos from first show
As a followup to yesterday's post about my first show, I thought I'd post some photos of my booth setup from this weekend: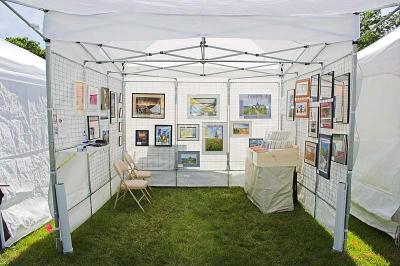
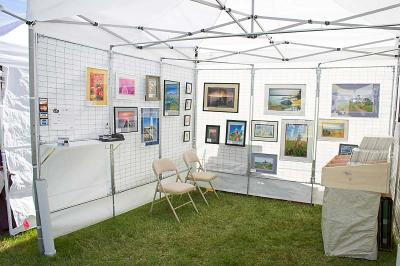
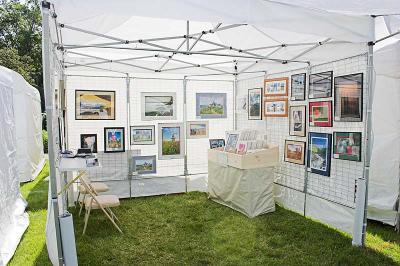
As a means of comparison, here is my booth slide from several months ago: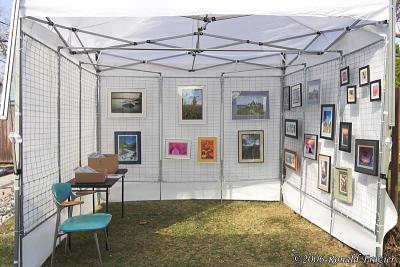
Similar, but the differences are:
1) Lots more framed photos...the entire left wall used to be empty. Now everything is filled
2) I have an actual bin for my photos, they aren't just sitting in cardboard boxes
3) More matted prints...lots more, and I now have 3 different sizes.
4) Got rid of that ugly chair and got 2 decent looking foldup chairs
5) I have a tablecloth on my table
6) The leftmost gridwall has been fixed...I chopped off the bottom section of the grid (which was a bunch of tied together segments) and added the fold out shelf in it's place.
7) Concrete filled PVC weights in the corners.
...click here to read more!
Tuesday, June 13, 2006
My first show is done!!!!
I did it! I can now say I'm a professional!
I had my first show this weekend: Livonia Michigan Art from the Heart. I was pretty happy with how things turned out, attendance seemed pretty good, and the show appeared well run. My goal for the first show was to break even on the jury/booth fee ($270). Counting just sales to strangers, I sold about 2.5x my booth fee, plus another $300 to friends/family (and no, they didn't get a discount). I was more than happy with my results. I heard some artists vowing to never return while others proclaimed it their best show ever. I'll be going back next year.
I sold a variety of photos, but I had one that was a runaway success. It sold 8 copies (five 8x10, three 11x14), was commented on by about 90% of my booth visitors, and was pointed out by countless people who walked by my booth without ever walking in. It was a 12x16 matted, framed print of this squirrel:
Leading Up to the Show
In the last 3 weeks before the show, it was apparent I needed to size up my inventory. I took most of those 30 or so photos and printed up 2 copies each of 5x7 (8x10 matted), 7x10 (11x14 matted), and 11x15 (16x20 matted). The first copy was double matted in a color combination that was picked by myself and my wife to accent the photograph. The second copy was single matted in plain white, as I've heard a number of reports here that white sells better than colors. I should add that all of my framed pieces were done with the colored mats.
A few weeks before, I decided I really did need a good cart to haul these in. Several months back, someone had suggested Rock N Roller carts, and they seemed very interesting to me. I debated over and over whether to save money with a smaller R8 or R10, but eventually I decided the extra $60 or $80 was worth it, so I went for an R12. I also knew I needed some bags for sold items. I bought some 18"x28" clear bags from veripack. I bought 100 packs of clear sleeves from Frame Destination in each of the 3 sizes. I built a nice wooden display box (2'x4') to hold all 3 sizes of prints.
In the last couple days, I decided I needed some business cards. Since I needed an address, I went and picked up a PO box for $25/6 months. For the business cards, I bought the avery clean edge cards ($16 or $18 for 200). Those things are brilliantly designed. Very easy to split apart and very professional looking. I decided to make a variety of cards. Each card had a photo on it. I set up a template in MS Publisher, made 25 copies of the template, and in each one I put a different photo (and put the "title" in tiny print just under it). I put a copy of the corresponding business card in the sleeve with each photo. I did a similar thing with MS publisher for the certificates...making 1 template then replicating it for each photo. The certificates were a complicated affair...doing a "Mail Merge" against a MS Access database of inventory (I'll write more about that in the coming week or 2).
The Day Before
I had already printed all my prints and cut all my mats, but I hadn't yet signed, assembled, and bagged most of them. The day before I spent the morning designing, printing and signing those certificates of authenticity. That took entirely too long(but now that it's done, I'm more than happy with the results). I finished up at about 3PM, got to work signing prints (I put the print #, photo title, date photographed, and signature on the back), and almost had that finished by 5PM. But now I had to stop.
Setup was allowed the evening before from 5-9PM, and I figured that was a better option than trying to rush in the morning, so I was now focusing on that. I had to carry everything upstairs (just the tent, gridwalls, cart, and ladder...everything else went the next morning), and load up the car. It took both my Blazer and the bed of my wife's pickup to get everything there.
My wife helped me setup the tent and grid walls. I wanted to do a practice run with her, but time didn't permit. However, she figured it out on the spot and managed just fine. Took us about 1.5-2 hours to get that all unloaded, carted to our spot, and setup. I was so glad I bought the R12 cart...it hauled like a charm, rolling over grass like nothing.
After that, I was exhausted, but had to go back home and get right to work on the prints. I was up until 1:30 AM putting them all together. Then I still had to come up with pricing and print up signs. I decided on the following price:
8x10 mat: 1st=$20, 2nd=$15, 3rd+=$10
11x14 mat: 1st=$40, 2nd=$30, 3rd+=$20
16x20 mat: 1st=$60, 2nd=$40, 3rd+=$25
For framed photos, I did
18x24 = $130
16x20 = $100
12x16 = $75
and then I had some other various sized frames.
I printed up the signs, started gathering supplies to bring, did my normal bedtime preparations, and got to bed about 2AM. For the next 30 minutes, I kept thinking of additional things I wanted to bring, so I'd get out of bed and make a note. By the time I actually fell asleep, it was about 2:30AM
Day 1
Stupid chirping birds woke me up at 5AM, and I couldn't go back to sleep, so with only 2.5 hours of sleep, I got up at 5:30 and started off the day with a good solid whack of my head into a door frame (left a nice mark in the center of my forehead). I made up some name/price tags for my framed work, packed up, carted the rest of my stuff upstairs, loaded the vehicles, took a shower, and left for the show at about 7AM. Got there, carted everything to the booth (again, the R12 cart performed excellently), hung all my framed work, setup my table and print bin, got out my sales kit (receipts, knucklebuster, cell phone for authorizations, etc). My wife showed up at 9, and I finished up setup about 9:30 (show starts at 10)
They always say your first sale will be your most memorable. Not only was it the most memorable, but it had the most memorable story. 9:45 (before the show officially opens) this lady walks in, spots this photo
and walks straight up to it without even looking at the rest of my booth. She tells my she loves pink, usually wears pink, she lives on flamingo street, and she just painted her bathroom hot pink and was looking for a photograph to match. She looks at the 3 different sizes and picks out the 11x14. SOLD!
I had 7 more sales that day (2 to friends and family).
I screwed up on one thing. I left my wife in charge while I took a break to walk around the show (no that wasn't the mistake...keep reading). I told her to call me if anyone had questions or for a sale. Someone came in with questions about my framed collage of 7 Michigan lighthouses. My wife called me, but my phone ringer was on quiet and I didn't hear or feel it ring. He said he would come back. After quite a while, he never showed up. My wife wanted to buy something from another booth but had trouble deciding. I told her I would take a look with her. I left my mother in law watching the booth, and we left for 2 minutes. In that time, he came back with his wife, they discussed it, she told him "whatever you want", and they left without saying a word. They never did come back. I was kicking myself until someone else bought it 30 minutes later.
My business cards with the pictures seemed to work. Whenever someone clearly liked a photo but couldn't be persuaded to buy it, before they left I gave them a card with that photo. One girl was clearly in LOVE with the squirrel. I gave her the card and she left. My mother in law saw her walking in the next row or booths, clutching the card in both hands, holding it up to her face, staring at it longingly. About an hour later, she came back and bought it. Another lady came back to buy the squirrel the next day.
Other notable point of the day...one of the readers of this blog stopped by my booth (if you are reading this...say hi) to tell me she was interested in attending fairs and had read my blog for ideas. Sometimes I almost wonder if I'm writing to myself here, so it's always great to be reminded that people DO read what I write.
After the show, we stopped at the store to pick up a couple of frames (to replace the collage I sold), I went home and printed up 16 more photos (including 8 of the squirrel). I cut up the matboards, and let it all sit overnight to dry.
Day 2
I actually got 7 hours sleep. I woke up, signed and framed my prints, bagged them up, made a few more business cards, got back to the show, and opened up. Sunday morning was slow....didn't get a sale until almost noon. Then it started picking up. I made 11 sales that day (2 to friends/family). My last sale of the day was a nice one too. I had some pictures of Washington state. Some lady came in, spotted my photo of Diablo Lake, and proceeded to tell me she was from Seattle (grew up there for about 20 years) and was upset that she didn't take any photos while she was there, so she had been looking for some nice photos of the area. After looking at my framed photos, she didn't seem quite convinced. Then I remembered I had one more photo unframed in each size. Using my best salesman technique (which is generally pretty poor) I proceeded to show her only the 16x20 version. She liked it, pulled out a crumpled wad of bills, and just barely had enough. SOLD!!!
My stupid mistake of the day....Some couple liked one of my 18x24 framed photos, said it would be great for their living room, but that it wasn't big enough. Stupid me let them get away, and only minutes later I thought "IDIOT!!!!! You should have told them you can have one made for them and have it ready by the next show"
After the show, my wife and mother in law helped tear down, load up 3 vehicles and cart it back home.
Thoughts and Conclusions
1) Most importantly, I need to get this down to a 1 vehicle job. Best bet is probably to go with a 4x8 trailer. I think that's where all my money for this show is going.
2) I need to rearrange my booth. I don't like where we are sitting. We were sitting in front of the booth for a few hours until one of the other artists spotted us, came over, pointed out where everyone else sits, and suggested we need to move to the back to invite people into the booth more. We rearranged and got us sitting in back of the booth.
I went over to thank him, and he started showing me all the other ways I could setup my booth better. I absolutely love the spirit of the people who do these shows. I did my best to return the favor by helping one neighbor open her booth when she showed up late 30 minutes after open, and I helped another neighbor with info on printing and my booth setup (she normally sells ceramics, but is getting ready for a photography show this summer and doesn't have the display yet)
3)My colored mats far outsold my white mats. I generally only sold white after the colored one was gone. I did have a few people prefer the white mats, and I had one person who upgraded from an 8x10 to an 11x14 because the 8x10 colored had already sold.
4)I need to make my booth quicker to setup. Connecting the panels together each show is too much of a pain. I need to find a better way to do the detachable legs. The most irritating part is that, the whole reason I went with the current scheme of detachable legs and bolt together segments (rather than Larry's zip-tie together grids) was because I couldn't fit the whole panel + legs into my car. If I go with a 4x8 trailer, that whole obstacle has been removed, and everything was made more complicated for no good reason.
5)EARLY PREPARATION IS KEY. I can't stress this enough. By the end of the first day, I went home and thought "I can't possibly see myself doing this any more than a couple times a year". I was happy with my sales but discouraged with the effort involved. After a good night rest, I was feeling much better, and at the end of day 2 I was looking forward to my next show. Being tired and rushed made the whole thing seem 10 times worse than it was.
6)MINIMIZING EFFORT IS ALSO KEY. Its worthwhile to invest money into well designed equipment. I was dreading hauling everything back and forth, but the Rock N Roller R12 made it a piece of cake. It was more effort getting everything there than it was hauling it. I'm excited about the idea of a cargo trailer (so I don't have to load/unload before/after each show, or fight packing it in the vehicle). I'm considering putting the profits from upcoming shows towards a better canopy, and then maybe towards better (professional) display walls. At this point, I'm not the slightest bit interested in recovering my last 2 years of expenses. I want to put everything towards making future shows easier...which will hopefully make me more inclined to apply to more shows.
7)Things I liked about the Livonia show and how it was run (not sure how much of it is run of the mill for shows):
- They did a LOT of advertising in the week before the show. I saw TV ads running during the evening news. Lots of other artists were commenting about how many ads they saw/heard for the show
- Day before setup...I think it's a great idea to be able to setup the night before, then rest overnight before beginning the show the next day (but morning-of setup was still an option if you wanted)
- Likewise, to make setup and teardown convenient, they had the police block off 1 lane of traffic (2 lanes for teardown) so that you could park right in front of the area to load up.
- They had food for artists each morning, and a very nice picnic for us Saturday night.
- They had workers come around to offer to watch your booth while you took a break.
- They had a package pickup area. When you make a sale, you give the customer 1 half of the ticket, attach the other half to the bag, place a flag out in front of your booth, and workers would pickup the package and hold it for the customer at the pickup area. Although I didn't end up having to use it, I thought it was a great idea none the less.
- They had a nice variety of artists/vendors...not too many of any one medium.
8) I was very pleased with the number of positive comments I received. Lots of comments on how my photos were by far the nicest/cleanest looking of the photographers at the show.
9) Surely, theres a bunch of other things I want to add but can't think of.
I'm looking forward to my next show (less than 2 weeks away)
...click here to read more!


