This weekend I had another bad show. This one was in Port Huron. It was my worst show yet. I had the least sales. I made back several times my inexpensive booth fee, but since it wasn't a local show, I had to pay for gas, lodging, and food. I made enough sales to cover everything but the food, so it wasn't a huge loss, but still a loss.
Setting up
This was my first show that did not have night before setup (it was in the middle of a road, and the road wasn't closed until the morning of). I was a bit nervous about getting everything done in the morning. We're still getting the process worked out and optimized, and it takes us almost 3 hours to setup, after which I'm usually a bit tired. This show, setup ran from 7AM to 10AM, so not only would I be setting up right up until the start of the show, I'll also be doing it a bit tired (I'm not at my best early in the morning), and then I'll be exhausted once the show starts.
Well, we managed to get everything setup in time, and as a bonus, it was pretty cool out so I didn't work up much of a sweat.
Booth layouts were a bit different this time...11 feet deep and 15 feet wide. I had no back space, but 5 feet of side space. I rearranged my grid panels to compensate by removing the middle panel of the left wall (previously I removed the rear middle panel. I think I liked this layout better since it gives you an entire back wall to work with, and the back wall is more visible to someone looking into your booth. I thought it made for a better display.
In addition, I also had some extra electrical conduit and right angle connectors that I had brought for the purpose of setting up an awning to sit under. I made these for the previous show but never got a chance to set them up. We gave them a try this time and turned our 5 feet of side space into a covered sitting area.
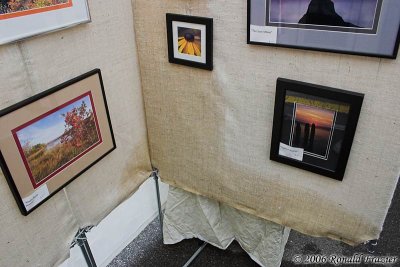
Here are some pictures of the booth all setup. You can see my wife sitting under the awning on the left.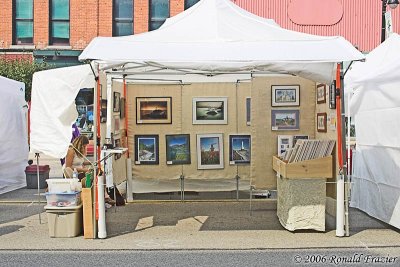
One thing you will noticed is that my panels are now covered. I never got around to writing about it, but about 3 weeks ago I spent about $80 on burlap fabric and thread and spent 3 good long evenings behind the sewing machine. End result are some nice looking fabric covers for my grid walls. I'll try to post about these at a later date, but just thought I'd point it out for now.
First Day
First day was slow. It appeared to be on the verge of rain all day, but none came during show hours. However, I only managed to make a couple of sales. After the end of the first day, the rain was very obviously coming, but it looked like the worst was going to be to the north and south of us. To be safe, I packed all of my matted prints away in waterproof containers. However, with the framed prints on the wall, since they are more time consuming to put back up, I decided to take the chance and leave them on the wall. After all, I had already tested the booth through storms at home and had no leaking problems. I wasn't really too worried. I just took off a few prints that were close to the front corners, where I wasn't able to zip up the zippers for the to foot or so due to the awning.
I returned to my hotel, and then the rain came. I wondered often how things would turn up. Would my new PVC contraption be as good at keeping the roof from pooling water as I though it would? Would everything hold up? How would the other artists fare?
Day 2: The Discovery
The next morning, the show was scheduled to start at 11am. I only had about 20 minutes of setup work to do, but I arrived 90 minutes early anyway, just because I had nothing else to do in town. When I got to the booth, my first observation was: no pooling on the roof...so far so good. As I got closer, I realized the awning, which I had left up (not expecting it to be an issue) had collected a massive pool of water in it. I drained it before realizing I should have taken a picture of it. However, it was still raining, so when it collected some more water, I took a picture: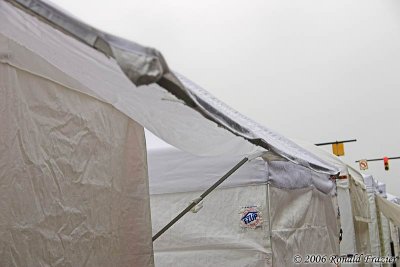
When I got inside, there was a lot more water in there than I had expected. The first thing I noticed was that my work shelf was covered in water. Luckily I had cleared it of everything (business card, calculator, sales slips, etc) the night before, so nothing got damaged. Here is the water on the shelf:
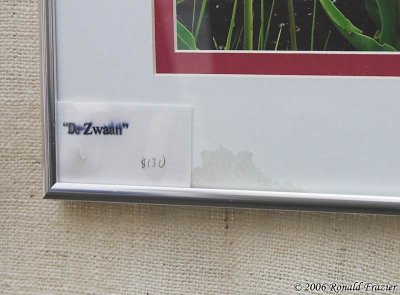
Next I noticed it had got on one of the frames and soaked the price card, but fortunately nothing made it under the glass:
Then I realized the back wall was quite wet, and that a couple of the photos had taken some water damage to the matting: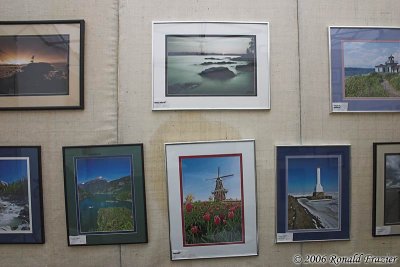
Another corner had taken on LOTS of water, but luckily none got into the frame:
In addition, there was a nice size pool of water in the print bin, so I'm lucky I had taken the matted prints out to protect them.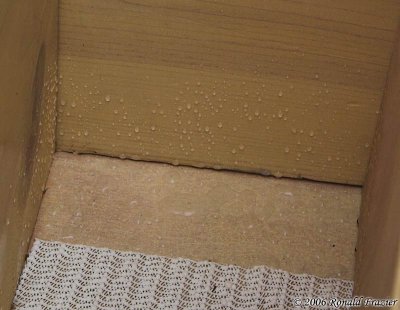
Now I had to figure out just what happened. Where was the water coming from? The first thing I noticed is that the water was running down the tent frame and dripping off at the low points.
That explains why certain areas of the walls (namely the center of each of side wall) took on most of the water. However, that was the least of the problems. The entire inside of the roof was covered with water. Whenever a breeze shook the tent, water dropped down everywhere. Where this water came from, I can't exactly be sure. It could have came through the seems, but it was everywhere. My best guess is that it just wicked through the top. Not good.
Next thing I noticed was that the roof velcro along 2 of the sides had come unfastened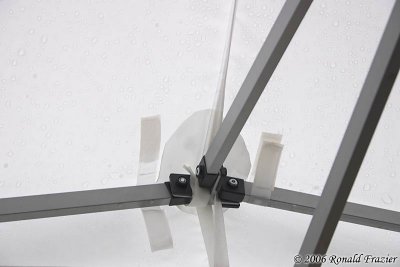

Cleaning Up
So now came the fun part...putting humpty dumpty back together and cleaning up his splattered innards. We started by using one of the waterproof box lids like a squeegee and wiping and shaking all the water off the entire bottom side of the roof. Once that was done, we got to work drying off all the frames. However, in the middle of each side, water continued to drip off the tent frame, so we cut open some plastic back and taped them up the to catch the water and divert it off the back side of the panels. We did a similar thing above the entire print bin. Now, with that obstacle overcome, we were able to clean everything up and getting our booth back in order.
We weren't finished with the cleaning until 11:15...15 minutes after the show began. However, it was still raining, and as such, there weren't any more than a tiny handful of attendees at the show yet. I took the opportunity to take a walk around the show and see how everyone else was coping. Lots of people were having water problems much worse than me, so I considered myself lucky. A few people set their displays back up, only to have to take them down again because their roof continued to leak.
One thing I was finally able to find were people using hoola hoops. Even though I already had come up with a PVC solution, I decided to take some hoola hoop pictures for those of you who haven't yet worked something out:


The first photo shows someone using hoola hoops in the center of each side. Although it seemed to work for him, as the second picture shows, the corners are VERY close to pooling. The third photo shows someone using hoola hoops in the corners instead. I'll leave it to you to figure out which way works best.
Working Day 2
The rain continued to fall until about 2:15pm, so half the show was lost there. After it finally cleared up, attendance picked up a bit and the show was moving once again. Or at least the customers were moving....but not the merchandise. By 3:30pm I still hadn't made any sales, so I was a bit down.
That's when it happened. A customer came in and said "You had a picture of Mount Rainier". Suddenly I remembered...I had spoken to someone yesterday about getting a picture of Mount Rainier for her mother, but she said her mother was at the show with her, so she'd be back for it. Well, she sent her sister back to pick it up in her place, but that was good enough for me. I showed her the options, she picked out the print, size, and color she wanted. I wrote up the receipt, imprinted her card, and got halfway done with filling out the credit card slip when she said....wait a minute, I just need to check with my sister on something. She stepped out of the booth to where I couldn't hear her, called up her sister, talked for 2 or 3 minutes, and then came back and said she was going to have to forgo the purchase because they came up with a different idea instead.
I was furious. After being so down about how things had gone the previous day, then the rain, then no sales most of the day, I was feeling a bit depressed. Then this customer came in, lifted my spirits way up, and then pulled the rug out completely from under me. I was calm enough not to explode or say anything nasty. In fact, I didn't say anything at all. I couldn't even look her in the eye as she apologized several times for backing out. I just gave her the cold shoulder. I realized later that was a bit of a mistake...what if she later changed her mind and decided she really DID want that print. I probably blew that opportunity. I should have played it cool and said something about "well, if you do change your mind, I'll be here until 5 tonight". Oh well, lesson learned.
I'm still not sure why she backed out? I tried asking when she first said no, but didn't get anything other than "We're going with a different idea". Did she not like the print her sister picked out? That didn't seem to make sense, because when I showed her the options, she instantly knew which one she liked, and there seemed to be no hesitation about it at all. Did she end up seeing my print and deciding "I have my own pictures, and now that I see what you've done, I get my own printed and mat it up like that much cheaper"? One of life's mysteries.
Later that day, I did end up getting one sale, and it was another lady who was back to buy a print from the day before. At the last moment, she decided to get a different print than the one she came back for, but at least she didn't back out of the sale.
The show ended, I packed up, and got out of there.
Conclusions
The show sucked for me and a lot of other people. I've got some ideas from this show and thinking things over, but it's deserving of another post all on its own. So I'll just wrap this one up for now, simply saying that I need to work on waterproofing and better protecting my work from the rain. The best option would be a better tent, but with a string of relative and actual failures lately, that's not really financially an option at the moment. What I need to do is get some waterproof spray and seal the roof, get some snaps to try and use in place of the velcro, and figure out a good secondary line of protection just in case thing leak again.
...click here to read more!
Tuesday, August 29, 2006
Another bad show
Thursday, August 17, 2006
Protecting my booth from rain
So far I've been pretty lucky. I haven't had any rain at any of my shows. I'm hopeful that it stays that way for quite some time, but "hope" is never a very good disaster plan. The smart thing is to prepare for rain and be ready if it shows up.
Now, you might be thinking "wait..you've got a tent over your head, so what are you worried about?" That's true. The tent does offer me a large degree of protection from the rain, but it's not foolproof. The biggest problem is the shape of the EZ-up style canopies. They use a pyramid shaped roof, but the only support points of the pyramid are at the top-center and the 4 corners. The end result is that, unless the top is pulled and kept completely tight (which is near impossible to do), you can get sagging in the roof, which can lead to puddling and then eventually (if you are unlucky) collapse.
Take a look at the following photo. The red arrows show the places where I've seen puddling occur when I setup the tent at home in a rain storm.
I never let it happen, but I expect when the puddling gets large enough, the canopy could rip away from the sides, exposing the framed artwork directly to rain. Then to make matters worse, once one side collapses, the roof would lose some of it's tension, and then the other 3 sides would be at increased risk of collapsing.
Lots of people online have discussed propping up the canopy using all sorts of objects, ranging from foam funnoodles, to hoola-hoops, to pvc piping. Of course, the one thing all of these discussions have been short on were pictures. I've been trying to find a photo of just what these setups look like. I've looked around at a half dozen local shows and haven't seen anyone using anything like that either. So, with only vague descriptions, I set out to try and create something to do the job, as well as document it here so that others have at least something to refer to.
I setup my tent in the backyard with the legs fully collapsed, so that the canopy was as low as possible. This made it easy to get inside and play around with different ideas without having to use a ladder. After playing around with several ideas, I figured out a way I though would work. My plan was to use PVC piping. I spent about $5 and bought:
(2) ten foot long 1/2" PVC pipes
(4) 1/2" to 1/2" PVC couplers
(4) 1/2" PVC right angles.
Before on continue on, let me first say that you should do your own investigation and measurement before you continue on. What works for me may not work for you, depending on the dimensions and design of your canopy.
First, I took each ten foot pipe and cut it into a 5 foot section, two 2 foot sections, and discarded the remainder. I then assembled it into a C shape : 2 feet, right angle, 5 feet, right angle, 2 feet. I then needed some way to connect this to the framework inside my canopy. I decided that I could cut a slot in the end of the pipe and slip it around one of the supporting beams in my tent. However, the supports of my canopy frame were 1/2" wide, which would hardly leave any material left to provide strength. This is where the couplers came in.
I took each coupler, used a 1/2" wide piece of matboard to help me mark a 1/2" slot on the end of one side of each coupler, used a hand saw to cut down halfway into the coupler (don't cut any more than halfway), and then used a pair of needle nose pliers to grasp each cut piece and snap it off. The end result looks like this:
Then you put one of those on each end of your C-shaped assembly, and you get this:
And here a better look at the end after it's connected
Now, you put each of the 2 assemblies inside the tent and attach it to the frame, and it looks like this:
The following pictures gives you a better idea of just how it hooks onto the frame:
That's it. Just those couplers holding onto the frame, the canopy holding down on the assembly, and it stays wedged in place. It would probably also be a good idea to tie, zip tie, or velcro wrap the centers of each assembly to the center post to help keep it in place even better.
Now, take a look at the outside when it's done:
In the following before/after pic, take a close look at the shape of the shadow that runs across the canopy. In the before shot, you can clearly see the shadow dipping down into the valley where I reported the pooling occurs. In the after shot, the valley is gone, and the shadow no longer dips.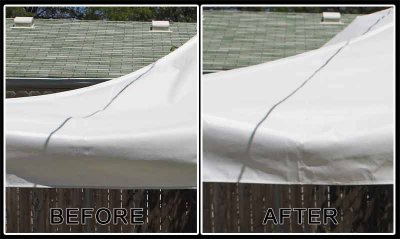
Just as an initial test, I pulled out the hose, started spraying down the canopy, and no water collected anywhere. Everything ran right off, no problem.
When you've got everything working,and you are happy with the entire setup, then you can use PVC cement to connect the pieces together permanently. I haven't done that yet, because I might play around with things a bit more just to make sure I've got the best arrangement.
When it's all done, you've got a solution to the puddling problem which takes up very little space in your vehicle and only adds about 60 seconds to your setup time.
...click here to read more!
Thursday, August 03, 2006
Initial Impressions of Adobe Lightroom
As I mentioned a few weeks back, Adobe has purchased Pixmantec and put them to work helping on Adobe Lightroom. Well, the beta of Lightroom is now available for Windows, so I gave it a try.
Overall, I like the way it works a lot. I've been using RawShooter Premium for some time and really love the way it works. Lightroom seems to have most of the functionality that RawShooter provided, plus has some additional features. The built in Library cataloging features is quite nice. I especially like the much improved adjustments. The new curve sliders feature is very nice, as is the split toning, and color-specific saturation. Feature-wise, I'm VERY impressed with Lightroom
The one thing I absolutely hate is that it crawls as slow as a turtle. Yes, I understand it's a beta and still in development and thus unoptimized (I'm a computer programmer by day, so I understand how this stuff works), but knowing that still doesn't make it any less painful to use at the moment.
Plus, I'm seriously worried about just how fast it could possibly be when finished. The Bridge and CameraRaw features of Photoshop CS 2 are fully optimized, production features, yet they are STILL slow as a can be. Lightroom does it's raw conversion using a new version of the CameraRaw plugin which features even MORE adjustments than before. I seriously don't see how Adobe is going to be able to make it do more than before, yet be significantly faster (unless they were just incredibly lazy with optimizing the previous version).
RawShooter, on the other hand, is a little speed demon. Previews build in a half second, adjustments effect the preview instantly, and full size conversions only take about 3 seconds. I would LOVE to get that type of performance out of Lightroom, but I'm seriously worried that it's NOT going to happen.
For now, I'm only using Lightroom to process my photos from Maine, and I'm only using it to make adjustments to those photos. I'm not going to import my whole catalog or bother keyword tagging any of the photos. I don't want to get too caught up in it and put too much time and effort in until I find out how it turns out.
...click here to read more!
Wednesday, August 02, 2006
Upgraded to the Logan 650 Framers Edge
Back in March of 2005, I mentioned that I bought a Logan 450 matcutter, and then I followed up with instructions for modifying the matboard to add a squaring arm with production stop.
Problems with the Logan 450 + modifications
After using that extension board for a while, I found that it wasn't always spot on accurate. Either the squaring arm would shift over time, or the extension board would be just a tiny bit loose, but loose enough to throw off the squaring slightly. I also found that getting the original 3" squaring arm perfectly lined up with the extended squaring arm was quite difficult, and as a result cutting tall but narrow sections of matboard was difficult.
After a while of dealing with all of this, I just gave up and reverted back to hand measuring all of my mats before cutting. Of course, the problem here was that the process became very time consuming, and there was a loss of accuracy in the process.
Another issue I discovered as my first show drew closer, and my rate of cutting ramped up considerably, was that using the 450 was a bit uncomfortable. The way the you had to depress the cutting blade with your fingers, but at the same time ensure that you keep the angle tool firmly on the slide (since it's not attached in any way), cause a bit of stress on my hands wrist. It was quite uncomfortable.
Finally, since both the cutting tools are NOT attached to the slide, they have a tendency to wobble or angle every now and then, resulting in cuts the bow a little bit.
The Logan 450 served me quite well as a budget cutter in my startup stage, but now that I'm getting more serious, it was time to get a bit more serious of a tool.
Picking out a new model
I had looked around at some of the other popular and highly recommended brands, such as Fletcher and C&H, but decided that with a cost of $1000 or more they were a bit out of my league. The Logan 750 was a step above my 450, and included the built in squaring arm (which solved a few of my issues) but it used the same basic mechanisms as the 450, so it wasn't a very considerable improvement over my current situation.
Instead, I opted to go right for the Logan 650 Framers Edge cutter. It's quite heavy duty in construction, the squaring arm is very rigid, and (most importantly) both cutting tools (straight and bevel) are securely attached to the slide (which means they don't come loose or tilt, and it makes the cutting less of a strain on the hand and wrist).
The Logan 650 normally sells for over $450, but I was able to get in on a really great deal (I had an old 30% off coupon from my local shop) and got it for $320. That was a price I couldn't resist.
Unpacking and setting up
My only complaint with the way things were packed was that the included instructional DVD was jammed in there in such a way that it was warped enough that I wouldn't dare consider putting it in any DVD drive.
UPDATE: I must add that I'm quite impressed with Logan's response over this matter. Without me even contacting them, I've been emailed twice by employees of Logan Graphics (Brian Buell - Director of Sales, and Connie Miley Cook - Director of Marketing). They both saw my blog, noticed my complaint, and offered to ship me out a replacement DVD.
When taking everything else out of the box, I was alarmed that there were screw marks on the squaring arm, indicating that it had already been installed once. At first I thought maybe I had received a refurbished unit. However, when I went to install it, I realized that there were precision adjustment screws to fine tune the angle of the squaring arm and ensure a perfect 90 degree angle. I then realized that the unit had probably been calibrated at the factory, and was thus relieved (actually, I was impressed). When I put everything together, a quick check confirmed that indeed, the squaring arm was perfectly square, and the parallel bar was perfectly parallel. So far so good...I was completely satisfied.
UPDATE: Brian Buell also let me know my assumption about it being assembled at the factory was correct. Here is what he said:
"Yes we do install and calibrate the squaring arm along with everything else. In fact, each machine is built from the base board up from one person, tested, then re-tested and packed by another QC person. So technically the machines are used during testing before being packed."
Putting to actual use
I've only been using this for a couple days now, and I've only cut a very small number of bevel cuts, so it's probably not fair to comment on that part of the tool. However, from the little bit I did use it, the bevel cutting seems to be perhaps a bit better then the 450. I'll post an update when I've used it more.
On the other hand, straight cutting (ie: cutting full sheets of matboard down to size) was MUCH easier. Absolutely no pre-measuring was required, and almost every single cut came out perfectly square. I had a few mistakes early on where the cut came out slightly off (and by slightly, I mean very close...well within acceptable tolerance for an 11x14), but as I got better at the process, I didn't have any more problems. In the course of a few hours, I was able to take all the bevel edged remnants I had from window cutting my 11x14 and 16x20 mats, and trim down into over 100 8x10 and 11x14 mats. That cleaned up a big pile of clutter I've had sitting around for several months now.
Next I took about a dozen sheets of foam board, and in about 10-15 minutes was able to trim them all down to 8x10s, 11x14s, and 16x20s. It was VERY quick...just a small fraction of the time I spent previously.
Conclusion
So far, I'm very satisfied with the Logan 650 framers edge. Just based solely on the straight cutting improvements, it was well worth the money. After I get to work on some bevel cuts soon, hopefully I'll discover that it was an even better investment. At this point, I have no regrets and would highly recommend it.
...click here to read more!
Tuesday, August 01, 2006
Here's what's been going on
Just wanted to break the silence here for a moment, since I haven't posted in a couple of weeks.
Right after my last post, I left for a weeklong trip to Maine. We drove from Detroit to the far end of the Maine coast (Lubec), and then worked our way back. We hit 21 lighthouses (18 in Maine, 1 in New Hampshire, and 2 in Canada), spent a couple of days at Acadia National Park, and did a mini tour of Stephen King related sites in Bangor. I was a bit disappointed with the weather. Once we got to the coast, the first 3 days brought us tons of fog. If you moved inland enough to escape the fog, the skies were perfectly clear with few clouds, making for harsh lighting. After the fog was gone, the cloudless skies continued for the majority of the trip. I was able to get a few good shots in the early morning fog and after sunset on the second day, and there was also a halfway decent sunset at one of the lighthouses the next day. However, overall I was less than satisfied with the results I came home with.
Last week, other things came up preventing me from getting much done other than doing some preliminary sorting of my Maine photos. Among those issues was having to put my cat Friskie to sleep. Forgive me for a brief deviation from photography into this personal issue (though what good is a blog if I don't post about my cat).
Friskie was my first of 6 cats, and he outlived the rest of them. I picked Friskie out from the litter only an hour or 2 after he was born. Here's a picture of me holding him when I was 11 years old and he was probably only a week or 2 old. .
.
Friskie was a big cat. His weight peaked at just over 20 pounds. The following photo was taken 4 or 5 years ago, sometime after he started losing weight. He probably weighed 16-18 pounds at this time: .
.
Four years ago, Friskie was diagnosed with partial kidney failure. He started going through occasional 2-3 day periods of not eating, and each time he lost a little more weight. Past experience has shown me that the sooner a cat loses its weight, the sooner it dies. To combat this, we increased his feeding schedule to help maintain his weight better and we had some success with this. His rate of weight loss slowed considerably. Of course, the downside to this is that it puts an increased burden on his failing kidneys. It was a case of damned-if-you-do/damned-if-you-don't. We did what we thought was best and were able to keep him alive and very happy for the last 4 years. In fact, he was the most playful he had been in quite some time. You haven't seen anything until you've seen an 18 old cat running at top speed around the house chasing down and tackling my wife's 3 year old cat.
However, in the last few months, his behavior took a downward turn and he was no longer interested in playing or getting attention. His day consisted solely of eating and sleeping. This last Wednesday and Thursday, he started eating very little, and by Friday I couldn't get him to eat anything at all. I've grown accustomed to this scenario over the years, however this time his behavior was different. Instead of being uninterested in food, he seemed very anxious to eat but couldn't find anything he wanted to take more the 2 or 3 licks of. By Saturday he was meowing for food nonstop almost the entire day. We tried several different flavors of 5 or 6 different brands of cat food, along with a variety of human food (tuna, salmon, sardines, chicken, roast beef, lunch meat, baby food, ice cream, etc), but he wouldn't take more than a few licks of anything before returning to meowing for food. By Sunday, he wasn't even meowing anymore, and instead spent the morning laying around with no energy.
Friskie was almost 19.5 years old. He was the friendliest and happiest cat I'd ever seen. He was my companion for nearly 2/3 of my entire life. I was lucky to have such a wonderful friend for so long. .
.  .
.  .
.  .
.
...click here to read more!


