Since I purchased my King Canopy from Sams Club a few days ago, it's just been sitting in my basement, begging me to set it up in the backyard. Well, I could resist no further, so I took it out of the bag and assembled it for the first time.
It went up rather easily, though I did have a few issues. Of course, I was assembling it alone, so that made it a bit more difficult.
First issue I had was expanding the frame to the halfway point (first step in the instructions). I got it halfway to where I needed it, but then I couldn't get it to expand any further. Had I another person to help, it might have been figured out faster, because I initially just blamed the problem on the fact that I was really doing a 2 person job by myself. However, it ends up that wasn't the problem. It was actually just the sliding corner brackets getting hooked on the posts for the front awning. One I opened up the awning posts just a tiny bit, it went right up.
The second issue was more a case of my interpreting the instructions badly. The instruction told me to secure the corners of the roof with the hook and loop straps. That kind of confused me...I couldn't find any hooks anywhere, and the only loop straps I had were in the center of each side, not the corner. In the corners, all I had to secure it was Velcro...one half on the cloth, and the other half on the corner posts. Obviously, those had to connect together, but what was this other thing they were talking about? Well, after about 5 minutes of looking at the canopy and rereading the instruction, over and over again, I finally realized my mistake. "Hook and loop strap" is a generic term for Velcro.
The third issue appeared when I was securing down those Velcro loops in the center of each side. Each side had a pair of those loop, which you are supposed to unfasten, wrap around the frame, and refasten. Well, one of the loops on the front was accidentally caught by the sewing machine. As a result, it's now sewn into position. You can unfasten it, but you can't wrap it around the frame. I might give the manufacturer a call and ask them to replace the top for me.
The fourth issue was with putting up the walls. Mostly it was just a matter of learning the right technique to attach them, but I did have some problem with the zippers. First, it seemed like the sides were a little too short. That turned out to be a case of the legs simply being opened too far. However, when I got around to attaching the fourth wall (like I would when closing up for the night, I ran into a problem. The sides are made to just barely fit as it is, but with the addition inch or so for the front awning's bars on each side, the front ends up being about 2 inches too short.
I tried closing in the front leg more (to shorten the distance between legs) but that still didn't help. I managed to just barely get the zipper over the awning bracket when I could see the zipper starting to give way...almost ready to tear out from the stitching. I quickly undid it. As it stands now, I can zipper up 3 of the corners fine, but that 4th corner only attaches by the Velcro loops. That might work alright, but then again, water might get in there and hit my corner display rack (once I get one built) getting the cloth wet. I'm not sure what I'll do with this. Possibly make a small 2 or 3 inch strip with zippers on both sides to connect it.
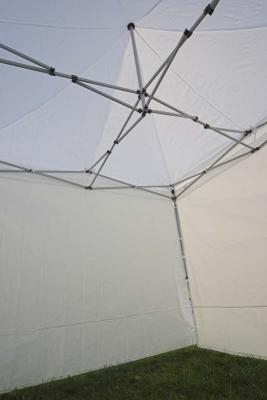
Heres a few pictures of the tent...one after being fully assembled (including the 4th side, but not the awning) and one on the inside.
I've left it sitting up overnight. I'll start construction on the display racks this weekend (I've already got most of the pieces sitting in my basement). I also have to test its ability to withstand water leakage and pooling.
...click here to read more!
Thursday, July 28, 2005
First assembly of my display canopy
Tuesday, July 26, 2005
Purchased a display canopy
Yesterday, I picked up a canopy for my display booth when I go to sell at art shows. I've been reading through the artshowphoto yahoo group and finding a lot of information and recommendations on booths. Lots of people are recommending light domes and flourish canopies, but these all sell for $800 and up. Thats a bit more than I'm ready or able to invest at this point. A few people mentioned getting good deal on those canopies on ebay, but I looked around for a week and only found one, which ended up going for over $500 with shipping...that still too expensive for me at this time.
A bunch of people were recommending a less expensive canopy from Costco that runs only $200. After looking around, that seemed to be the best bet for me. I was getting ready to go buy it when I found out Sams Club sells a similar model for the same price, but the Sams Club version has a stronger top, and its 4 wall close with zippers rather than velcro. I went and picked it up last night. Tomorrow I should get around to setting it up in the backyard. Then I have to get to work figuring out how to setup some walls I can hang some framed photographs on.
I'll also need to do some rain tests on it. Some people complained of these pyramid topped canopies leaking that the seams. Seam sealant fixed those problems for most people. A few more unfortunate people have reported that the roof sags and pools water, and once enough water pools up the edge of the roof gives way from the frame and dumps water into the booth. Again, people have come up with creative solutions to this...pulling the canopy tight and clamping it down, adjusting the spring tension to raise the peak higher, or even using inexpensive funnoodles (the swimming pool toys) to pull the top tight and remove those sags. It's not something I'm terribly concerned about as long as I test and prepare for it.
...click here to read more!
Sunday, July 17, 2005
Pastel Sketching
This weekend I've been working on getting more of my photos ready for selling at an art show. In addition to the many regular photos I've been printing up, I thought it would be cool to do a few stylized ones, where I do a bit more photoshop work to give the image a surreal or non-photorealistic look. I came across some nice actions and instructions. A few really caught my eye, and I'd like to mention one of them.
I was playing around with Isabel's Pastel Sketch action, and really liked the results I got from it. Here's a sketch of the Sand Hills Lighthouse
I started out working with the action, but I really had no idea how it was working or what effect my adjustments were having. I did some digging around and found a post on dpreview from Isabela explaining the technique step by step.
http://forums.dpreview.com/forums/read.asp?forum=1006&message=11085888
Doing it by hand (rather than through the action) and reading some of her additional explanation really helped me understand what was going on. The action has a ton of extra adjustment dialogs which aren't really necessary for the basic effect. To me, they just confused me further, as I didn't know what effect anything I clicked on was having on the picture.
This is a really nice result. I've tried this trick with a tree pic and a butterfly pic...both came out very cool looking. I'm thinking this effect will look really good printed on a matte or art paper. I'll continue to play with this effect.
...click here to read more!
Monday, July 11, 2005
Evaluating RawShooter Essentials 2005
I've been a devoted fan of the C1 raw converter software from Phase One for a little over a year now. My love for it is primarily for it's more convenient workflow when processing dozens of Raw Files at once. Compared to Photoshop, where you can only deal with converting one raw file at a time, C1 is a godsend.
A couple months back, when I heard about a new Raw converter called RawShooter Essentials 2005 (hereafter referred to as RSE), is was only mildly interested. When I found out it was free, I took note. When I heard it was written by some former people from Phase One, I decided to give it a download. I took a quick look at it, and it seemed nice, but not a whole lot different than C1. I never really got around to giving it a thorough test. However, this week I had about 600 photos from my Copper Harbor trip to sort through and convert. This seemed like a decent test, so I went and downloaded the latest version (1.1.3) and got to work.
The good:
The workflow in RSE is very nice. Much like C1, you can scan through an entire folder of raw files very quickly...view the thumbnails and then click each one to get a close up view. However, I quickly discovered some really nice advantages to working with RSE.
1) Perhaps my favorite feature is the priority grouping. In C1, you have an option to tag an image and then later view only those images that are tagged. Thats handy for narrowing down a long list of raw files to select only your very best. However, RSE takes this feature a step further by including three priority groups in addition to tagging/flagging. You can optionally assign each image to a priority group and use that however you want. One way is to categorize your images into "convert now", "convert later" and "convert if I get around to it" groups. Another way is to recursively narrow down you images by marking all your favorites as priority 1, then going through priority 1 and moving your favorites to priority 2, then repeat moving from priority 2 to priority 3. When you are done, you should have your favorite of your favorites in priority 3. However you decide to go back and recheck the images you included in the first or second priority group, but eliminated before getting to the 3rd, you can do that too. However you decide to use it, it is a very handy feature.
2)Another very nice workflow feature in RSE is the setting snapshot. In C1, I often find myself wondering what an image would look like with 2 different settings. If it's just a single contrast or saturation slider, it's easy enough to slide it back and forth to compare. However, if you want to compare between 2 totally different groups of settings, it's not very realistic. In RSE, that problem is nicely overcome. Simply press the snapshot button and a new tab bar pops up with a tab for each settings snapshot. You can jump back and forth to each snapshot, further refine it, and even create additional snapshots. Very nice for experimentation.
3)RSE is fast. Very fast. I compared conversion speeds on my Pentium 4 3.4GHz machine using a batch of 15 files, converting them to 16 bit TIFF files. C1 converted the batch in 3 minutes 17 seconds (~13.1 seconds/image). RSE converted the exact same batch in just 1 minute, 40 seconds (~6.7 seconds/image). That makes RSE almost twice as fast as C1. I thought it might be an issue of settings...one was applying sharpening and the other wasn't, or some similar issue. However, after going through the different settings, that didn't appear to be the case. No matter how I configured it, RSE came out almost twice as fast as C1.
4)RSE has a simple and convenient EXIF display. C1 originally had a nice EXIF display on the Capture tab. It was a simple docked panel that displayed a subset of the image's EXIF data. The downsides of this panel are that it contains more than just the most common info (though it's more concise than the entire EXIF block) and that it's only visible on the Capture tab. Newer versions of C1 have made the EXIF data visible on a floating tool window, which resolves the last problem, but lets the EXIF data window always get in the way (no way to dock it). With RSE, there is a simple little panel at the bottom that contains only the basics (but most commonly used) bits of the EXIF block: camera model, aperture, shutter speed, focal length, and ISO. It's in a format very easy to read (easier than in C1) and it's alway visible without it getting in the way.
5)RSE has some better viewing options. There are sliders to adjust the size of the thumbnail images. More convenient slider for adjusting the main image zoom...the zoom slider and the 100% zoom button are right on the toolbar rather than being located inside of another button like C1, making them easier to access. The fit to screen button is right next to the zoom button/slider, rather than at the opposite end of the toolbar (like in C1)
6)RSE has a nicer set of adjustment controls. The contrast slider in C1 has been outdone by 2 sliders in RSE: shadow contrast and highlight contrast. There is an edge sharpening option added to RSE. There are 2 sliders for noise/color-noise suppression. The controls for white balance, image adjustment, and sharpening all appear on the same tab in RSE rather than on 3 different tabs as they do in C1. And finally, simply pressing the Ctrl button show you which parts of the image are clipped (I find this more convenient than the using the F5 key as your would in C1 simply due to it's position on the keyboard and the fact that it works off a simple press and release rather than press once to turn on, press again to turn off).
The bad:
1) Even though RSE gives some more options for adjustment, it loses a few at the same time. First, there is no curves adjustment in RSE. Second, even though there is an edge sharpening option added to RSE, the regular sharping option is simplified from the one present in C1...just a single slider for amount (compared to C1's separate sliders for amount and threshold, plus a selection box for normal or soft sharpening)
2) Although this is very subjective, I tend to like the default appearance of images from C1 slightly better. With a bit of work, though, I can get very similar results from RSE. Also, making the adjustments in C1 to get to the best results is quicker than in RSE, though I will admit that may be due to my extra experience working with C1.
3)In RSE, there is no cropping tool, no split screen view to work on 2 images at once, and no black and white button (you need turn the saturation down on individual images...not as convenient when trying to look at an entire gallery in B&W mode)
4)Instead of using a standard Windows menu bar, RSE uses a bar full of buttons that generate drop down menus. While this may be personal opinion, I think that was a bad choice. It's a little more confusing than having simple text for the menu trigger instead of buttons.
5)After going through my entire 600+ images from Copper Harbor, picking out my favorites, adjusting them, converting them to TIFFs, further processing them in Photoshop, converting them to web format, uploading them to my website, and arranging my entire online gallery, I made one very annoying discovery: THE EXIF DATA IS MISSING. Even though I had the "Meta Data" box in the convert tab set to EXIF, there was no EXIF data in the resulting TIFF to indicate any of my camera settings. I now have an entire gallery of images online with no EXIF info, and all the options available for adding that info back in are quite time consuming.
After digging around online, I discovered that the problem was due to me not having the THM (thumbnail) files in the same location as the CRW (raw) files. The CRW files only contain a subset of the EXIF data, while the THM files contain the complete EXIF data. On the one hand, I think that is somewhat a failure on Canon's part...there's no reason the CRW shouldn't contain all the info on it's own. On the other hand, the CRW does at least contain the most important settings (ISO, aperture, shutter speed, and focal length), so why couldn't RSE at least include that data in the output file? It has no problem reading that data and displaying it on screen while you are working on the image, so it should at least continue to use it. C1 has no problems doing this...if the THM is not present, it includes as much EXIF as is available in the CRW file.
The ugly:
Nothing. At first, I thought the EXIF problem above (bad #5) was ugly, but after figuring out the problem was caused by a missing THM file, I upgraded the problem to only bad.
In conclusion, I was quite happy with the workflow features of RSE. Keeping in mind the EXIF issue (which will hopefully get fixed...and until then, I'll be sure to keep the THMs and CRWs together), and being a bit forgiving of the slower image adjustment process (which will hopefully go away once I become accustomed to working in RSE), I am very happy with the results I got out of RawShooter Essentials. For now, I may continue to bounce between the C1 and RSE as I compare them in more detail, but at the moment I'm leaning a little towards moving to RSE for all of my raw conversions.
...click here to read more!
Wednesday, July 06, 2005
Returned from Copper Harbor
I just returned a few days ago from a 4 day trip up to Copper Harbor, Michigan and a few other areas in the Upper Peninsula along the way. While up there, we got to see 11 lighthouses, some nice shorelines, some "mountain" views, a handful of waterfalls, a sunrise and sunset over the lake, a quick trip into the Porcupine Mountains, and another visit to Mackinac Island.
The bugs are nasty up there this time of year. The beaches are swarming with those biting black flies. I got bit quite a few times. We also had some windy weather a few days...camping in 50MPH winds is not ideal for a light sleeper like myself. In the end, it was worth it. I took about 600 photos and got some nice ones. I'm sorting through them right now...hopefully by this weekend I'll have the best ones online.
...click here to read more!
Tuesday, July 05, 2005
Photos from Washington
I returned from my Washington trip just over a month ago, but I never got around to posting a link to the photos (even though they are just on my pbase site).
http://www.pbase.com/ldkronos/washington
Here are a few of my favorite shots:
This shot of the Kautz Creek at Mount Rainier was one of my favorites. Something about the way the time lapse exposure came out, giving the creek a cartoonish look to it and the tree leaves a slightly soft appearance.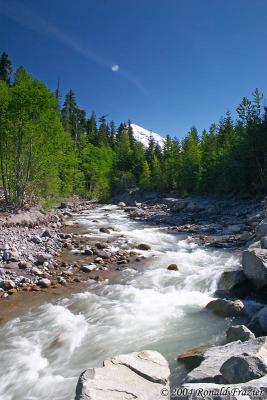
The green water of Lake Diablo in the North Cascades is beautiful. I think the color is due to minerals dissolved in the water. In a way, it reminds me of the deep blue waters in crater lake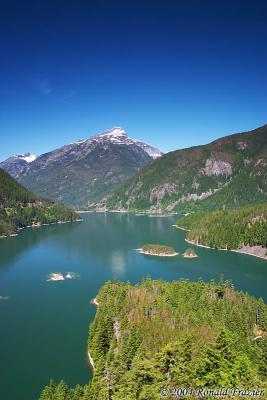
We saw this lighthouse at Browns Point a few hours after arriving. A storm was just blowing in across the Pugit Sound while a small break of blue sky was just rolling out. While not the prettiest lighthouse I've photographed, this one certainly makes for the most dramatic lighting.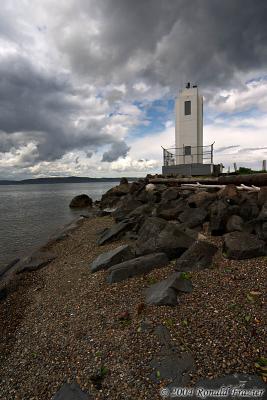
This panorama of Mount Saint Helens was actually stitched together from 10 separate images. The full resolution file is just under 16,000 pixels wide and contains an amazing level of detail. The trick here will be in getting this one printed up and framed
There are lots of other great shots in the galleries, so check out the link above.
...click here to read more!


