Last Tuesday was our final day of class. It's a bit disappointing to have the class ending already (it was only an 8 week class), as I was really enjoying working on the different assignments. Even worse, I was planning on taking the followup advanced class, but our instructor had other obligations and won't be teaching there again for at least a couple of semesters (if ever). I guess the college never found someone else to teach the class, because it isn't scheduled for next semester at all. I'll need to find something else to keep me busy taking pictures...maybe look for some photography clubs in the area or something.
Anyway, our final assignment was to shoot some portraits (either posed or candids) as well as a self portrait. I really wanted to do something new, so I decided that I would make an attempt to doing some studio style portraits. First things first: I needed a studio.
I started by clearing an area in the basement where I could shoot. It was nothing more than a 10'x10' area. The next requirement was lighting. There were some glass block windows, but that wasn't nearly enough light to shoot. Luckily, I still had handy that very old photography lighting setup (with four 100 or 150 watt lamps) which I had used on assignment #1. Those, combined with a few ordinary table lamps and my onboard flash, should be more than enough lighting.
The last item I needed for my studio was a backdrop. I could have just hung up a bed sheet, but I wanted something with a little more character. I headed up to Joanne fabrics looking for a nice looking backdrop, but couldn't find anything which I liked. So instead, I grabbed a roll of 108" wide white muslin which wasn't too expensive per yard, but only had a little over 1.5 yards of fabric on it. That would have to do. I ended up walking out with $7 in fabric and a $2 box of royal blue RIT dye. I went home, looked up some websites on tie-dye techniques, and made an attempt at a homemade tie-dye backdrop. The first suggestion I followed just about ruined all hope...It ended up almost solid blue, with no white left and almost no variation in color. However, I didn't give up hope. I found another web site, and after another 2 or 3 attempts I ended up with something that looked really good. So off it went for it's final wash, but when it came out it had lost most of it's beautiful shading and ended up with only subtle color variations. I was quite disappointed, but by this point I had given up, so I just dried it, then crumpled it up in a pile to sit overnight (hoping the look of the wrinkles would make up for the lack of color variation).
The next day I took it and hung it up on the wall, set up the lighting, and started practicing. Not knowing the slightest thing about how to go about this all, I decided to shoot my self portrait first, so I wouldn't bore anyone else while I figured out the right lighting technique. After angling the lights, setting up a stool, putting my camera on a tripod, and shooting my first shot with the cable release (followed by several more shots to get the exposure just right), I came to a few conclusions. First, the backdrop looked very good under studio lighting. Second, I had a lot of work to do on improving the lighting.
I tried several different techniques of lighting. I started out with the camera perpendicular to the backdrop, and the main lights at my side at a slight angle: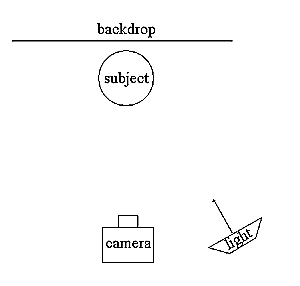
That gave me a very strong lighting at one side, but not a lot of fill light, and some pretty harsh shadows (and some pretty ugly shadows on the backdrop). I spent a good hour playing with different lighting techniques, including positioning the table lamps at opposite sides and behind/below to fill in shadows. Lots of things that didn't work. I tried hanging some sheets at the side to bounce light. That helped a little. The shadows being cast on the backdrop were still the biggest concern. The table lamps weren't filling them in quite the way I wanted. I then discovered the best trick: pull the subject forward away from the backdrop, and move the lighting to more of an angle so that the shadow falls enough to the side that it doesn't end up in the photo. Here's pretty much what my final setup looked like: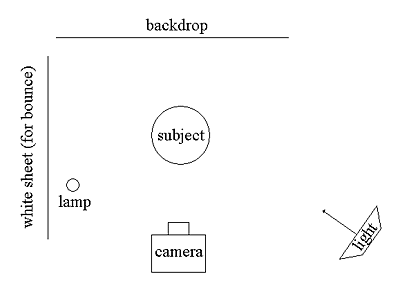
Here are a few of the self portraits I took throughout the process.

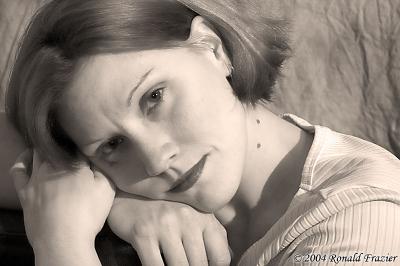
Now at this point I was fairly happy with my setup, so it was time to call in my subject. Since my wife hates being in my photos, I thought it would be fun to torture her by making her the sole subject of my photos. After picking out a couple different outfits, we got to work. Once I got her down there, where I could see the lighting interactively, I made some more adjustments (and in fact I adjusted the lighting slightly all throughout the shoot). However, the bigger problem I now faced was getting her into interesting poses. Here I was completely out of my league, knowing nothing about posing a subject, and I felt really dumb not knowing exactly what to tell her to do. None the less, we muddled out way through it all. In the end, she even ended up enjoying the whole process (especially once she saw the results). Here are a few of the resulting shots.


Finally, we posed for a few shots of us as a couple (though I forgot to throw my dress shirt back on and didn't realize it until later on). You can see this shot and a couple other shots of my wife in the assignment gallery:
http://www.pbase.com/ldkronos/capture_the_moment_assignment7
All in all, it was a very fun assignment and I learned a ton, though there's still tons to learn with respect to both lighting and posing the subject. Some better equipment would definitely be helpful. I should have an external flash by the end of the year, and if I decide to do more of this type of stuff, I've been looking into some better lighting equipment from Alien Bees.
...click here to read more!
Sunday, November 28, 2004
Assignment 7 - Portraits & Self Portraits
Thursday, November 18, 2004
Assignment 6 - On Campus Photography
Assignment 6 was an in-class/on-campus photo shoot. We gathered in class as normal, and after a brief talk we were encouraged to break off (solo, pairs, or groups) and go do anything we wanted. I joined up with Wayne and Melanie and we started off by hitting the hallways. At first we were a little lost for what to do. There were a few people studying at tables or sitting on bench reading the paper. Didn't really seem like much there but we started that way. As we wandered down the hall, we peeked into the pottery classroom, and the instructor saw us and invited us in. The was the start of a great series of shots. We got a lot of pictures in there...people shaping pots on the wheel, working with clay, adding details to projects. Lots of interesting pictures. I though this one captured the essence of the class quite well: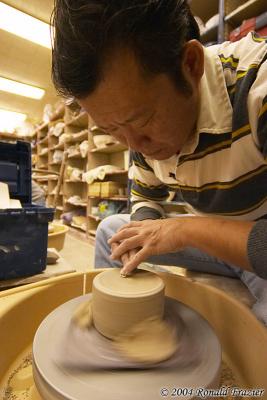
After that, we kind of had our courage up to go into more classrooms. Melanie found a piano class and got some pictures while Wayne and I were still working on pottery, but by the time we got there, the instructor didn't want anyone else in the class. So we all headed to the next hallway and found a clock making class. The teacher invited us in, so we took some more photos in there. I think this first shot was my favorite of the whole assignment:
Also, this class happened to be held in a science lab, so I found this great shot: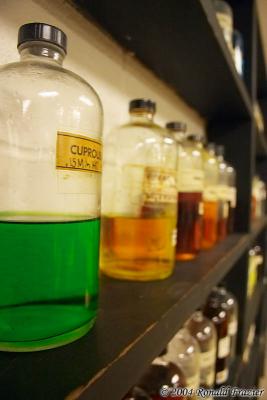
While Melanie stayed behind in the clock class, Wayne and I wandered out and found a chemistry lab. Not wanting to get in dangerous proximity to the chemicals, Wayne took a shot from the door and then left. I snuck a little closer, trying to maintain safety from the other side of the glass hoods. Then the instructor caught sight of me, and being somewhat interested in photography, he invited me in, asked a few questions about my equipment, and told me they were working with fairly harmless chemical so feel free to walk around. I took him up on the offer, and captured a few good shots (though I think the focus is in the wrong spot on this shot):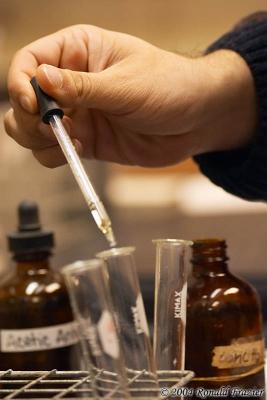
After leaving the chemistry lab, I wandered the hallways a bit looking for Wayne and Melanie, taking a few shots here and there along the way. I caught up with them, then Wayne decided to head back to class while Melanie and I headed outside for some shots. After taking a bunch of outdoor shots (a bell tower and some reflection shots off cars and windows) we went into the library. We took a few random shots here and there, then I went for the card catalog computer, looked up the call number for the photography books, found them, and took this shot: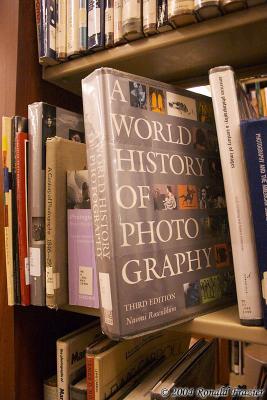
We then went back to class to catch up with everyone else. The instructor had brought in and set up a bunch of his lighting equipment: a black backdrop, a lamp with a directional filter to use for backlighting, a high powered flash which had a preview lamp and was optically triggered, a light reflector, and his hotshoe flash (for those with Nikon cameras). He had been in class with a bunch of students working on portraits. I stayed for a few pointers and took a few shots. Melanie (who works at a photo studio) jumped in the hotseat and started giving us pointers for how they position poeple. While she was demonstrating, I caught this shot:
After a bit more of that, I went outside with the instructor and some other lady to see what they were working on, then I wandered off on my own. I took a bunch of random outdoor shots, caught up with Jake, and we took a walk through the gym. We found the racquetball courts, and tried to take some shots, but I didn't get anything worthwhile. I did find a room where they were holding a dance class, and fired off a few shots: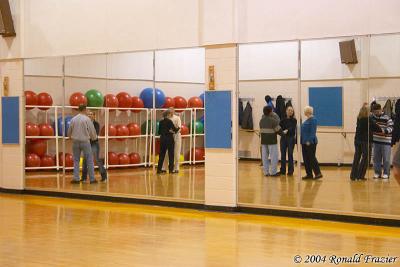
By then, my memory card was full (for about the 3rd or 4th time). I pointed my camera down to put in a new memory card when the UV filter on my Sigma 70-300 somehow just fell off, landed on the floor, and shattered. I should have taken a photo of the carnage, but I was so in shock, I just picked it up, stared at it, and threw it in the nearest garbage can. I'm not sure how it happened. That filter has been securely on that same lens for at least a month, so I'm not sure how it suddenly came lose. At least it was only a $25 UV filter and not my $70 polarizer. Class was almost over, and I thought that was a good sign to call it quits, so I headed back to class, packed up and headed home.
I have a bunch more photos from the assignment, but I didn't want to make this blog entry any longer than it already was. However, you can view the rest of the photos here:
http://www.pbase.com/ldkronos/capture_the_moment_assignment6
...click here to read more!
Monday, November 15, 2004
Assignment 5 - Interesting Lighting Situations
I'm a bit late posting this here, as assignment #6 is already due tomorrow. But better late than never, and hopefully I'll be more timely on posting #6 (maybe by Wednesday morning). Anyway, the goal of this assignment was simply to look for situations with interesting lighting. Things other than your ordinary sunny or overcast days, or your evenly lit flash lighting.
Almost as if mother nature were giving me a helping hand, the very next morning after class I was sitting in my office and looked out the window only to see that the black sky was just starting to clear off of the horizon. And by luck, it was still quite early (meaning the sun was low) and the clouds were blowing the opposite direction of what they normally do. These factors all combined to give me an amazing view, where the sky was still very dark but the sun was there illuminating everything (with just a touch of that golden hour coloring left). Turning my back to the sun, I found the brightly lit trees with a dark backdrop to be extremely dramatic. I ran out of my office with my camera looking for a place to shoot, and found this field in the woods by the lake worked nicely.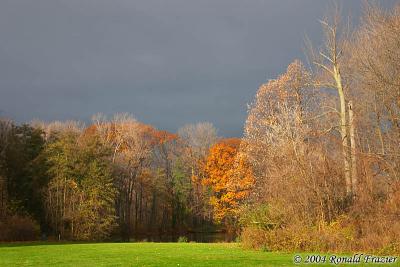
The next weekend, my wife and I decided to take an overnight trip to Niagara Falls photographing lighthouses there and back. After spending all day doing that, we about an hour away when sunset hit, and it was quite lovely. Driving on and on, I was looking for the perfect place to stop. I thought I had made a mistake by passing up the 2 different fields I wanted to photograph from, but I knew I made the right choice when I found this church.
The above image had a slight bit of editing. Due to the Digital Rebel's inability to show you a 3 color histogram, parts of the sky had saturated to solid yellow with my knowing it, but a little use of the burn tool in photoshop fixed this up reasonably.
After arriving in Niagara Falls and checking in at the hotel, we headed down to the falls for some late night shots of the falls illuminated. This first shot I though was fabulous, with the red light shining off of the sidewalk (which was soaked with mist from the falls).
I also like this shot of the falls lit by a glowing blue light, and framed between the dimly lit trees and the wall/fence.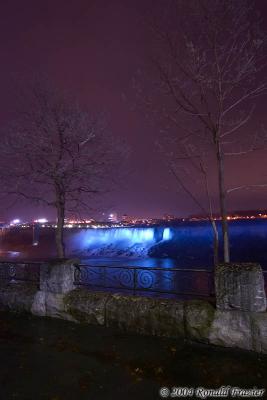
The next day, on our way home, I was shooting a picture of a butterfly near one of the lighthouses when I saw this fuzzy tree. In order to fully backlight it (to get those hairs glowing on the edges) the sky ended up overexposed, but once again the burn tool in photoshop brought out some color in the background (which appeared solid white originally).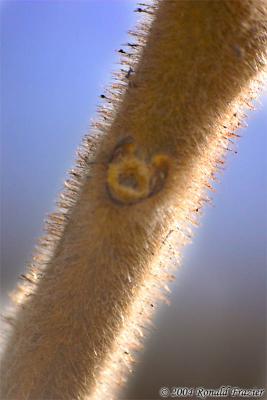
Finally, on our way home, we stopped in a small town for dinner. On the drive from the expressway to the town I saw this tree a corn field, and I knew the sun was getting low, so I figured by the time we were heading back out of town it would probably look quite dramatic. A short while later, it appeared exactly as I imagined it would, and I captured this shot.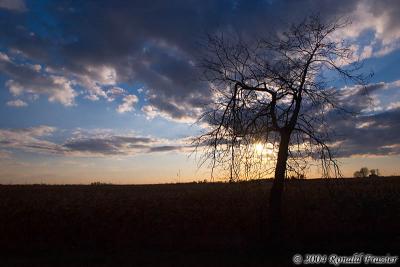
...click here to read more!
Friday, November 12, 2004
An Interesting Few Weeks in Astronomy
Wow, what an interesting few weeks it has been for those of us who look to the sky for photos. At the end of October we had the total lunar eclipse (which we won't see again for 2.5 approximately years). I posted my collage of shots from that night a few weeks ago. That in itself seemed like an interesting event, and made me wish I had something with a bit more magnification power, or maybe even a telescope with a camera mount. But the fun didn't end there.
Last week we saw the conjunction of Venus and Jupiter, when the earth and those planets are aligned, causing them to appear very close together in the morning sky. Not any sort of grand event that you would notice unless you knew what you were looking at, but it seemed interesting to me none the less. Unfortunately, I did exactly that...I didn't notice it until I read about it after the fact. The closest day of the conjunction was Friday morning, but I didn't hear about it until Friday night. However, the planets move quite slowly, and by Saturday morning they would still be relatively close together. So with that, I got up early (5:30AM) and got to shooting. Shot through a 300mm zoom (on my Digital Rebel, that's a 480mm equivalent), you could just start to make out several of Jupiter's 4 largest moons. I thought that was quite fascinating. But again, just like the lunar eclipse, it only made me wish I had some more magnification power. Anyway, here are the results I got:
Just like shooting the moon, shooting stars is difficult, especially when trying to resolve the dimmer, tiny objects like the moons of Jupiter's. You need to get a lot more light onto the sensor, but long shutter speeds cause problems because of how fast objects move through the sky. More than a few seconds and you start to see star trails instead of stars. The above shot was done at f/5.6 at ISO 800 for only 2 seconds, and you can already begin to see the object are elongated.
Not to let the fun end there, the following week (actually, just 2 days later) we got to experience the strongest Aurora Borealis in...I don't know how long. Quite a while, from what I heard, but I wouldn't know since I've never seen them before. Of course, once again I found out about it just a little too late. The strongest occurrence was on Sunday night, and I read about it Monday morning (and kicked myself). I looked for it on Monday night, but no such luck. However, another flare on Tuesday caused the aurora to strengthen. I wasn't able to get out of the bright lights of the city, so I missed some spectacular sights, however I was able to see a faint glow in the sky. It took me several minutes of staring at it to realize I was in fact looking at my first aurora ever. I grabbed the camera for a long exposure to be certain, and this is what I got:
In retrospect, I shouldn't have taken such a long exposure. While the time lapse exposure does give a nice effect in showing a giant green blur in the sky, the aurora is constantly changing, so you lose all the detail. In that picture, you can just barely see the vertical stripes coming out of it, but in person, they were quite apparent. I should have opened up the aperture more (I could have gone 1 and 2/3 stops more) to get a faster shutter speed, and maybe even bumped the ISO up to 400 or 800. That would have given me an exposure around 2 to 5 seconds, and probably would have looked much better.
So, it was an interesting 3 weeks to photograph the sky. It makes me really want to get some better equipment, like an auto-tracking telescope. It also makes me wonder what will be waiting in the sky to be photographed next week?
...click here to read more!
Tuesday, November 09, 2004
A Broken Lens (and other things to come)
Well, the strangest thing happened to me: my Canon 50mm f/1.8 Mark II lens fell apart in my hands. No, I wasn't torturing the poor things, just manual focusing. The lens had started to develop a little catch in the focusing ring. After turning the focus ring about 90% of the way it would catch and not go any further. A little jiggle of the focus ring (just backing off slightly and then continuing forward) would solve the problem. I meant to have the lens looked at, but since it was still working and the warranty wasn't about to expire, I guess taking in a working lens to have it looked at seemed to be too much trouble. That is, until last week. I was doing some manual focus, and when it got to that catch, the center part of the lens just fell out into my hands. Imagine my shock. Here's what I was left with: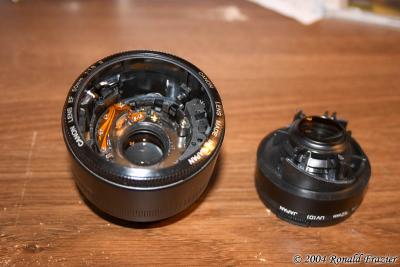
I tried taking it up to the local Canon authorized service center, but they were useless. They didn't even want to help me...just told me to send it to Canon because they didn't think Canon would pay them to fix it. Way to go to bat for your customer (you can be sure I won't be recommending them to my friends). So now I have to send it off to Canon for repair. That is, as soon as I get around to calling them.
I've also got a few other updates to post this week (when I get the time). I went on a lighthouse trip to Canada this weekend and stopped by Niagara Falls for the night, so I'll post a few photos from that trip. I've got a shot from the conjunction of Venus and Jupiter to share. Hopefully the aurora shows up tonight here in Michigan. I've also been meaning to post an update on the topic of LAB mode editing. Someone asked me for some pointers on how I made my moon collage, so if I get a chance, I'll post a quick little step-by-step tutorial. I'm sure there is something else.
...click here to read more!
Wednesday, November 03, 2004
Assignment 4 - Lighting Technique
The goal for this assignment was to practice with different lighting techniques and using flash for both primary lighting and for fill. I found this assignment to be a bit more challenging than the others. Flash usage is not one of my strong points, so it was fun to give it a try. At the same time, I don't have an external flash, so I was stuck using the one built into my rebel. As a result, I ran into some difficulties along the way. There were a few places I found where I wanted to use fill flash, but the distance was so great that the little built in flash couldn't reach it with enough power to produce any significant fill, so those shots didn't work. In other places I was again limited by the power of the built in flash, as the room was too big for me to bounce the built in flash off the ceiling (using an index card to bounce it) but the direct flash was too strong. In the end, I didn't get a whole lot of useful examples to take in, but I at least ended up with enough shots to demonstrate three different degrees of flash.
Flash as Primary Light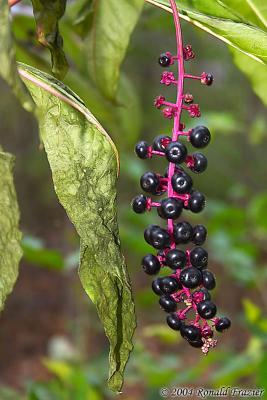
This first image demonstrates using fill flash as the primary source of lighting. I found this little plant in the woods and thought it would make an interesting subject. At first I tried to shoot it with no flash to see what I could get. I was able to easily get enough lighting to expose it at a reasonable handheld shutter speed. However, what I ended up with was a very distracting photo. Even though the leaves in the background had blurred, they were still quite bright and stood out (drawing your attention away from the foreground). With a bit of flash, I was able to light the foreground properly while shortening the shutter speed enough to darken the background to keep if from being distracting. In fact, the foreground lighting ended up better, since it accentuated the divots in each of the berries (which were almost invisible in the shot without flash). I also used a piece of translucent plastic from a fruit juice jug to partially diffuse the flash (though it wasn't enough...there are still some pretty obvious flash highlights).
Blending Flash and Ambient Light
In this example, I had to back up and zoom in to keep the flash from being too strong (though I only discovered that through trial and error). Luckily by the time I found the right distance, this kid became quite distressed about removing his costume and presented me with quite a nice expression. If you look carefully, you can still tell flash was used (glare in eyes, on tip of nose, and on teeth and fingernails). These could be photoshopped out quite easily (though that wasn't my goal for the assignment, so I left them in). However, looking at the rest of the outfit, it is lit quite naturally. You can see a subtle shadow around his neck from the green neck piece, but the flash fills it in and makes it more subtle.
Sidelighting with Subtle Fill Flash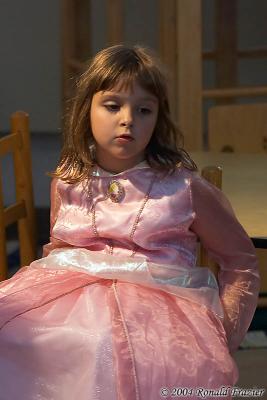
I'm not sure what this little girl was thinking, but she sat down in this wonderful lighting and then gave this very dramatic look. I'd swear she was posing for the camera, but that would mean she knew more about lighting and composition than me. I didn't want to get close enough to distract her, so I very quickly swapped out my 18-55mm lens and put on a 70-300mm one. I did the first shot without flash, and while it exposed properly, the shadowed side of her face ended up too dark. I popped up my internal flash, and from about 20 feet away it provided JUST enough flash to fill in the other side of her face ever so slightly. About the only evidence of flash might be the glare on the tip of her nose (though that may be from the sidelight...I'm not sure).
While I didn't uncover the most opportunities to use flash, I ended up with a broad enough sample to cover the different techniques. I've also never been a big fan of using flash, since every time I did I was less than satisfied with the results. However, the results I did get were enough to show me that I can take pictures with flash and still make them look good. Now I just need to get an external flash (to give me more distance and control) and to get out there and practice using it more (so that I can predict when, where, and how the flash will look best without using the LCD for trial and error).
...click here to read more!


