Tamrac Expedition 7 Backpack - Part 1
Today I'm going to talk about loading that backpack up and my thoughts on it's features and construction. As far as actual use, I haven't had a chance to try it yet....I've been sick. However, the last few days I've been feeling better, and as of last night, the only sign left was an occasional series of coughs. So with any luck, I should be able to find some way to put it to the test this weekend. When I do, I'll post part 3 with my thoughts.
On The Inside
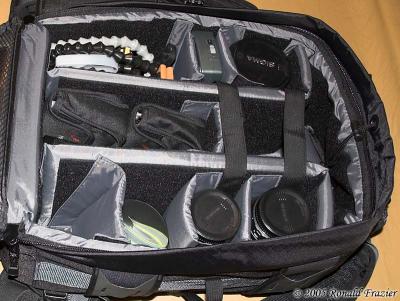
The first thing I had to do was find a way to get all my gear into the backpack. I didn't think there would be any problem at all. In fact, my initial thought was that this backpack might be a bit bigger than I needed, and that I'd end up with quite a bit of empty space. I couldn't have been more wrong. I overestimated the size of this bag, but I more severely underestimated the quantity of my equipment. However, I did manage to fit everything in with a bit of room to spare (and I could make more room if needed). First, a look in the main backpack compartment:
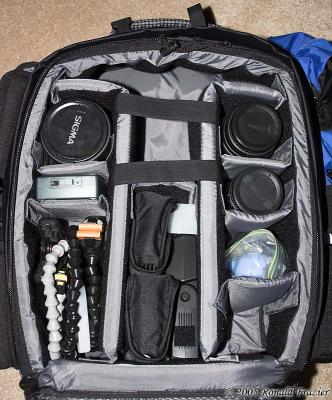
On the left, from top to bottom is my Sigma 12-24 lens, Vosonic X-Drive, and my Plamp & McClamp clamps. In the center, at the top is a space for my Digital Rebel, and at the bottom I squeezed in my 2 cases of filters, my Sigma EF-500 DG Super flash and Stofen Omnibounce. On the right, from top to bottom is my Sigma 70-300 APO Super Macro II, Canon 50mm f/1.8 + Kenko extension tube set, misc items (shade for my 30-700 and bulb air blower), and on the bottom is an empty space for future items (like someday a spare camera body).
If prompted for a little more room, I could also clear the misc items from the lower right by putting the shade in the same compartment as the lens and squeezing the blower into one of the top corners (in the unused gaps next to the camera).
As you can see, I've loaded my body and lenses near the top. I figured near the top was better, since I wouldn't have to open the zippers all the way to get at the body and lenses quickly. I'm wondering now if it would be better to have the heavier lenses near the bottom (to keep the weight and center of gravity low). I'll see how that turns out when I actually use it and adjust if necessary.
Next, we'll take a look at the items I squeezed into the main compartment pockets.

The top pocket holds a bunch of misc accessories (an extra filter, some clips & straps, ect). The middle pocket has my PecPads, parts for my Cokin filter kit, and a few extra lens and body caps. In the bottom pocket is my Lumiquest Promax kit and my Better Beamer (both really fold up nice and compact).
On The Outside
First let's take a look at the front of the backpack
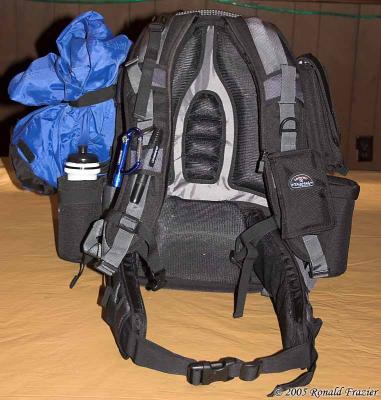
On the left side, you can see I've attached the water bottle on the bottom, and there's a place for me to attach a light jacket using the optional cinch strap attachment. On the right side I've attached a lens case on the bottom and a large pouch on top. I've got them there for now, but once I'm out in the field, I'll probably attach them to the waist band so that I can access them more easily.
As far as the shoulder straps, on the left strap (left in the picture...it would be the right strap when I'm wearing it) I've used the clip to attach a mini flashlight/compass, and I've found a place to tuck in my lenspen for easy cleaning. On the other strap I've attached the 4 pocket memory card/battery pouch. Inside I have my 2 extra memory cards and 1 spare battery.
Now, let's turn the backpack around and look at the back:
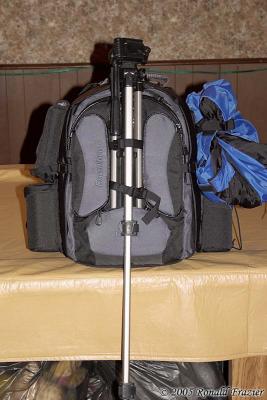
In the first picture you can see I've attached my tripod (with the one broken leg, which is why it's stuck open). The backpack holds it very secure. Two legs slide into a special reinforced pocket at the bottom while the third leg hangs free. A strap at the top wraps around the head of the tripod to hold the top in place. Then two more straps wrap around the middle of the tripod to make sure it's not going anywhere.
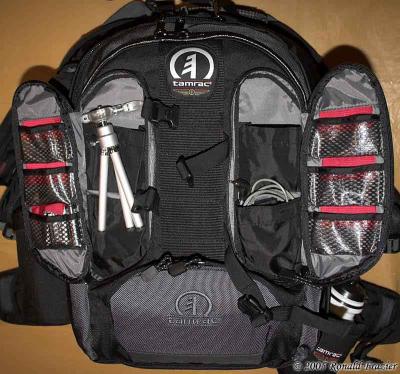
In the second picture, you can see the wing-like accessory pockets opened. On the left I have my mini tripod, a set of spare AA batteries for my flash, and lots of empty pockets for more batteries, memory cards, a cell phone, etc. In the right, I have my cable release, an extra battery for the camera (which you can't even see in the pocket), and several more empty pockets.
There is also a zippered compartment to fit more accessories inside the back panel of the backpack. Right now it's empty, but I could use it to hold a book & notepad, or maybe a collapsible reflector (which I plan on purchasing soon).
Thoughts on Construction
The backpack is build really solidly and seems pretty well thought out. So far, without using it I can't see any weak points, but I will point out a few of it's strong points. First, lets take another look back into the main compartment:
One thing I really like here is the velcro on the dividers. Lots of other bags I've tried only had one or 2 strips of velcro on each divider and on the side of the bag. However, in this backpack Tamrac has put full width patches of velcro lining the entire compartment. This gives you plenty of flexibility with how to attach the dividers, as well as helping ensure that the dividers are attached very securely.
The next feature I really like is the pair of clips to hold the back shut. I've seen backpacks before that have nothing but a zipper holding the backpack shut. There was even a post from someone in the dpreview forums who had their zipper fail, the back fly open, and their entire contents of the backpack (body, lenses, and all) fall right out onto the ground. That can't be pleasant. Well, with this backpack, there is an extra clip-on-strap on each side of the flap (about half way up) to hold it closed, just in case the zipper should fail.
Also,you might be concerned about the fact that the tripod attaches to the back panel. Will the weight of the tripod pull open/break the zippers? The answer is no, because the strap that wraps around the head of the tripod is actually connected to the top of the backpack itself rather than the back panel. This serves 2 purposes. First, it removes the weight from the back panel. Second, should the zipper fail, it kind of acts as a third latching point (in addition to the 2 side clips) to help hold the back panel closed.
Other than that, the backpack has most of the standard features, like waterproof zippers and extra flap that completely covers the main zipper (so you can be sure no rain leaks into the main compartment). The one thing it doesn't have (which many other backpacks do) is a waterproof flap to cover the entire back side. However, when you consider that you attach your tripod to the back, that doesn't make a lot of sense for this backpack. And while we are talking about the tripod and rain, I should point out that the bottom pocket (for the tripod legs) has a drain hole at the bottom so that it doesn't collect water. That's good if you want to use it for a tripod as designed, but if you want to use it as an extra general purpose pocket...well, don't put anything that isn't water/dirt proof in there.
I think that pretty much covers things for now. Stay tuned for part 3, when I actually put this backpack to the test.


No comments:
Post a Comment