Monday, January 30, 2006

Multiple exposure on a DSLR - Part 1 - The Capture

I'd like to talk a bit about doing multiple exposures on a DSLR. However, it's a bit of a large topic, so I'm going to break it up into 2 parts. Today, I'm going to talk about the capturing of images. In part 2, I'll talk about merging those images to create your multiple exposure.

As Digital SLR cameras have progressed over the years, they are gradually overtaking traditional 35mm film SLR cameras in almost every way. However, one aspect which I am lately missing is the ability to do multiple exposures.

As I mentioned previously, I've been reading the book Fine Art Flower Photography by Tony Sweet. I'm only halfway through, but so far it has been a fantastic read, with plenty of inspiring photos and ideas about how to take flower photographs that really stand out.

When I went to the arboretum last weekend, I figured it would be a great opportunity to try out some of the techniques I read about. Several of my favorite techniques involved using multiple exposures in various ways to create a dreamy, surreal, or abstract look for your photograph. It's been years since I did a multiple exposure...back since the days of 35mm film. But now that I use a digital SLR, I had to stop and think a bit about how the techniques used for creating multiple exposures have changed for digital.

Well, the first and most obvious change....most DSLRs don't have a multiple exposure feature (there are a few...I'll get to that later). There is no way to take multiple captures and have them go to the same image file. That certainly makes doing multiple exposures shots a bit more difficult, doesn't it? Well, no problem, I figured. That's what software is for. I can take multiple shots, load them up into Photoshop, and blend them together. It's the same effect. In fact, it will give me even more flexibility in how I blend the exposures. Great...off to the arboretum I go.

Not so fast there, cowboy! I now realized that this altered process had another implication for multiple exposure technique. When working with film,
each exposure is additive to the final result. If you took 2 properly exposed shots on the same frame, your end result would be 1 stop overexposed.
In order to compensate, you needed to take each shot 1 stop underexposed. Once added together, your end result should be properly exposed (though that can vary, depending on your specific subject matter).

Normally, underexposing a shot is a bad thing because it introduces more noise into your picture. However, when doing multiple exposures on film this wasn't an issue because the noise was generated by the medium (grain and imperfections of the film), not the process. No matter what you did, the level of noise on a given frame on the film never changed. However, with digital, the noise is part of the process of capturing the photo. When merging exposures, each additional exposure also adds additional noise. You can't count on the second exposure to make the scene brighter in relation to the noise. True, merging multiple exposures together will tend to cancel out some of the noise and reduce the overall noise level, but that's true whether each shot is maximally exposed or 3 stops underexposed, so your best bet is to still get as much headroom above the noise as is possible.

So, the trick in doing multiple exposures with digital is not to purposely underexpose the individual shots as we did with film, but rather to make each individual shot maximally exposed. Then, when we go to merge, we will reduce each shot in brightness. This will simultaneously reduce the brightness of the scene AND the noise.

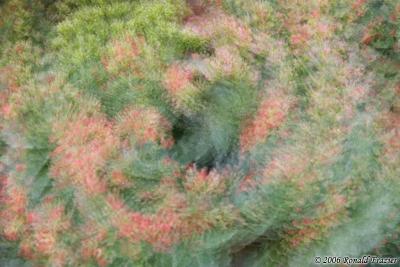
Keeping this in mind, I was now ready to head out for the arboretum. Once there, I picked out a couple of different subjects and decided to try 2 different techniques. For the first one, I simply panned the camera upwards between each shot. The second one was a simple rotation around the center point of the image.

As I was capturing each set of images, I really began to grasp the weakness of doing digital multiple exposure. If you ask almost any photographer what's the best part of shooting in digital, you will probably hear the words "instant feedback". With digital, you get to see your results immediately, and if you made any mistakes, you can identify them, correct them, and try again. Yet when it comes to doing multiple exposures, the current system completely fails to take advantage of that ability. Indeed, I found myself wondering: did I pan enough? too much? rotate enough? too much? I was, if you'll pardon the expression, shooting blind.

Well, when I got home and checked the results, the answer was: Yes I panned too much. Yes, I probably rotated too much (although my result for this one actually worked, it was more drastic than what I was intending). So now I know what I did wrong and I can try again....except that the arboretum is about a 30-40 minute drive from my house. Oh well, I can just try again next time. Well, as it happened, it's one week later and I made it to the arboretum again. I tried the rotation shot and got something closer to what I intended last week. However, with the panning shot, this time I underdid it. Maybe next time...except I don't know when that will be. This kind of makes the learning process a bit slow...just like the days before digital.

So how could a DSLR be designed to do multiple exposures? Well, the simplest way is to let you take individual images that are already stored on the memory card, and merge them after the fact. This would allow you some flexibility to try different combination of exposures to see what looks best. In addition, you can combine non-consecutive photographs (take your first part of the multiple exposure, then shoot a bunch of other photographs, then take the second part later). Of course, the downside is that this takes up a lot of space on your memory card. If you want to take a bunch of 9-shot multiple exposures, you are going to fill up your memory card very quickly.

Another way would be for the camera to have a multiple exposure mode you can turn on. When in this mode, the individual frames would be stored only in the camera buffer, rather than on the memory card. When you are done, the camera can then combine the images and store only the final result on your memory card (thus saving a lot of space on the card). In addition, the camera could do things like let you see the interim result after each shot. If you get 5 or 6 shots into a series of 9 and then see that your more recent shot didn't fit with everything else, you could undo and try again before continuing on.

With either method, it could be possible to allow you to dynamically adjust the weight of each image. If one shot shows too prominantly in the mix, reduce it's exposure by a stop or 2 to make it blend better with the series.

Of course, these are only what could be done in theory. I took a look around to see if any DSLR's actually handled multiple exposures in camera, and if so, how they did it. Well, it turns out a few of them do this. The Nikon D2X and D200, and the Pentax *istD all have multiple exposure support. However, I could find very little info about how they work. Unfortunately, none of the Canon DSLRs so far support these features. Hopefully by the time I'm ready to upgrade Canon will have added this feature to newer models.

That pretty much wraps up the topic of capturing images for a multiple exposure on a DSLR. Next time I'll discuss merging & blending these images together to give you your final result.
...click here to read more!
Tuesday, January 24, 2006

A few shots from the arboretum

I took a trip to the Belle Isle Arboretum this weekend. It was pretty nice being able to take pictures of flowers in the dead of winter (I can't have any plants/flower as home...the cats eat them). It also gave me a chance to experiment with a few items. I got to give a good tryout to my new 22" reflector, which I bought from adorama a few weeks ago. I also got to try out a friend's 180mm Tamron macro lens. Finally, I got to experiment with a few tricks from the book "Fine Art Flower Photography: Creative Techniques And The Art Of Observation".

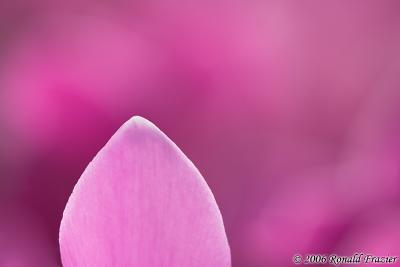
My favorite shot from the day was one I call Pink. It's kind of an oddity...contrast without contrast. There's no contrast in color, just contrast in focus and luminance. The foreground and background are all the exact same sort of flowers. I used the Tamron 180mm macro from about 2 feet away, and got this single petal at an angle where it was both backlit and positioned in front of the darkest set of petals in the background. This made the petal quite bright pink, surrounded by a dark pink, and then transitioning out into a medium shade of pink through the rest of the shot. However, to reduce the backlight effect a bit and let you see a little more surface detail in the petal, I used the gold surface of my reflector to brighten/warm up the petal's front side.


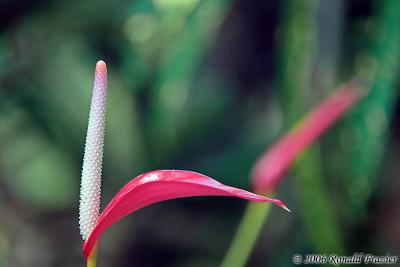
The next shot, I really liked how the photograph leads your eye along into a W shaped path. Your eye is clearly drawn to the white spike first, then follows out along the bright red, arching leaf. When it reaches the end, you are left following up the red leaf of the out-of-focus plant, which just kind of dissipates and lets you draw back to see the entire photo once again.


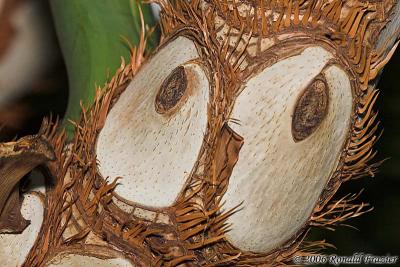
The next shot...I'm not exactly what sort of tree this is, but it is very fascinating looking. This shot here looks like a big pair owl eyes.


Finally, for the last shot I took some pretty uninteresting flowers and tried to make an interesting shot via multiple exposure. Trying to replicate multiple exposures via DSLR is a bit of a pain, but I'll save that topic for another time. Inspired by the book mentioned above, I tried a set of 6 rotating exposures. Didn't come out exactly how I would have liked (it's a bit more abstract than I was looking for) but not too bad (in my opinion).


In the next week or so I'll try to post a review of the book (once I finish it), and also provide a little more information about multiple exposures photographs on a DSLR.
...click here to read more!

Tuesday, January 17, 2006

Hama single bubble level

I just got a new little toy the other day from Adorama. It's a VERY simple accessory, but it kind of disappointed me a little, so I felt like sharing my thoughts.

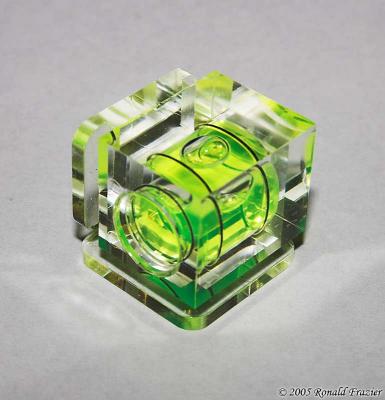
The new item is a Hama single bubble level. The purpose of this item is that you can slip it into the hotshoe of your camera, and then you can determine when your camera is level. Of course, the most common use for this item is to make sure your camera isn't tilted from side to side. This way, you can make sure any horizontal lines are straight.


That's pretty useful, because it can be a bit tricky getting the horizon straight. In such a small viewfinder, what APPEARS to be straight in camera can actually end up being at a pretty drastic slant once you print an enlargement. Another use can be for shots where you aren't looking through the viewfinder. Like maybe the ground is wet, and you see this nice looking puddle shot, and you want to get a wide angle shot from just a couple inches off the ground, but you don't want to lie down and get your clothing soaked. So you just hold your camera down low, and take a blind shot. I've done this a number of times, and almost always I end up with the horizon being crooked (often drastically). A bubble level will solve this problem...just position your camera, tilt until level, and shoot.

So, that's the reason I decided to get one of these levels. My only question was which one to buy. These levels come in 2 basic types...single bubble and double bubble. The double bubble levels have an extra level in a different orientation. This allows you to level your camera in 2 directions at once. For example, not only can you ensure that you are shooting the horizon level, but you can make sure the camera if pointing parallel to the ground, rather than tilting up or down slightly.

Now, in thinking about this usefulness of this, I asked myself when would I ever want to level my camera 2 directions at once? Perhaps it might make sense when shooting a subject from directly above. However, for landscape photos that doesn't make much sense. Having a level horizon is a technical issue, so a technical solution (a level) makes sense. However, the up and down angle is more of an artistic/composition issue. It doesn't generally make sense to apply a technical measure to it.

So I decided that a less expensive single-bubble level was what I wanted and ordered the Hama model from Adorama. When it arrived yesterday, I opened the package, slipped it on the camera, and made an unpleasant discovery. The bubble level has 2 connectors on it (so that you can attach it to the hotshoe 2 different ways). I knew this before ordering. However, what I didn't know was that the second connector was completely useless...it didn't provide the ability to attach it in any different orientation the first connector.

As a result, although you can use the level two different ways when the camera is in landscape orientation, once you turn the camera to portrait orientation, there is no way to level the camera left to right. You can only level the camera in the front/back (tilt up/tilt down) direction. In other words, the level is virtually useless in portrait orientation.

The most annoying aspect of this is that, if the extra connector had been but on the third axis instead, you would be able to use this level in either direction for either orientation. A very simple design change would have made this accessory MUCH more useful.
...click here to read more!

Tuesday, January 10, 2006

Tamrac Expedition 7 Backpack - Part 3

Two weeks ago, I talked about my thought process in deciding on this backpack and a brief overview of it. If you haven't read that entry, read it now:
Tamrac Expedition 7 Backpack - Part 1

Last week I talked loading up the backpack, and my thoughts on it's construction. If you haven't read that entry, read it now:
Tamrac Expedition 7 Backpack - Part 1

On Friday, I had a chance to go out and actually put this backpack to the test, at least for a little bit. I headed down to the park and spent about an hour and a half taking pictures of stuff. While I didn't get to test as thoroughly as I'd have liked, I got a pretty good idea for how it handles.

First off, carrying the backpack around that long was no problem at all. With the 2 shoulder straps and the waist strap, the weight was pretty well distributed. The bag did not feel too top heavy, as I was concerned might be the case. However, since I wasn't hiking (I was just walking around taking picture) I had my camera and an extra lens out at all times, so the backpack wasn't at full weight. Also, for the same reason, I didn't have my tripod attached, so that was even less weight on the backpack.

Removing and getting into the backpack was not bad at all. Not as difficult as I feared. To test quick accessibility, I attached my lens case to the waist belt and put a lens in there. While the case does work well for my 70-300, the Sigma 12-24 was a little too wide. It could just barely fit in there, and as a result, it was a bit difficult getting it out. I need to find a larger case that fits a little better.

Another problem I noted here was that, due to the cold weather, I was wearing a thick, bulky jacket, and as a result it kind of pushed the straps further out. Its kind of hard to describe exactly what I mean, but the end result was that the lens case on the waist belt was a bit further out and behind me, and the memory card/batter wallet was a bit higher up on my shoulder. This made them both a little more difficult to get at...a problem I don't seem to have when not wearing a jacket. The end result is that it makes the bag just a little more difficult to use in the winter (but then again, photography in general is a little more difficult in winter).

All together, I was pretty satisfied with how the backpack handled. However, I think an even bigger test will be using it in the summer, when I'm more likely to be hiking longer distances and thus needing a backpack the most. We'll have to wait a couple months for much nicer weather around here before I can try that out.
...click here to read more!
Thursday, January 05, 2006

Tamrac Expedition 7 Backpack - Part 2

Last week I talked about my thought process in deciding on this backpack and a brief overview of it. If you haven't read that entry, read it now:
Tamrac Expedition 7 Backpack - Part 1

Today I'm going to talk about loading that backpack up and my thoughts on it's features and construction. As far as actual use, I haven't had a chance to try it yet....I've been sick. However, the last few days I've been feeling better, and as of last night, the only sign left was an occasional series of coughs. So with any luck, I should be able to find some way to put it to the test this weekend. When I do, I'll post part 3 with my thoughts.

On The Inside

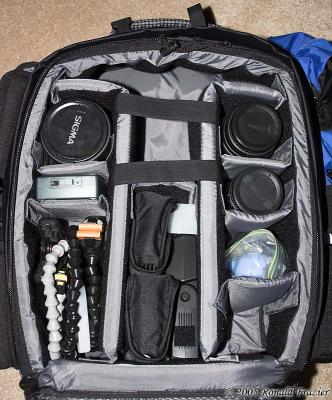
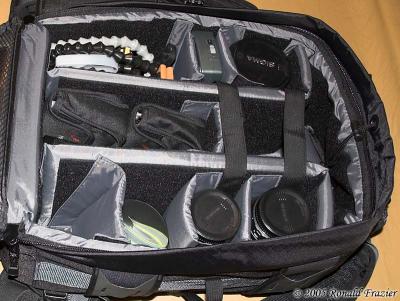
The first thing I had to do was find a way to get all my gear into the backpack. I didn't think there would be any problem at all. In fact, my initial thought was that this backpack might be a bit bigger than I needed, and that I'd end up with quite a bit of empty space. I couldn't have been more wrong. I overestimated the size of this bag, but I more severely underestimated the quantity of my equipment. However, I did manage to fit everything in with a bit of room to spare (and I could make more room if needed). First, a look in the main backpack compartment:


On the left, from top to bottom is my Sigma 12-24 lens, Vosonic X-Drive, and my Plamp & McClamp clamps. In the center, at the top is a space for my Digital Rebel, and at the bottom I squeezed in my 2 cases of filters, my Sigma EF-500 DG Super flash and Stofen Omnibounce. On the right, from top to bottom is my Sigma 70-300 APO Super Macro II, Canon 50mm f/1.8 + Kenko extension tube set, misc items (shade for my 30-700 and bulb air blower), and on the bottom is an empty space for future items (like someday a spare camera body).

If prompted for a little more room, I could also clear the misc items from the lower right by putting the shade in the same compartment as the lens and squeezing the blower into one of the top corners (in the unused gaps next to the camera).

As you can see, I've loaded my body and lenses near the top. I figured near the top was better, since I wouldn't have to open the zippers all the way to get at the body and lenses quickly. I'm wondering now if it would be better to have the heavier lenses near the bottom (to keep the weight and center of gravity low). I'll see how that turns out when I actually use it and adjust if necessary.

Next, we'll take a look at the items I squeezed into the main compartment pockets.


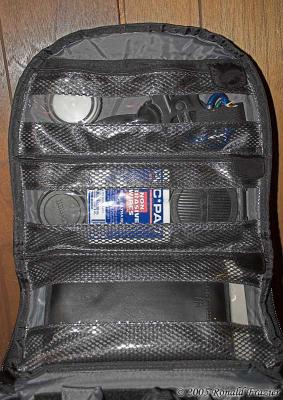
The top pocket holds a bunch of misc accessories (an extra filter, some clips & straps, ect). The middle pocket has my PecPads, parts for my Cokin filter kit, and a few extra lens and body caps. In the bottom pocket is my Lumiquest Promax kit and my Better Beamer (both really fold up nice and compact).

On The Outside

First let's take a look at the front of the backpack


On the left side, you can see I've attached the water bottle on the bottom, and there's a place for me to attach a light jacket using the optional cinch strap attachment. On the right side I've attached a lens case on the bottom and a large pouch on top. I've got them there for now, but once I'm out in the field, I'll probably attach them to the waist band so that I can access them more easily.

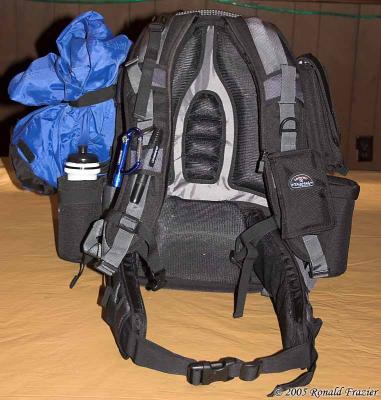
As far as the shoulder straps, on the left strap (left in the picture...it would be the right strap when I'm wearing it) I've used the clip to attach a mini flashlight/compass, and I've found a place to tuck in my lenspen for easy cleaning. On the other strap I've attached the 4 pocket memory card/battery pouch. Inside I have my 2 extra memory cards and 1 spare battery.

Now, let's turn the backpack around and look at the back:


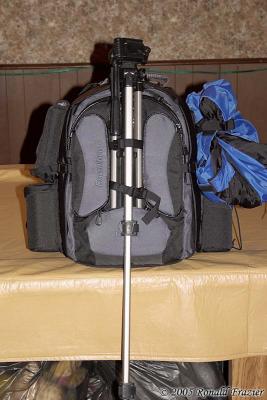
In the first picture you can see I've attached my tripod (with the one broken leg, which is why it's stuck open). The backpack holds it very secure. Two legs slide into a special reinforced pocket at the bottom while the third leg hangs free. A strap at the top wraps around the head of the tripod to hold the top in place. Then two more straps wrap around the middle of the tripod to make sure it's not going anywhere.

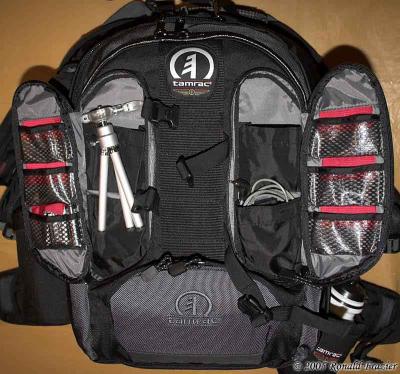
In the second picture, you can see the wing-like accessory pockets opened. On the left I have my mini tripod, a set of spare AA batteries for my flash, and lots of empty pockets for more batteries, memory cards, a cell phone, etc. In the right, I have my cable release, an extra battery for the camera (which you can't even see in the pocket), and several more empty pockets.

There is also a zippered compartment to fit more accessories inside the back panel of the backpack. Right now it's empty, but I could use it to hold a book & notepad, or maybe a collapsible reflector (which I plan on purchasing soon).

Thoughts on Construction

The backpack is build really solidly and seems pretty well thought out. So far, without using it I can't see any weak points, but I will point out a few of it's strong points. First, lets take another look back into the main compartment:


One thing I really like here is the velcro on the dividers. Lots of other bags I've tried only had one or 2 strips of velcro on each divider and on the side of the bag. However, in this backpack Tamrac has put full width patches of velcro lining the entire compartment. This gives you plenty of flexibility with how to attach the dividers, as well as helping ensure that the dividers are attached very securely.

The next feature I really like is the pair of clips to hold the back shut. I've seen backpacks before that have nothing but a zipper holding the backpack shut. There was even a post from someone in the dpreview forums who had their zipper fail, the back fly open, and their entire contents of the backpack (body, lenses, and all) fall right out onto the ground. That can't be pleasant. Well, with this backpack, there is an extra clip-on-strap on each side of the flap (about half way up) to hold it closed, just in case the zipper should fail.

Also,you might be concerned about the fact that the tripod attaches to the back panel. Will the weight of the tripod pull open/break the zippers? The answer is no, because the strap that wraps around the head of the tripod is actually connected to the top of the backpack itself rather than the back panel. This serves 2 purposes. First, it removes the weight from the back panel. Second, should the zipper fail, it kind of acts as a third latching point (in addition to the 2 side clips) to help hold the back panel closed.

Other than that, the backpack has most of the standard features, like waterproof zippers and extra flap that completely covers the main zipper (so you can be sure no rain leaks into the main compartment). The one thing it doesn't have (which many other backpacks do) is a waterproof flap to cover the entire back side. However, when you consider that you attach your tripod to the back, that doesn't make a lot of sense for this backpack. And while we are talking about the tripod and rain, I should point out that the bottom pocket (for the tripod legs) has a drain hole at the bottom so that it doesn't collect water. That's good if you want to use it for a tripod as designed, but if you want to use it as an extra general purpose pocket...well, don't put anything that isn't water/dirt proof in there.


I think that pretty much covers things for now. Stay tuned for part 3, when I actually put this backpack to the test.
...click here to read more!