I've had a few questions about how I made my weights for the corners of the booth. I got the basic idea from Larry Berman: http://artshowphoto.com/pages/weights.htm
Except where he used lead, I used concrete. All the parts can be bought from Home Depot or your local home improvement store. Total cost should be $30-$40.
Materials
(1) 10 foot length of 3" diameter PVC pipe
(4) 3" PVC end caps
(4) cabinet door handles (plus bolts/nuts to secure them)
(4) 6" long, 1/4" eye bolts
(4) 1/4" fender washers
(8) 1/4" nuts
(1) 60 lbs bag of concrete mix
PVC cleaning solvent/cement
Instructions
Cut the PVC pipe into (4) 2.5 foot sections. With each section, drill holes and bolt the handle in place halfway along the length of the pipe. It's important to use bolts, rather than the wood screws the handle probably came with. Take a PVC end cap, apply the cleaning solvent to the outside of the end of the pipe and the inside of the cap, do the same with the PVC cement, and put the cap on the end of the pipe. You'll want to give the cap a 1/4 turn as you slide it on, and then keep pressure on it for about 60 seconds to help it seal in place (otherwise the connection has a tendency to slide apart).
Repeat the above process with each of the other 3 sections of pipe. When you are done, you should have 4 hollow sections that look like this: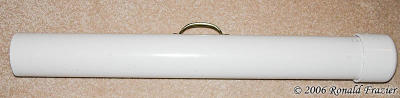
You'll want to let it sit overnight to bond. The next day, take each bolt, apply a nut, then a fender washer, then another nut. Using 2 wrenches, tighten the 2 nuts together so they are tight. You should now have 4 assemblies that look like this: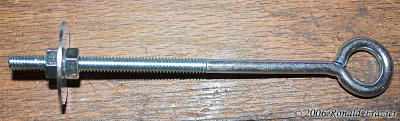
Now you'll want to mix up your bag of concrete. Follow the instructions on the bag. When it's properly mixed, you'll want to start filling each of the tubes. As you are filling it, you should stop 3 or 4 times, pick it up, and shake it up and down a bit to help the concrete settle in compactly. When you get it filled about 4 or 5 inches from the top, insert the eye bolt assembly, push it down so that it doesn't stick up too far, and then continue filling with concrete. You'll want to use a rubber glove so that you can pack the last bit down with your hand (or just do what I do and use your bare hands, as long as you don't mind getting a little messy). Now set the filled weight somewhere where it can stand upright without any chance of falling over. That's important...otherwise you'll have a nice mess on your hands.
You should now have something like this (minus the rope):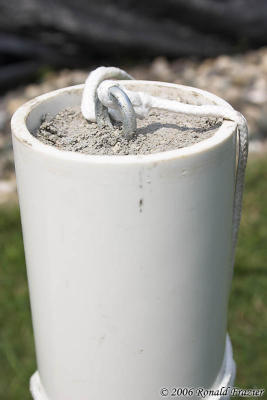
Repeat the process on the other 3 tubes. You should just barely have enough concrete to finish filling the 4th tube. Clean up and let the weights dry for a couple of days.
When you are done, each weight should weigh around 20 pounds. If you'd like more weight than that, you can opt to use 4" PVC pipe instead, which should give you about 35-40 pounds per weight and require two bags of concrete mix.
Now, all you need is a way to attach it to your canopy. I currently just use a section of rope...tie one end through the eye bolt, wrap the other end around the canopy and tie it tight. The problem there is, 1) it's difficult to get it tight, and 2) it's a pain to climb up on a ladder in order to tie it down.
When I was at a show this weekend, I found a better solution in use by another artists. Get 4 moving straps with hooks on each end: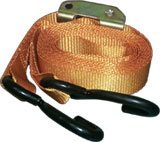
Hook one end through the eye bolt, hook the other end around your canopy frame, and then crank it until it's tight. Ideally, you want to have it tight enough so there is no slack or give, but you don't want to make it so tight that it lifts the weight off the ground or starts to bend your canopy frame.
Tuesday, June 27, 2006
PVC and cement corner weights
Subscribe to:
Post Comments (Atom)


1 comment:
I wanted to let you know that I linked to this wonderful and informative post from my blog about outdoor art shows & tents:
http://samanthasartstudio.blogspot.com/2009/05/outdoor-art-show-advice-part-1-tent.html
Thanks for posting this!
Post a Comment