So far I've been pretty lucky. I haven't had any rain at any of my shows. I'm hopeful that it stays that way for quite some time, but "hope" is never a very good disaster plan. The smart thing is to prepare for rain and be ready if it shows up.
Now, you might be thinking "wait..you've got a tent over your head, so what are you worried about?" That's true. The tent does offer me a large degree of protection from the rain, but it's not foolproof. The biggest problem is the shape of the EZ-up style canopies. They use a pyramid shaped roof, but the only support points of the pyramid are at the top-center and the 4 corners. The end result is that, unless the top is pulled and kept completely tight (which is near impossible to do), you can get sagging in the roof, which can lead to puddling and then eventually (if you are unlucky) collapse.
Take a look at the following photo. The red arrows show the places where I've seen puddling occur when I setup the tent at home in a rain storm.
I never let it happen, but I expect when the puddling gets large enough, the canopy could rip away from the sides, exposing the framed artwork directly to rain. Then to make matters worse, once one side collapses, the roof would lose some of it's tension, and then the other 3 sides would be at increased risk of collapsing.
Lots of people online have discussed propping up the canopy using all sorts of objects, ranging from foam funnoodles, to hoola-hoops, to pvc piping. Of course, the one thing all of these discussions have been short on were pictures. I've been trying to find a photo of just what these setups look like. I've looked around at a half dozen local shows and haven't seen anyone using anything like that either. So, with only vague descriptions, I set out to try and create something to do the job, as well as document it here so that others have at least something to refer to.
I setup my tent in the backyard with the legs fully collapsed, so that the canopy was as low as possible. This made it easy to get inside and play around with different ideas without having to use a ladder. After playing around with several ideas, I figured out a way I though would work. My plan was to use PVC piping. I spent about $5 and bought:
(2) ten foot long 1/2" PVC pipes
(4) 1/2" to 1/2" PVC couplers
(4) 1/2" PVC right angles.
Before on continue on, let me first say that you should do your own investigation and measurement before you continue on. What works for me may not work for you, depending on the dimensions and design of your canopy.
First, I took each ten foot pipe and cut it into a 5 foot section, two 2 foot sections, and discarded the remainder. I then assembled it into a C shape : 2 feet, right angle, 5 feet, right angle, 2 feet. I then needed some way to connect this to the framework inside my canopy. I decided that I could cut a slot in the end of the pipe and slip it around one of the supporting beams in my tent. However, the supports of my canopy frame were 1/2" wide, which would hardly leave any material left to provide strength. This is where the couplers came in.
I took each coupler, used a 1/2" wide piece of matboard to help me mark a 1/2" slot on the end of one side of each coupler, used a hand saw to cut down halfway into the coupler (don't cut any more than halfway), and then used a pair of needle nose pliers to grasp each cut piece and snap it off. The end result looks like this:
Then you put one of those on each end of your C-shaped assembly, and you get this:
And here a better look at the end after it's connected
Now, you put each of the 2 assemblies inside the tent and attach it to the frame, and it looks like this:
The following pictures gives you a better idea of just how it hooks onto the frame:
That's it. Just those couplers holding onto the frame, the canopy holding down on the assembly, and it stays wedged in place. It would probably also be a good idea to tie, zip tie, or velcro wrap the centers of each assembly to the center post to help keep it in place even better.
Now, take a look at the outside when it's done:
In the following before/after pic, take a close look at the shape of the shadow that runs across the canopy. In the before shot, you can clearly see the shadow dipping down into the valley where I reported the pooling occurs. In the after shot, the valley is gone, and the shadow no longer dips.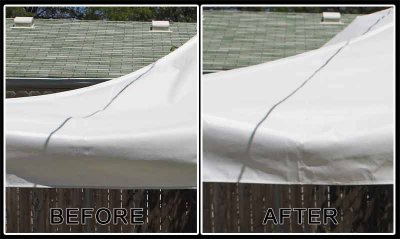
Just as an initial test, I pulled out the hose, started spraying down the canopy, and no water collected anywhere. Everything ran right off, no problem.
When you've got everything working,and you are happy with the entire setup, then you can use PVC cement to connect the pieces together permanently. I haven't done that yet, because I might play around with things a bit more just to make sure I've got the best arrangement.
When it's all done, you've got a solution to the puddling problem which takes up very little space in your vehicle and only adds about 60 seconds to your setup time.
Thursday, August 17, 2006
Protecting my booth from rain
Subscribe to:
Post Comments (Atom)


No comments:
Post a Comment