I've had a few questions about how I made my weights for the corners of the booth. I got the basic idea from Larry Berman: http://artshowphoto.com/pages/weights.htm
Except where he used lead, I used concrete. All the parts can be bought from Home Depot or your local home improvement store. Total cost should be $30-$40.
Materials
(1) 10 foot length of 3" diameter PVC pipe
(4) 3" PVC end caps
(4) cabinet door handles (plus bolts/nuts to secure them)
(4) 6" long, 1/4" eye bolts
(4) 1/4" fender washers
(8) 1/4" nuts
(1) 60 lbs bag of concrete mix
PVC cleaning solvent/cement
Instructions
Cut the PVC pipe into (4) 2.5 foot sections. With each section, drill holes and bolt the handle in place halfway along the length of the pipe. It's important to use bolts, rather than the wood screws the handle probably came with. Take a PVC end cap, apply the cleaning solvent to the outside of the end of the pipe and the inside of the cap, do the same with the PVC cement, and put the cap on the end of the pipe. You'll want to give the cap a 1/4 turn as you slide it on, and then keep pressure on it for about 60 seconds to help it seal in place (otherwise the connection has a tendency to slide apart).
Repeat the above process with each of the other 3 sections of pipe. When you are done, you should have 4 hollow sections that look like this: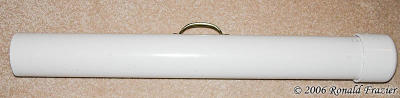
You'll want to let it sit overnight to bond. The next day, take each bolt, apply a nut, then a fender washer, then another nut. Using 2 wrenches, tighten the 2 nuts together so they are tight. You should now have 4 assemblies that look like this: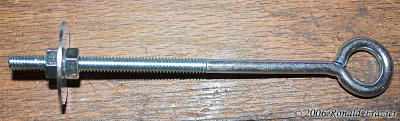
Now you'll want to mix up your bag of concrete. Follow the instructions on the bag. When it's properly mixed, you'll want to start filling each of the tubes. As you are filling it, you should stop 3 or 4 times, pick it up, and shake it up and down a bit to help the concrete settle in compactly. When you get it filled about 4 or 5 inches from the top, insert the eye bolt assembly, push it down so that it doesn't stick up too far, and then continue filling with concrete. You'll want to use a rubber glove so that you can pack the last bit down with your hand (or just do what I do and use your bare hands, as long as you don't mind getting a little messy). Now set the filled weight somewhere where it can stand upright without any chance of falling over. That's important...otherwise you'll have a nice mess on your hands.
You should now have something like this (minus the rope):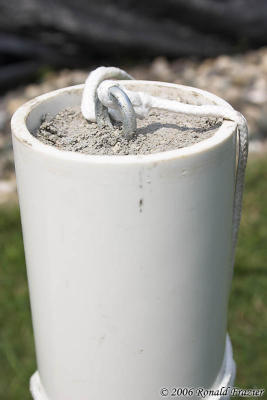
Repeat the process on the other 3 tubes. You should just barely have enough concrete to finish filling the 4th tube. Clean up and let the weights dry for a couple of days.
When you are done, each weight should weigh around 20 pounds. If you'd like more weight than that, you can opt to use 4" PVC pipe instead, which should give you about 35-40 pounds per weight and require two bags of concrete mix.
Now, all you need is a way to attach it to your canopy. I currently just use a section of rope...tie one end through the eye bolt, wrap the other end around the canopy and tie it tight. The problem there is, 1) it's difficult to get it tight, and 2) it's a pain to climb up on a ladder in order to tie it down.
When I was at a show this weekend, I found a better solution in use by another artists. Get 4 moving straps with hooks on each end: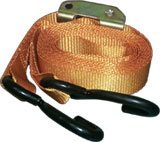
Hook one end through the eye bolt, hook the other end around your canopy frame, and then crank it until it's tight. Ideally, you want to have it tight enough so there is no slack or give, but you don't want to make it so tight that it lifts the weight off the ground or starts to bend your canopy frame.
...click here to read more!
Tuesday, June 27, 2006
PVC and cement corner weights
Monday, June 26, 2006
Report on my 2nd show
My second show is over. I had a booth at the 3rd annual Lathrup Village Art in the Park show this past weekend. I made a few sales, got a small taste of defeat, made some friends, got some ideas for my booth, tested out some changes I've made, added a few images to my inventory, refined my salesmanship a little, and a bit more.
Again, like my last show report, this will be a bit long. I want to cover the feedback I received and share some of my sales tactics. However, I'll break it into sections for easy skimming, and I'll have a summary/conclusions/lessons learned at the end.
Friday
In the 2 weeks since the last show, I was too busy working on improving other aspects of my business to even get around to getting all of my sold inventory replaced. I did manage to get it all printed up, but matting didn't take place until Friday morning. It was a marathon of cutting until noon, and it wasn't even done by then.
I haven't had a chance to blog about it yet, but last Wednesday I bought a cargo trailer to make it easier to get back and forth to shows. I wasn't able to get it loaded before now, so I interrupted my mat cutting and started loading up the trailer. Getting that done, catching up on a few important things around the house, and then getting dinner ready kept me busy until 4:30PM, and then it was off for the show on the trailer's maiden voyage (well.....except that I bought the trailer used, but lets forget about that).
We (my wife and I) got to the show, got the registration info, and I learned that my booth had been moved. I was happy to learn that the new booth was in a more central location to the show. We setup and were delighted with the time saving gained, and more importantly, the reduced effort required due to the modifications I'd made to the grid walls. However, the back of the booth was right against a parking lot, so we had no back space to utilize, so we setup the grid walls in the standard arrangement. After getting the booth and walls setup, we started hanging pictures only to realize I had left half of my hooks at home. We ended up hanging as many pictures as we could and then headed home. Total setup time was 2 hours.
I went back home, sat down to watch TV and relax for 15 minutes, then it was back downstairs to finish cutting and matting. I wrapped up just before 2AM, but I had only been able to cut 1 of my time consuming collage mats.
Saturday
I slept well that night and my wife ended up having to wake me at 6:30. I was feeling better than I had for the last show, plus I was able to keep my head away from the door frame this time. So far so good. I went downstairs to cut at least 2 more collage mats, got those put together, lugged all my prints up the stairs and into the truck, took a shower, and left. My wife wasn't feeling well, so it was to be a solo day for me.
After forgetting to take a more efficient route there, and then contending with a closed expressway ramp, I finally made it to the show. I learned that another artists had convinced the show coordinators that letting cars park directly behind our booth was a very bad idea (he's seen cars hit the booths before) so I now had backspace to utilize. I opened up one of the back panels, hung the remainder of the framed photos, placed all the matted prints in the bin, and then spent the first 1/2 hour of the show fine tuning the arrangement of photos.
I then took my seat in the back of the booth and waited...and waited....and waited some more. A few people came in, but the show was pretty dead. When people did come in, I felt like I was in the boonies sitting way back there. Greeting them from the back seemed very impersonal, but coming up front to greet them each time made me feel like I was acting desperate. I didn't like that, so I got started rearranging some more to try and clear the photos out of the back cove, and then I moved my chair there. Now I felt much better...I was tucked out of the way of customers browsing my booth, but still close enough to easily greet them.
Now it was back to waiting...and waiting. My sister came up to visit me, and although she bought something, I don't consider that a sale to credit to the show. Then I waited some more, got a visit from my mom, and then from my wife and mother-in-law, then waited some more, and then FINALLY it was time to close up day one with (for all practical purpose) not a single sale.
During the day, although I didn't have a sale, I did have a number of people tell me they would definitely be back the next day. Yeah, I know how that goes, and although I responded pleasantly, I wasn't holding my breath. I also had a few pleasant conversations with some people about photography and my work. One guy had seen one of the photos I had just worked on in the last week from Pictured Rocks: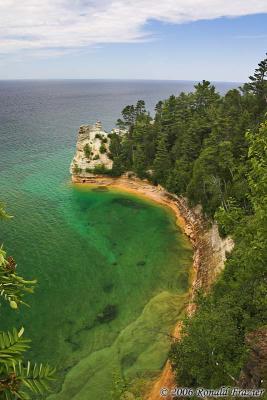
"The Malachite Moat" (Miners Castle, Pictured Rocks)
He informed me that there had been a collapse a few months back, and one of the 2 rock pillars had fallen into the lake. Although I was disappointed to learn that, I quickly realized I had my first REAL collectible photo...something that captures a moment that will never come again. I realized I could use that as a selling point.
After closing up, I had debated whether or not to go to the artists reception. Last show I had been too shy to talk to anyone and had just ate my food and split. I decided I'd just run in for some food, so I went in grabbed a table by myself, went and got a plate of food, and then made the bold move of sitting down with someone else instead of by myself. Soon we were joined by 3 other artists (2 of them photographers). We had a good time, and what I intended to be a 10 minute event turned into 2 hours of conversation that only ended because we ran out of time.
I went home cheerful about the friends I had made, but bitter with the taste of defeat. I had 2 choices about how to spend that evening...relaxing and getting some much needed rest, or doing my best to try and improve the show for tomorrow. A less dedicated person might have chosen the rest and said "what's the point", but I looked for something to do.
At the previous show, customers had asked me if I had any Grand Haven or Holland lighthouse photos, and although I had both in my catalog of 13000 shots, I didn't have any ready and printed up. In the 2 weeks between shows, I had picked out this nice shot of the Holland lighthouse and got it ready for this show: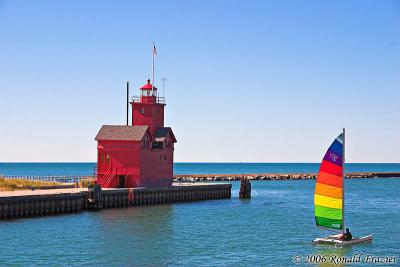
"A Beacon for the Bold" (Holland Harbor Lighthouse)
However, no one ended up buying that photo. Instead, I had more people this show asking me for Grand Haven photographs again. I realized I had missed an opportunity, but I wasn't going to miss it again. I pulled out my catalog of photos, picked out 2 nice grand haven sunset/twilight shots, and worked them into this: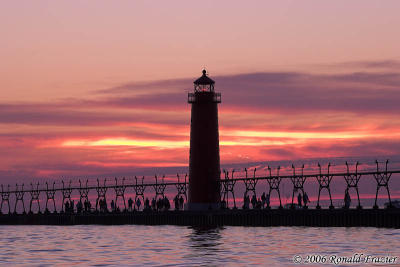
Havenly Sunset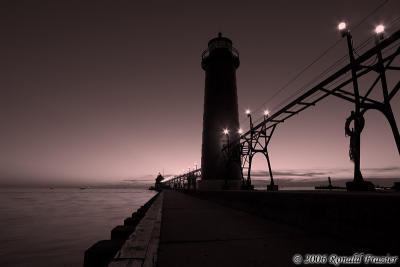
The Twilight Tower
I printed up 1 copy of each in both 5x7 (8x10 mat) and 7x10 (11x14 mat) sizes, and went to bed just before 1AM.
Sunday
Sunday morning, I had a bit more time to sleep, so I didn't wake up until almost 7:30. My wife helped me pick out mat colors for the Grand Haven photos I had made, I cut the mats up, and then was ready to sign them. I needed to come up with names for them. My wife gave me an idea that helped me come up with the name of one ("The Twilight Tower"), and then she came up with the other ("Havenly Sunset", a playful mix of "Grand Haven" and "Heavenly Sunset").
My wife was feeling better today, so we had breakfast, hooked up the trailer, headed back to the show, grabbed some bagels and danishes, opened up, and were ready for a fresh start when the show began at 11am.
It was another slow morning. There were a few small bursts but it quickly died back down. For the first 45 minutes, nothing much had happened. I had a few customers I thought might have been interested, but I just couldn't get them to buy.
Then at 11:45 AM, a couple came in. I talked with them a bit, explaining where several of the photos had come from. The husband liked my photo of "The Malachite Moat", so I shared with him the story I had learned yesterday about the collapse of the tower and how it doesn't look like that anymore. Then the wife liked an 8x10 from Copper Harbor: "A Calm Morrow". I told her about the photo, and then used one of my new tactics by explaining how it was part of a set (one is sunset, the other is sunrise in the same spot the next morning) and how there was a discount on the second print. She seemed willing to buy the pair, but now her husband stepped in and said he really liked my photo of "The Malachite Moat" and that she should get the one she originally liked, and he should get his photo. Not to be too pushy, I let them debate it on their own for a few moments before stepping in and reminding them that a third print is an even bigger discount...just $10 for the third 8x10. They bought all 3...my first sale of the show.
Next, one of the volunteers from the show who had seen me at my last show in Livonia showed up to pick up a set of 4 small framed flowers she had her eye on a few weeks back. A short while later, a mother and daughter had shown up and had their eye on one of the new 11x14's I had just made last night. They seemed very interested but wanted to wander around the show some more first. Then another lady came in and bought both of the 8x10's I had just made up last night. After that, the mother and daughter had returned. Rather then picking up the Grand Haven pic, she went for an 11x14 of my squirrel instead. And then her daughter realized the squirrel was a very good match for a photograph she had just bought from one of the other photographers. It was my only copy of the 11x14, so she let the daughter have it and got herself the 16x20 instead. Then she debated some more and decided to also get the Grand Haven shot she had originally like. Another 3 photo sale. Working on those photos the night before had paid off.
Now a couple came in, looked at my lighthouse collages, thought about getting one for their dad, and then were just about on their way out. I wanted to keep them talking to me and in the booth so I asked if their dad was a really big fan of lighthouses. They stopped, told me a bit about his interest and how they thought about getting one, but then which one do they get, or do they get both, but that's too much money...etc etc. After discussing it for a few minutes, they finally bought both framed prints.
At some point during the later part of the day, another lady came in and loved the "Havenly Sunset" photo I had just made the night before. However, she wanted it in a larger size, but I hadn't had a chance yet to get it enlarged. Remembering my mistake from last show, where I failed to tell I couple I could have a larger print available by the next show, I told this lady I'd definitely have the photo ready by my next show in 2 weeks. Hopefully she'll show up. If she does, I'll be ready.
That was it for the end of the show. We packed up the trailer and headed home.
Thoughts and Conclusions
When it was all said and done, I had sold $405 worth of photos on a booth/jury fee of $145. After gas, materials, and other expenses, I probably cleared somewhere around $200. Not too great for a whole weekend of work, but at least I wasn't in the red. Most of the other artists I spoke with had had similar results.
There were definitely a few lessons this show.
1) Having the cargo trailer made this a heck of a lot easier. Packing up and getting home was virtually stress free.
2) As one of the artists had joked to me at the Saturday night reception, there was a reason we were there that day even if it was a dud. At the time, we both thought it had been for the food. But for me, I now know the reason I was there was to learn about the collapse at Miner's Castle. That gave me a great selling point for that photo.
3) You never give up. All day long, one of my neighbors kept saying you just have to stick it out, because you never know what will happen. At the end of the first day, my other neighbor had asked me if I would be returning the next day. It would never even occur to me to skip out a day early. I paid for the show, I'm going to get what I can out of it. Good thing I did come back, as I made some sales and got some good salesmanship practice.
4) Pay close attention to what your customers ask for. If you can get it, then do so. It paid off with the Grand Haven lighthouses. On Sunday, customers were asking for a few different lighthouses. By the next show, I'll see if I have any decent shots of those lighthouses I can add. A few customers also asked for various styles of landscapes. Over time, I'll build a large enough collection and be better able to have what customers are looking for.
5) Have a functional website ASAP. My website is up, but not yet ready to handle orders. I've had a few people come in and ask for a card because they like to order gifts for people every now and then and they liked my work. I gave them a card and explained ordering will be available in the next week or so.
6) I need to get a fan (although it wouldn't have helped for this show, since I had no electricity) and to make an awning for the back of my booth.
7) Keep a notebook that you write down thoughts and important details in during the show. I did this last time and it helped. I did it again this time, and it reminded me of something important that came up during the show which I had since forgotten about.
8) Perhaps its not a great idea to signup for shows that haven't been around a number of years. I won't let that stop me for the moment, but I'll see what other people say and I'll keep an eye on how other new shows do. If I see a pattern, then I'll stop applying to them.
9) Have postcards for your upcoming shows available in your booth. I had a number of people who seemed interested, including the lady who had the print in a size I didn't have. I gave each of them a business card and a postcard for my next show, so hopefully I'll see one or 2 of them there.
...click here to read more!
Wednesday, June 21, 2006
Grid wall modifications
Before I begin, if you happened to read my posting a while back on the grid wall instructions and then went off merrily to build a set of your own: please don't yell at me after reading this post...I never said the original design was perfect.
When I built the grid walls last year and did some test setups, they seemed easy enough to put together. However, once I got to actually using them, I found a few problems.
1) While they aren't terribly time consuming to assemble, at a real show they are only one of a number of things that need to be setup in short order. Any time savings helps
2) The holes don't always line up easily, especially if the ground is unlevel, or (even worse) if you don't put all the panels and connecting legs/arms together in the exact same order/orientation each time. I had to use a hammer to force several of the bolts through the holes.
3)With the sections bolting together, there was no flexibility in orienting panels at different angles.
4) I wanted to open up a doorway in the rear of the booth.
5) Some shows don't guarantee a level ground. There is no way to easily adjust the leg height with the current setup, should you experience something like a curb running through the back of your booth
6) I had nowhere to work. I needed a desk of some sort, but didn't want to use up valuable space in the booth.
I set about to right some of these wrongs. To fix #1, #2, and #3, I decided to connect the panels together with zip ties instead of using the bolts. This also solved #4, but left me needing a different way to attach the legs. For this I used conduit couplers to easily attach a piece of conduit to the bottom corners of each panel instead of between panels/on the end(so I now have 6 legs per wall instead of 4). This also solved problem #5 in that I could very quickly cut another piece of conduit to form a new leg of any size without needing to lineup and drill bolt holes. As for #6, I cut out a section of the grid from one of the panels and added a fold out shelf in its place.
I'll get into more detail on the changes in a moment, but first a few pictures to get started. To do this as quickly as possible, I set up my booth frame without the roof and vinyl walls, so I'm sorry about the distracting background (try to stay focused on the booth, not my weedy backyard or my too-cold-to-swim-in-at-the-moment pool.
Here is the gridwalls with the doorway in back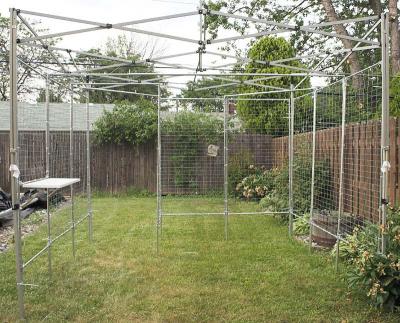
Here's a closer look at how I swung out the corner panel to create the doorway while not losing any wall space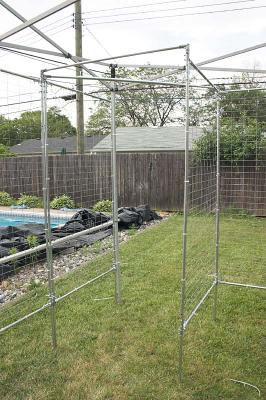
So now for the changes. The first step is to add on the new legs. To do this, I cut away a small strip of conduit where the 2 pieces butt together in each corner. This allowed me room to slip on a straight (ie: no angle) conduit coupler. I then cut 18 pieces (2 legs for each of 9 panels) of 16" long 1/2" electrical conduit, slipped that into the other end of the coupler, and tightened everything down. Here's what the result looks like.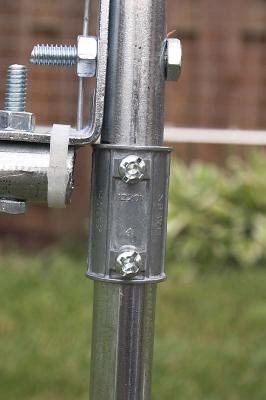
Notice that, if you put any zip ties in the corner, as I did on this panel, you'll have to move them over to the other side of the bolt so that they don't slip off into the newly cut area.
Also, cutting these same gaps at the top allows you to attach the crossbar supports: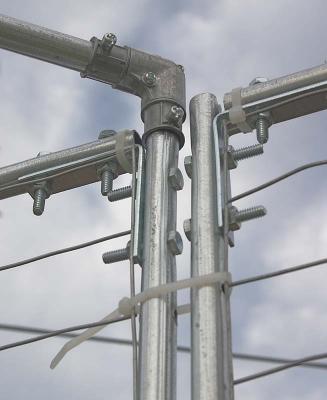
Now, sorry I don't have a better picture of this, but as you can see below, sometimes adding on crossbar is not possible because of the orientation of the screws. In this image, the right-angle connector on the left would not be possible to attach since the screw to tighten it would be inaccessible. To solve this, I attached a straight-on connector (like I used for the legs), cut a 1.5" long piece of 1/2" electrical conduit, and used that to join the 2 connectors together: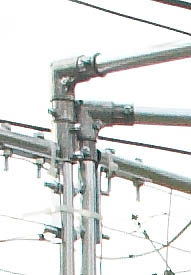
Now, connecting the panels together using zip ties is trivial, but in case you have no imagination, take a look at that last 2 pictures above and you can see the zip ties. Also, with the panels zip tied together, you don't even have to break apart each segment of 3 when you tear down. Just leave them connected to each other and fold the panels together.
Now, about that shelf. As you can see in the image below, I cut away a section of one of the grids, added another piece of conduit going across the pane, got a 10"x36" shelf, attached it to the new bar using hinges, and then supported it with some folding hinges attach to the side of the panel.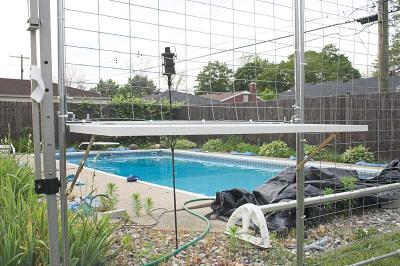
A better look at the primary hinges: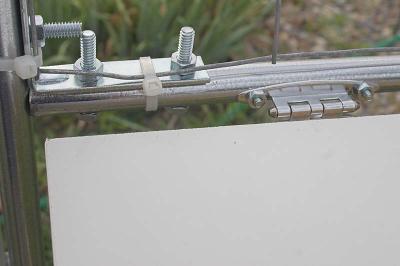
And the folding hinges: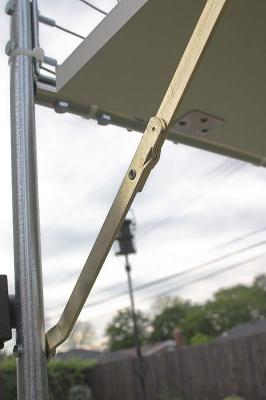
By now, my investment in the panels is probably somewhere around $225, but a bit of that is waste from my trial and error learning/redesigning. The new design actually saves on some conduit and bolts. I'd estimate the original panels using the new techniques could be built for around $150, plus another $15 or $20 if you want the shelf like I did.
As for the effect on setup time, the initial setup took me 4 minutes per set of 3 panels, plus another 3-5 minutes to connect up the crossbar supports. I should be able to shave another 1 or 2 minutes off that figure for each of the 3 sides, since the initial connecting with zip ties has already been done, thus there's no need to lie them down, line them up, and tie them. So total time for the gridwalls to setup (including supports) should be 9-14 minutes. Of course, this doesn't count adding on the legs (which I won't have to do now that I'm getting a trailer), but that shouldn't take more than about 20 seconds per leg (just insert the leg and screw tight with a cordless drill), so add about 6 minutes total if you need to do that (so expect about 15-20 minutes for complete setup).
...click here to read more!
Monday, June 19, 2006
Sources for materials and equipment
As promised, here's a list of some of the places I buy my materials and other items I use, and how they come in handy for me.
Rock N Roller R12 cart
http://www.sweetwater.com/store/detail/R12/
I paid $229 with free shipping. This cart is an incredible workhorse. You can effortlessly wheel equipment across just about any surface. You can configure the cart 7 different ways to haul just about anything (click here to see a video of it ). I'll post more about this cart in a coming blog entry.
Matboard & Foamboard
http://www.framingsupplies.com/
Great prices on boards. A 25 pack of bainbridge archival 1/8" foamboard is just over $100 shipped. Matboard prices are also very good, with a wide assortment of standard and rag matboard from Crescent. One trick...when you order too much stuff, the shipping gets really expensive (due to the large size). If you need to order more than 25 sheets of matboard or foamboard at a time, it's best to break it into quantities of 25 and place separate orders.
Clear Plastic Sleeves
http://www.framedestination.com/
Excellent prices on 100 packs of plastic sleeves. You use these to put your matted (but unframed) prints into. It's a much better alternative to shrinkwrapping (faster, cheaper, and looks better). Most stores sell plastic bags with the adhesive on the flap, which is bad because it can stick to your print and damage it when you insert it into (or remove it from) the sleeve. However, these bags have adhesive on the bag instead of the flap, so your prints are safer.
Clear Plastic Sales Bags
http://www.veripack.com/
These are clear plastic bags you can insert your prints into for a customer to carry them away in after the sale. Clear bags are better because they can show off your work as the customer carries it around (potentially, another show patron could see the print, ask where they bought it, and you could have another sale). I use the polyethylene flat bags in 1.5 mil thickness. You want to make sure the bag is big enough to for the customer to get a good grip on the bag. I'd recommend a bag with a height at least 8 inches (if not more) greater than the print it will be holding. You also want to make sure a couple inches wider than the print so you can get it in easily, especially if the customer buys multiple prints. I use the 18" wide by 28" high bags, which is enough to hold a couple of 16"x20" matted prints. This size bag in quantities of 500 cost $55 shipped.
Bubble wrap
http://stores.ebay.com/pakoutlet
I paid $21 shipped for a 24" x 150' roll of bubble wrap. Other places sell at better rates per foot, but only sell in much larger quantities (500 foot or more), which is more than I need for the moment. This was the cheapest way to get started. I use this to protect the framed prints during transport and when a customer purchases one. Cut a piece of bubblewrap long enough to wrap around the frame, trim it a few inches wider, fold it in half, and tape up (with clear packaging tape) 2 of the 3 open ends. You now have a padded sleeve to slide the frame into.
I think that about covers the majority of my supplies. If I can think of anything else, I'll update this. If you know of a better source for any of these items, please post them in the comments section
...click here to read more!
Sunday, June 18, 2006
Quick update
I just got back from a 4 day trip to Chicago and around the Indiana/Illinois/Wisconsin sides of Lake Michigan. I got a bunch more photos of lighthouses. I haven't had much time to go through them yet. I'm still getting ready for my next show. I'm trying to make some changes to my gridwall setup. Thats partially complete. I need to make a few more pieces and then do a test assembly. I also found a lightly used 5x10 trailer to buy. I'll be picking it up on Wednesday. I'll be posting more details on lots of topics soon.
...click here to read more!
Wednesday, June 14, 2006
Booth photos from first show
As a followup to yesterday's post about my first show, I thought I'd post some photos of my booth setup from this weekend: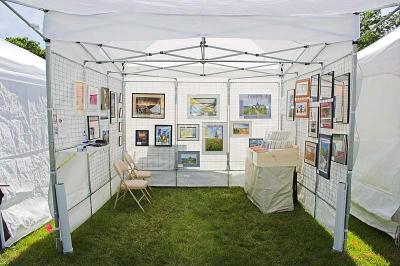
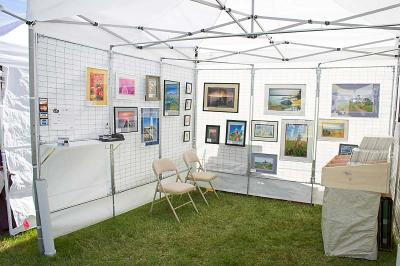
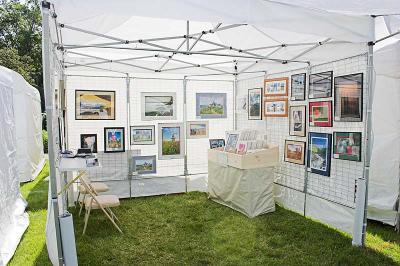
As a means of comparison, here is my booth slide from several months ago: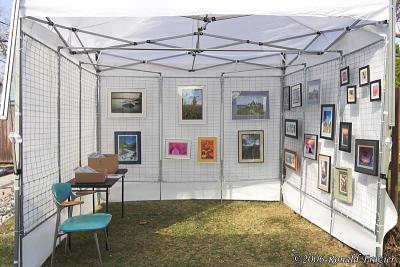
Similar, but the differences are:
1) Lots more framed photos...the entire left wall used to be empty. Now everything is filled
2) I have an actual bin for my photos, they aren't just sitting in cardboard boxes
3) More matted prints...lots more, and I now have 3 different sizes.
4) Got rid of that ugly chair and got 2 decent looking foldup chairs
5) I have a tablecloth on my table
6) The leftmost gridwall has been fixed...I chopped off the bottom section of the grid (which was a bunch of tied together segments) and added the fold out shelf in it's place.
7) Concrete filled PVC weights in the corners.
...click here to read more!
Tuesday, June 13, 2006
My first show is done!!!!
I did it! I can now say I'm a professional!
I had my first show this weekend: Livonia Michigan Art from the Heart. I was pretty happy with how things turned out, attendance seemed pretty good, and the show appeared well run. My goal for the first show was to break even on the jury/booth fee ($270). Counting just sales to strangers, I sold about 2.5x my booth fee, plus another $300 to friends/family (and no, they didn't get a discount). I was more than happy with my results. I heard some artists vowing to never return while others proclaimed it their best show ever. I'll be going back next year.
I sold a variety of photos, but I had one that was a runaway success. It sold 8 copies (five 8x10, three 11x14), was commented on by about 90% of my booth visitors, and was pointed out by countless people who walked by my booth without ever walking in. It was a 12x16 matted, framed print of this squirrel:
Leading Up to the Show
In the last 3 weeks before the show, it was apparent I needed to size up my inventory. I took most of those 30 or so photos and printed up 2 copies each of 5x7 (8x10 matted), 7x10 (11x14 matted), and 11x15 (16x20 matted). The first copy was double matted in a color combination that was picked by myself and my wife to accent the photograph. The second copy was single matted in plain white, as I've heard a number of reports here that white sells better than colors. I should add that all of my framed pieces were done with the colored mats.
A few weeks before, I decided I really did need a good cart to haul these in. Several months back, someone had suggested Rock N Roller carts, and they seemed very interesting to me. I debated over and over whether to save money with a smaller R8 or R10, but eventually I decided the extra $60 or $80 was worth it, so I went for an R12. I also knew I needed some bags for sold items. I bought some 18"x28" clear bags from veripack. I bought 100 packs of clear sleeves from Frame Destination in each of the 3 sizes. I built a nice wooden display box (2'x4') to hold all 3 sizes of prints.
In the last couple days, I decided I needed some business cards. Since I needed an address, I went and picked up a PO box for $25/6 months. For the business cards, I bought the avery clean edge cards ($16 or $18 for 200). Those things are brilliantly designed. Very easy to split apart and very professional looking. I decided to make a variety of cards. Each card had a photo on it. I set up a template in MS Publisher, made 25 copies of the template, and in each one I put a different photo (and put the "title" in tiny print just under it). I put a copy of the corresponding business card in the sleeve with each photo. I did a similar thing with MS publisher for the certificates...making 1 template then replicating it for each photo. The certificates were a complicated affair...doing a "Mail Merge" against a MS Access database of inventory (I'll write more about that in the coming week or 2).
The Day Before
I had already printed all my prints and cut all my mats, but I hadn't yet signed, assembled, and bagged most of them. The day before I spent the morning designing, printing and signing those certificates of authenticity. That took entirely too long(but now that it's done, I'm more than happy with the results). I finished up at about 3PM, got to work signing prints (I put the print #, photo title, date photographed, and signature on the back), and almost had that finished by 5PM. But now I had to stop.
Setup was allowed the evening before from 5-9PM, and I figured that was a better option than trying to rush in the morning, so I was now focusing on that. I had to carry everything upstairs (just the tent, gridwalls, cart, and ladder...everything else went the next morning), and load up the car. It took both my Blazer and the bed of my wife's pickup to get everything there.
My wife helped me setup the tent and grid walls. I wanted to do a practice run with her, but time didn't permit. However, she figured it out on the spot and managed just fine. Took us about 1.5-2 hours to get that all unloaded, carted to our spot, and setup. I was so glad I bought the R12 cart...it hauled like a charm, rolling over grass like nothing.
After that, I was exhausted, but had to go back home and get right to work on the prints. I was up until 1:30 AM putting them all together. Then I still had to come up with pricing and print up signs. I decided on the following price:
8x10 mat: 1st=$20, 2nd=$15, 3rd+=$10
11x14 mat: 1st=$40, 2nd=$30, 3rd+=$20
16x20 mat: 1st=$60, 2nd=$40, 3rd+=$25
For framed photos, I did
18x24 = $130
16x20 = $100
12x16 = $75
and then I had some other various sized frames.
I printed up the signs, started gathering supplies to bring, did my normal bedtime preparations, and got to bed about 2AM. For the next 30 minutes, I kept thinking of additional things I wanted to bring, so I'd get out of bed and make a note. By the time I actually fell asleep, it was about 2:30AM
Day 1
Stupid chirping birds woke me up at 5AM, and I couldn't go back to sleep, so with only 2.5 hours of sleep, I got up at 5:30 and started off the day with a good solid whack of my head into a door frame (left a nice mark in the center of my forehead). I made up some name/price tags for my framed work, packed up, carted the rest of my stuff upstairs, loaded the vehicles, took a shower, and left for the show at about 7AM. Got there, carted everything to the booth (again, the R12 cart performed excellently), hung all my framed work, setup my table and print bin, got out my sales kit (receipts, knucklebuster, cell phone for authorizations, etc). My wife showed up at 9, and I finished up setup about 9:30 (show starts at 10)
They always say your first sale will be your most memorable. Not only was it the most memorable, but it had the most memorable story. 9:45 (before the show officially opens) this lady walks in, spots this photo
and walks straight up to it without even looking at the rest of my booth. She tells my she loves pink, usually wears pink, she lives on flamingo street, and she just painted her bathroom hot pink and was looking for a photograph to match. She looks at the 3 different sizes and picks out the 11x14. SOLD!
I had 7 more sales that day (2 to friends and family).
I screwed up on one thing. I left my wife in charge while I took a break to walk around the show (no that wasn't the mistake...keep reading). I told her to call me if anyone had questions or for a sale. Someone came in with questions about my framed collage of 7 Michigan lighthouses. My wife called me, but my phone ringer was on quiet and I didn't hear or feel it ring. He said he would come back. After quite a while, he never showed up. My wife wanted to buy something from another booth but had trouble deciding. I told her I would take a look with her. I left my mother in law watching the booth, and we left for 2 minutes. In that time, he came back with his wife, they discussed it, she told him "whatever you want", and they left without saying a word. They never did come back. I was kicking myself until someone else bought it 30 minutes later.
My business cards with the pictures seemed to work. Whenever someone clearly liked a photo but couldn't be persuaded to buy it, before they left I gave them a card with that photo. One girl was clearly in LOVE with the squirrel. I gave her the card and she left. My mother in law saw her walking in the next row or booths, clutching the card in both hands, holding it up to her face, staring at it longingly. About an hour later, she came back and bought it. Another lady came back to buy the squirrel the next day.
Other notable point of the day...one of the readers of this blog stopped by my booth (if you are reading this...say hi) to tell me she was interested in attending fairs and had read my blog for ideas. Sometimes I almost wonder if I'm writing to myself here, so it's always great to be reminded that people DO read what I write.
After the show, we stopped at the store to pick up a couple of frames (to replace the collage I sold), I went home and printed up 16 more photos (including 8 of the squirrel). I cut up the matboards, and let it all sit overnight to dry.
Day 2
I actually got 7 hours sleep. I woke up, signed and framed my prints, bagged them up, made a few more business cards, got back to the show, and opened up. Sunday morning was slow....didn't get a sale until almost noon. Then it started picking up. I made 11 sales that day (2 to friends/family). My last sale of the day was a nice one too. I had some pictures of Washington state. Some lady came in, spotted my photo of Diablo Lake, and proceeded to tell me she was from Seattle (grew up there for about 20 years) and was upset that she didn't take any photos while she was there, so she had been looking for some nice photos of the area. After looking at my framed photos, she didn't seem quite convinced. Then I remembered I had one more photo unframed in each size. Using my best salesman technique (which is generally pretty poor) I proceeded to show her only the 16x20 version. She liked it, pulled out a crumpled wad of bills, and just barely had enough. SOLD!!!
My stupid mistake of the day....Some couple liked one of my 18x24 framed photos, said it would be great for their living room, but that it wasn't big enough. Stupid me let them get away, and only minutes later I thought "IDIOT!!!!! You should have told them you can have one made for them and have it ready by the next show"
After the show, my wife and mother in law helped tear down, load up 3 vehicles and cart it back home.
Thoughts and Conclusions
1) Most importantly, I need to get this down to a 1 vehicle job. Best bet is probably to go with a 4x8 trailer. I think that's where all my money for this show is going.
2) I need to rearrange my booth. I don't like where we are sitting. We were sitting in front of the booth for a few hours until one of the other artists spotted us, came over, pointed out where everyone else sits, and suggested we need to move to the back to invite people into the booth more. We rearranged and got us sitting in back of the booth.
I went over to thank him, and he started showing me all the other ways I could setup my booth better. I absolutely love the spirit of the people who do these shows. I did my best to return the favor by helping one neighbor open her booth when she showed up late 30 minutes after open, and I helped another neighbor with info on printing and my booth setup (she normally sells ceramics, but is getting ready for a photography show this summer and doesn't have the display yet)
3)My colored mats far outsold my white mats. I generally only sold white after the colored one was gone. I did have a few people prefer the white mats, and I had one person who upgraded from an 8x10 to an 11x14 because the 8x10 colored had already sold.
4)I need to make my booth quicker to setup. Connecting the panels together each show is too much of a pain. I need to find a better way to do the detachable legs. The most irritating part is that, the whole reason I went with the current scheme of detachable legs and bolt together segments (rather than Larry's zip-tie together grids) was because I couldn't fit the whole panel + legs into my car. If I go with a 4x8 trailer, that whole obstacle has been removed, and everything was made more complicated for no good reason.
5)EARLY PREPARATION IS KEY. I can't stress this enough. By the end of the first day, I went home and thought "I can't possibly see myself doing this any more than a couple times a year". I was happy with my sales but discouraged with the effort involved. After a good night rest, I was feeling much better, and at the end of day 2 I was looking forward to my next show. Being tired and rushed made the whole thing seem 10 times worse than it was.
6)MINIMIZING EFFORT IS ALSO KEY. Its worthwhile to invest money into well designed equipment. I was dreading hauling everything back and forth, but the Rock N Roller R12 made it a piece of cake. It was more effort getting everything there than it was hauling it. I'm excited about the idea of a cargo trailer (so I don't have to load/unload before/after each show, or fight packing it in the vehicle). I'm considering putting the profits from upcoming shows towards a better canopy, and then maybe towards better (professional) display walls. At this point, I'm not the slightest bit interested in recovering my last 2 years of expenses. I want to put everything towards making future shows easier...which will hopefully make me more inclined to apply to more shows.
7)Things I liked about the Livonia show and how it was run (not sure how much of it is run of the mill for shows):
- They did a LOT of advertising in the week before the show. I saw TV ads running during the evening news. Lots of other artists were commenting about how many ads they saw/heard for the show
- Day before setup...I think it's a great idea to be able to setup the night before, then rest overnight before beginning the show the next day (but morning-of setup was still an option if you wanted)
- Likewise, to make setup and teardown convenient, they had the police block off 1 lane of traffic (2 lanes for teardown) so that you could park right in front of the area to load up.
- They had food for artists each morning, and a very nice picnic for us Saturday night.
- They had workers come around to offer to watch your booth while you took a break.
- They had a package pickup area. When you make a sale, you give the customer 1 half of the ticket, attach the other half to the bag, place a flag out in front of your booth, and workers would pickup the package and hold it for the customer at the pickup area. Although I didn't end up having to use it, I thought it was a great idea none the less.
- They had a nice variety of artists/vendors...not too many of any one medium.
8) I was very pleased with the number of positive comments I received. Lots of comments on how my photos were by far the nicest/cleanest looking of the photographers at the show.
9) Surely, theres a bunch of other things I want to add but can't think of.
I'm looking forward to my next show (less than 2 weeks away)
...click here to read more!
Thursday, June 08, 2006
A few days from my first show
I haven't posted anything recently. I've been VERY busy the last few weeks, getting prints ready, buying supplies and equipment, building stuff for my booth, working on business cards, etc. I have lots of things I'd like to post here, but haven't had the time. Hopeful after this weekend I'll have a chance. A few of the things I'd like to cover:
-Constructing PVC/cement corner weights
-Modifying one of my display panels to create a shelf.
-Constructed my print display box
-Creating my business cards
-My Rock N Roller cart.
-Suppliers I used to buy things inexpensively.
Wish me luck...
...click here to read more!


