As I mentioned a few weeks ago, I picked myself up a Logan 450 mat cutter. While I was very pleased with how well it worked, there were a few shortcomings with it:
1) The squaring bar is very short. Squaring up a 40" mat board against a 3 inch squaring bar is not exactly highly accurate. I found that I could shift the board a few degrees in either direction while still having the board appear to be square against such a short bar. For the best accuracy, the squaring bar needs to be as long as possible.
2) The bar you use to set the border width only goes out to about 4.5 or 5 inches. While this is more than adequate for a majority of mat cutting applications, it is NOT suitable for A) cutting mats with VERY large borders, and B) cutting mats for collages.
The best solution (at least out of the box) for both of these problems is to use a measuring stick to mark out the desired cutting line BEFORE placing the mat on the cutting board, and then just eyeballing the cut to the line. However, for better accuracy, or for easily cutting mats in larger quantities, I needed a better solution. Enter my modified Logan 450.
After running through a great number of ideas in my head about how best to modify the board, I finally came up with a solution that gave me reasonable results with minimum expense and manufacturing difficulty. Also, a key requirement was that the modification not be permanent. I should be able to assemble and disassemble the extension board with a minimum of difficulty and with as much accuracy as possible.
Before I get to describing just how I made these modification, I first want to say that I don't suggest that you make these modifications to your own board. However, if you are handy with tools, and are able to do quality work, then feel free to give it a go at your own risk.
Now, ideally I should have been taking photos of the whole process as I made the modifications. Of course, hindsight is 20/20, so all I have are after the fact photos. I'll post those photos below, and give step by step instructions for how I did what I did. First, I suppose I should start with a photo of the finished product, just so you can see what we are working towards: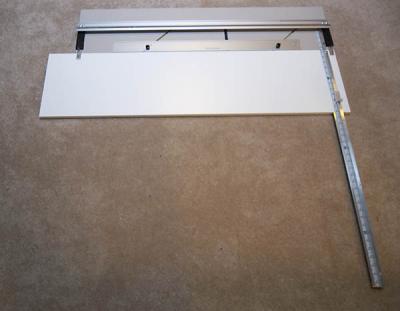
Step 1) We need a board we can attach to the side of the Logan 450. For this purpose, a typical laminated shelf of about 12" x 48" x 3/4" works well. 48" is slightly longer than the Logan, so you could cut off the extra 4-5". I wasn't sure what ideas for modification I might come up with in the future, so I decided it didn't hurt to leave the extra couple inches on there just in case.
Step 2) We need to keep the board from shifting along the joint. For this purpose, I used 2 pieces of 3/16" steel rod. Cut off 2 pieces about 1.5" long. Then I took a drill with a 3/16" bit, and drilled 2 holes in the edges of both the Logan 450 and the extension board. The holes need to be about 3/4" deep, need to go into the edge of the board perfectly straight, and the corresponding holes on each of the boards should match up perfectly, and the near edge of the extension board and the Logan 450 should be flush. See the hole marked A in the following photo (ignore hole B for now).
Step 3) Take the 2 pieces of 1.5" long 3/16" steel rod, and insert them into the holes on the edge of the Logan 450, as indicated by label A (again, ignore label B for now).
Step 4) Lay the 2 boards next to each other, as shown in the following picture, and then push them together. If you drilled your holes correctly in step 2, it should go together perfectly, and the near edges should be flush. After the boards are pushed together, there should NOT be a gap between them. If there is, you didn't drill one or both of your holes deep enough (or the steel rod is too long).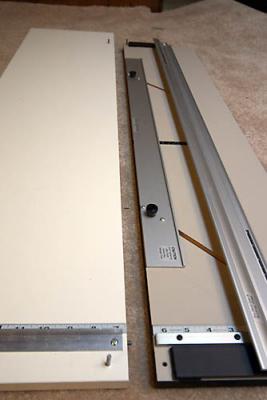
Step 5) Now we want to devise a way to keep those 2 boards locked together as tight as possible while still allowing us to easily pull them apart. For this, I took a piece of 1.5" x 36" x 1/8" aluminum stock, and cut off 2 pieces about 3/4" wide (well, to tell the truth, I actually cut them from a smaller, separate piece of stock that I bought earlier, but I later discovered I need the larger piece for something else, and the smaller one was just a waste of money). I then used a metal file to smooth down any sharp edges.
Step 6) Now, using the 3/16" drill bit, drill out 2 holes in the bar. On one of the edges, make sure the hole is as close to the edge as possible (without being so close as to make the edge thin and weak)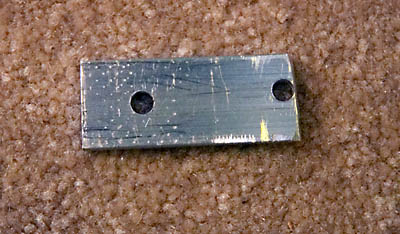
Step 7) Now, we need to position these 2 bars at each end of the joint, near each of the Logan 450's hinges. Once they are in place, you want to use the 3/16" drill bit to drill through the holes in the bars and into the 2 boards. See hole B in the photo from step 2.
A few things to be careful of here. First, don't drill the hole too deep into the board...you don't want to go all the way through. About 3/8" to 1/2" should be more than enough. Second, when you drill the hole into the Logan 450, you do not want to mess up and ruin it, so you need to get this right the first time. You don't want the hole to be too close to the edge of the board (you need to keep enough surrounding wood to keep the hole strong). On the other hand, if you get too close to the hinge, what you will find is that the hinge hits the aluminum bar ends up not opening all the way. This is the mistake I made the first time around. Luckily I was able to file away/round off/thin down the corners enough to fix this. So make sure you get it right the first time. Finally, when you drill the second hole of each pair (first hole is in the Logan 450, second hole is in the extension board), you want to make sure the hole is far enough over that you get a very tight fit. You might want to mark the center of the hole with the aluminum bar in place, then remove the aluminum bar and drill the hole just a very slight bit further away from the joint.
Step 8) Cut 4 more pieces of the 3/16" steel rod, each about 1" long. Insert them into the 4 holes, as shown by label B in the photo from step 3.
Step 9) Now, you should be able to slip the aluminum bars snugly onto the steel pegs.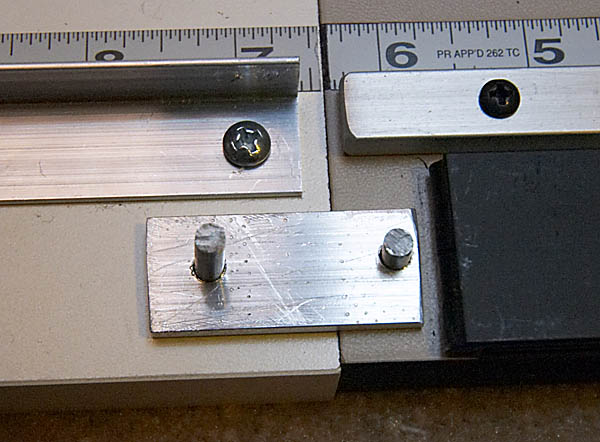
Step 10) Now that we have the 2 boards connecting together solidly, we want to add on the squaring arm. For this I took a piece of 3 foot long aluminum offset angle stock. I drilled 2 small screw holes into the bar so I could mount it to the board. As you can see in the photo above (step 9), I placed the angle bracket to be flush with the Logan 450's own squaring bar. Then, as shown in the photo below (by the blue lines), I used a large carpenters square (the larger the better) to make sure the bar (denoted by label C) was a) flush with the Logan's squaring bar, and b) perpendicular to the Logan's cutting bar/slot. Once everything was lined up, I drilled a few pilot holes in the wood and then (ensuring it was still squared) tightened it down.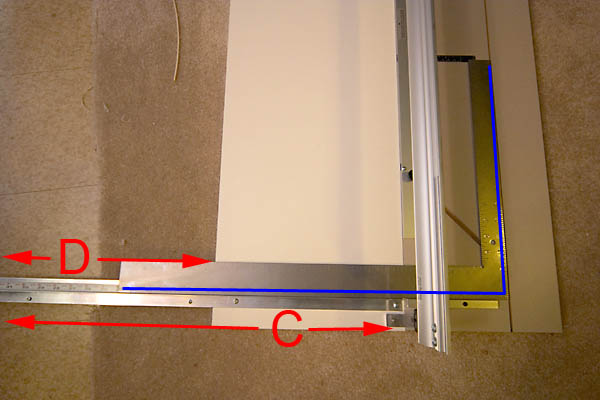
Step 11) As shown in the photo above, the squaring bar runs the length of the arrows labeled by C. However for the segment of that bar denoted by the D arrows, there is no lip for the mat board to rest on. So I took the left over 1.5" x 1/8" stock, cut it to the length of section D, placed it half under the squaring bar and flush up against the extension board, clamped it in place, and drilled holes through both pieces, as shown below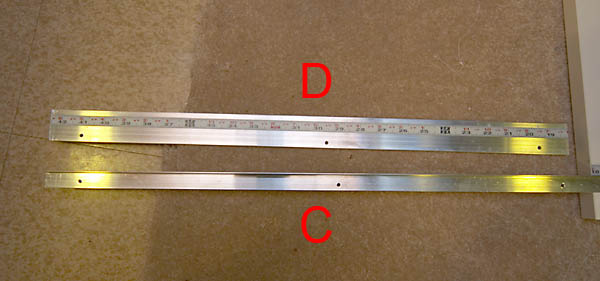
Step 12) I used some machine screws/nuts to connect the 2 bars together. For the first 2 holes, you can use 1/4" screws. However, for the last screw, I wanted something to support the weight of that end of the bars (to keep them from bending), so I used a 3/4" long screw. Once it's tightened on, the extra length acts like a stand for that end of the bar.
Step 13) Now that the whole mechanism is entirely in place, we need a measuring tape to run the length of the cutting bar. For this, you need to pick up a right-to-left adhesive backed measuring tape. This was the most difficult item to locate. However, you should be able to track one down at just about any wood working store. I located mine at the local Woodcraft. You can also order it online:
http://www.woodcraft.com/family.aspx?familyid=432
Your goal here will be to cut the tape into 3 pieces. You will need to VERY CAREFULLY measure the lengths of the tape before cutting. If you don't get your measurements accurate here, then you mat cuts will not be precise (especially important for cutting collage mats and other fancy mats). The lengths listed below are only approximate...BE SURE TO MEASURE THE CORRECT LENGTHS YOURSELF.
Piece 1: runs from about 2" to 6+3/8". For this piece, you will want to get it precisely in place against and Logan 450's built on squaring bar, use an exacto knife to carefully cut the vinyl surface around the perimeter of the measuring tape, peel off that rectangle of vinyl, and attach the adhesive backed measuring tape to that cut out area. The purpose of cutting out and removing the vinyl is to recess the measuring tape so it sits flush on the cutting board.
Piece 2: runs from about 6+3/8" to about 18+3/8". Peel off the back, and place this flush up against the squaring bar, and stick it to the board. You may first need once again to cut out a strip of the laminate surface so you can recess the tape flush. I didn't bother with that step. since my shelf was just a hair thinner than the Logan 450's board, it still ended up flush with the Logan (just not flush on the extension board)
Piece 3: runs from about 18+3/8" to about 42+3/8". Just peel off the back and stick this to the aluminum stock.
Step 14)The final piece of the puzzle is to create some type of device that can be clamped onto the squaring bar to act as a production stop. I found a little aluminum U bracket that was used as a security stop for home windows (to keep a burglar from opening an unlocked window far enough to get in). I needed to saw off a piece of this bracket, then replace its clamping mechanism with a thumb screw. Here is the stop device.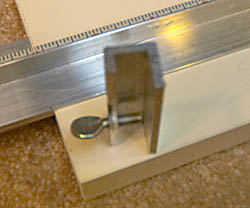
And here it is clamped onto the bar to act as a production stop at the 14" mark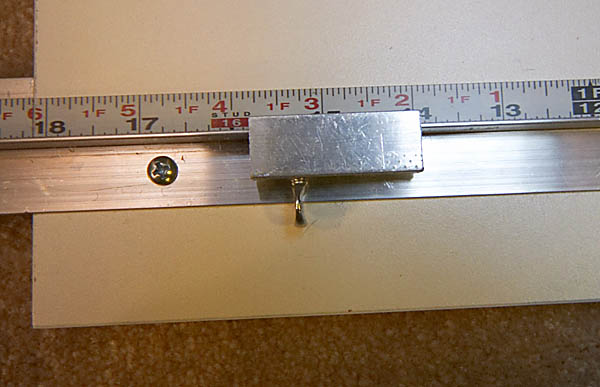
Finally, with everything put together at last, here is a photo of the 2 layered collage mat I was able to make.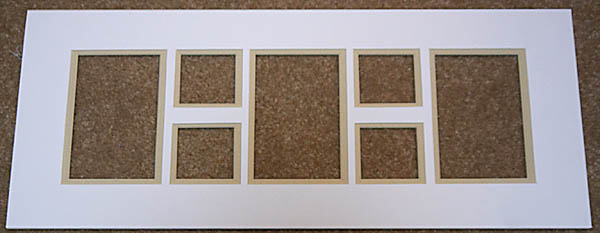
So there it is... my complete extension board for the Logan 450. Final cost (not counting the extra $3 piece of aluminum stock I unnecessarily bought and wasted):
$ 6.50 : Base board
$ 2.00 : 3/16 steel rod
$ 3.00 : 3 foot aluminum angle offset stock
$ 1.50 : sliding window lock
$ 6.00 : 3 foot 1.5" x 1/8" aluminum stock
$10.00 : adhesive backed right to left measuring tape
$ 2.00 : misc screw/nuts/bolts (if you don't already have them on hand)
------
$31.00 : Total for all materials.
Tuesday, March 15, 2005
Modifying the Logan 450 Matcutter
Subscribe to:
Post Comments (Atom)


No comments:
Post a Comment