Last Tuesday was our final day of class. It's a bit disappointing to have the class ending already (it was only an 8 week class), as I was really enjoying working on the different assignments. Even worse, I was planning on taking the followup advanced class, but our instructor had other obligations and won't be teaching there again for at least a couple of semesters (if ever). I guess the college never found someone else to teach the class, because it isn't scheduled for next semester at all. I'll need to find something else to keep me busy taking pictures...maybe look for some photography clubs in the area or something.
Anyway, our final assignment was to shoot some portraits (either posed or candids) as well as a self portrait. I really wanted to do something new, so I decided that I would make an attempt to doing some studio style portraits. First things first: I needed a studio.
I started by clearing an area in the basement where I could shoot. It was nothing more than a 10'x10' area. The next requirement was lighting. There were some glass block windows, but that wasn't nearly enough light to shoot. Luckily, I still had handy that very old photography lighting setup (with four 100 or 150 watt lamps) which I had used on assignment #1. Those, combined with a few ordinary table lamps and my onboard flash, should be more than enough lighting.
The last item I needed for my studio was a backdrop. I could have just hung up a bed sheet, but I wanted something with a little more character. I headed up to Joanne fabrics looking for a nice looking backdrop, but couldn't find anything which I liked. So instead, I grabbed a roll of 108" wide white muslin which wasn't too expensive per yard, but only had a little over 1.5 yards of fabric on it. That would have to do. I ended up walking out with $7 in fabric and a $2 box of royal blue RIT dye. I went home, looked up some websites on tie-dye techniques, and made an attempt at a homemade tie-dye backdrop. The first suggestion I followed just about ruined all hope...It ended up almost solid blue, with no white left and almost no variation in color. However, I didn't give up hope. I found another web site, and after another 2 or 3 attempts I ended up with something that looked really good. So off it went for it's final wash, but when it came out it had lost most of it's beautiful shading and ended up with only subtle color variations. I was quite disappointed, but by this point I had given up, so I just dried it, then crumpled it up in a pile to sit overnight (hoping the look of the wrinkles would make up for the lack of color variation).
The next day I took it and hung it up on the wall, set up the lighting, and started practicing. Not knowing the slightest thing about how to go about this all, I decided to shoot my self portrait first, so I wouldn't bore anyone else while I figured out the right lighting technique. After angling the lights, setting up a stool, putting my camera on a tripod, and shooting my first shot with the cable release (followed by several more shots to get the exposure just right), I came to a few conclusions. First, the backdrop looked very good under studio lighting. Second, I had a lot of work to do on improving the lighting.
I tried several different techniques of lighting. I started out with the camera perpendicular to the backdrop, and the main lights at my side at a slight angle: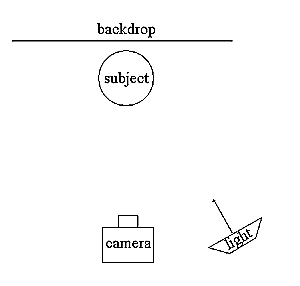
That gave me a very strong lighting at one side, but not a lot of fill light, and some pretty harsh shadows (and some pretty ugly shadows on the backdrop). I spent a good hour playing with different lighting techniques, including positioning the table lamps at opposite sides and behind/below to fill in shadows. Lots of things that didn't work. I tried hanging some sheets at the side to bounce light. That helped a little. The shadows being cast on the backdrop were still the biggest concern. The table lamps weren't filling them in quite the way I wanted. I then discovered the best trick: pull the subject forward away from the backdrop, and move the lighting to more of an angle so that the shadow falls enough to the side that it doesn't end up in the photo. Here's pretty much what my final setup looked like: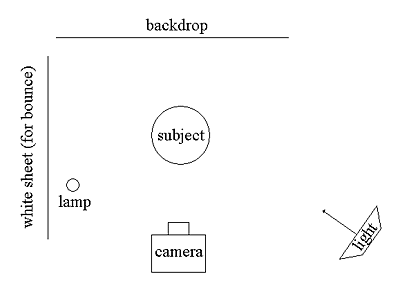
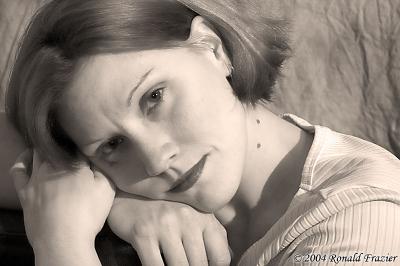
Here are a few of the self portraits I took throughout the process.

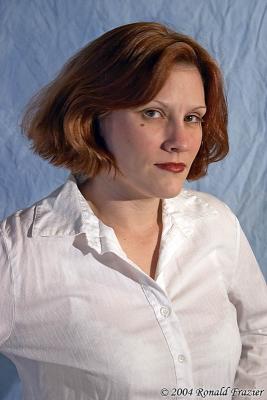
Now at this point I was fairly happy with my setup, so it was time to call in my subject. Since my wife hates being in my photos, I thought it would be fun to torture her by making her the sole subject of my photos. After picking out a couple different outfits, we got to work. Once I got her down there, where I could see the lighting interactively, I made some more adjustments (and in fact I adjusted the lighting slightly all throughout the shoot). However, the bigger problem I now faced was getting her into interesting poses. Here I was completely out of my league, knowing nothing about posing a subject, and I felt really dumb not knowing exactly what to tell her to do. None the less, we muddled out way through it all. In the end, she even ended up enjoying the whole process (especially once she saw the results). Here are a few of the resulting shots.

Finally, we posed for a few shots of us as a couple (though I forgot to throw my dress shirt back on and didn't realize it until later on). You can see this shot and a couple other shots of my wife in the assignment gallery:
http://www.pbase.com/ldkronos/capture_the_moment_assignment7
All in all, it was a very fun assignment and I learned a ton, though there's still tons to learn with respect to both lighting and posing the subject. Some better equipment would definitely be helpful. I should have an external flash by the end of the year, and if I decide to do more of this type of stuff, I've been looking into some better lighting equipment from Alien Bees.
Sunday, November 28, 2004
Assignment 7 - Portraits & Self Portraits
Subscribe to:
Post Comments (Atom)


No comments:
Post a Comment