As usual, it's been a while since I've updated. Not much has been going on with my photography since I finished my last show in the Fall. I've been quite preoccupied with a number of things, mostly centered around big life change...sometime next month, I'm going to be a father.
My wife and I have been hoping to have kids for a few years now, and in early November we found out she's pregnant. Since then, it's just been a whirlwind of things to do. There are so many new things to learn, long before the baby even arrives.
As a photographer, when choosing a camera I read lots of reviews and pour over the specs sheets. I know exactly what sort of stuff I'm looking for, which features are bad and which are good, what sort of gotcha's you can run into, etc. The processes of reviewing a new camera for a potential purchase is quite easy for me. The same holds true of most major things I have to buy (TVs, computer parts, stereos, cars, etc). Now, when it comes to having a kid, I have that same sense of "I need to make sure I choose the right item to buy" that I have when buying a camera. Only this time, I have absolutely no experience buying any of this stuff, and all of the knowledge necessary to make an informed decision is missing.
So here I am trying to buy a crib, and I'm at a complete loss to know what features are available, which are desirable, which ones seem nice in theory but are essentially useless in practice, etc. It's a matter of starting at square one, and doing all the research not only on the product, but on how to research the products to begin with. Quite a daunting task. Then I have turn right around to do the same thing with a car seat, and a stroller, and a host of other things.
Then on top of that, there are a ton of other choices to make. When setting up the baby registries, you've got to make hundreds of decisions, and all in very short order. You can't research every single item so you just have to make gut decisions. How many bottles of each size and how many nipples should I put on the registry? Accessory X seems really cool, but will it really make a difference and be worth spending $20 more on than accessory Y? Perhaps Y will be just as good and then the person buying it will be able to get me 2 items on my list instead of 1.
All together, just buying/choosing things is a very daunting task...at least for someone like me, who is looking to not only make really good decisions but to not go unnecessarily overboard (as tends to happen when children are involved). And then there's all the other things beside that, such as painting/decorating, preparing the house, learning what you are going to need to know once the baby is born, etc.
So even before the baby is born, the first half of this year has been all "baby, baby, baby". Thus it has been hard to focus on much of anything else. Now, as we enter the last 4 to 8 weeks, we're starting to hit a bit of a break (or maybe you could say a calm before the storm). We've got everything pretty much done. The baby shower is this weekend, so after that we just need to go out and buy up whatever wasn't bought for us. We've only got a couple hours of birthing classes left. We've got a really good idea how things are supposedly going to work out. So hopefully, it's just going to be a bit of waiting and catching our breath one last time before the baby comes.
As far as photography, I've got 1 show later this month, and then nothing until 1 show in the middle of August, and then a few in September. It's going to be a lighter-than-usual show schedule for me this year. Usually I like to prepare new works to add to my portfolio each year. This year I'm not sure if I'm going to be able to do that (perhaps I can add something from my Yellowstone trip if I find the time/energy). For the most part, I think this year my art shows are going to be on a bit of cruise control, and I'll just try to make it through them with a minimum of changes and effort. Then next year hopefully I can pick up some of the shows I love (but had to drop this year due to the timing), rework my product line, update the display, etc.
...click here to read more!
Thursday, June 03, 2010
New baby on the way
Sunday, October 11, 2009
Packing early...I've surrendered my badge of honor
I've had some bad shows in the past. Despite how badly things go, I take some pride in sticking things out. Other artists pack up and head out early, but I feel a duty and obligation to stick it out to the end. In general, I really don't even start packing up early, much less leave early. If things are going badly and I'm not very busy, I might start packing up some of the less important frames a bit early...like maybe if I get a booth where an outside wall is usable and I fill it with my extra "rarely sell" photos, I might start putting those away slowly over the course of the last hour of the show. Or if I've got those sort of photos inside the booth (like if I sold one of my frames/canvases and I use them to fill in the space), I might start putting them away 15 minutes early. But in general, I wait until the actual show end time to start packing.
However, all of that is now out the window. For the first time ever, a show went so badly, I felt the need to pack up not just an hour or two early, but more than an entire day early.
The show, and why I picked it
The show in question was the Fall Into Dearborn show in early October. It was a 3 day show...a 4 hour charity preview party on Friday evening, and 8 hours on Saturday and Sunday. I picked the show on a whim, simply because I had nothing else that weekend, it was close to home, and I wanted to give an indoor show a try.
Early signs of trouble should have been a clue
Early on, there were a few things about the show that should have indicated to me what was in store. First, the application indicated a booth size of 9'x9'. As anyone familiar with art show configurations knows, a standard booth size is 10'x10'. This should have been an indication something was odd. However, I wrote it off, as some indoor shows merely offer enough space for a table...maybe 5'x8'. I thought maybe this one was a being bit more generous, and figured I could work with 9'x9' with a few adjustments. It turns out they just didn't realize the configuration of a typical booth. They ended up rearranging and making the booths 10'x10' anyway after several artists expressed concern.
The application specified a date by which you would be notified of the acceptance or rejection. Yet, 10 days later I had heard nothing. I had to email the show organizer to get an email response confirming I was accepted. Shortly there after, I got a letter in the mail indicating acceptance and stating that I would receive more details in early September. Well, as of September 29th, I had received no followup info and once again had to email the organizer to get the info.
Also, on the application there was a box to indicate whether or not you wanted to donate an item for the charity auction, and it stated that donors would be given preference for booth selection. I checked the box and didn't think much more about it. Then, 2 days before the show I was contacted to ask what item I would be donating. I had no idea they needed to know ahead of time and thus hadn't given it any thought, so I said I'd need to think about it. I was told they would call back to get the details later that day or the following day, yet I never received a followup call. Needless to say, I never had an opportunity to give any input into my booth location. As far as preference, there seemed to be no advantage given to anyone in particular. In fact, the artist right next to had the advantage of a corner space (which was not a paid feature at this show), and they didn't even show up for the Friday preview, so I'm fairly certain they didn't donate anything for it.
What went wrong
The show officially started at 4PM. By 4:15, I realized where they had setup the auction and went over. I indicated that I hadn't been contacted about my item. Someone followed me back to my booth to accept it. While I was digging for it, they realized they didn't have an auction tag for me. They asked if I had called to let them know what I was donating. I told them they said they would call me but never did so. I was told to hold onto my donation for the moment. However, nobody ever came back to ask for it.
The Friday night preview party was a dud. It definitely seemed like less than 100 people showed up. I don't know what the actual number was, but from what I saw it seemed like maybe 50, and a lot of them were mostly standing at the front, not browsing artists booths. I ended up making a $5 sale to another artist, and a $50 sale to a show patron. That was it.
Oh...and about that auction. I took a look at a number of items and saw very few that received bids. There were at least 50 items up for auction. When the auction was over and they announced the winners, I wasn't paying careful attention but it sounded like no more than 10 items had been bid on.
In chatting with other artists that evening, it turns out I wasn't the only person who had received poor communication. Pretty much everyone else had the same problem. One person hadn't even been notified of their acceptance until 2 days before the show. Unbelievable.
What went wrong - day 2
Based on Friday's results, I had low expectations for Saturday. The show was set to start at 10AM, so I figured I'd show up around 9:30. I didn't imagine there would be many customers there for the first few hours (at least). Imagine my surprise when I pull in and couldn't find a parking spot. The main lot was filled. People were driving up and down isles. I had to park in the much less obvious side lot, and even then I had to walk a decent distance. I said "oh my gosh...this place is packed. They've got to be lined up at the door to get in". I practically ran to the room only to find it empty and nobody outside. So what were all the cars there for? Well, it turns out there were 1200 people there for a multi-level-marketing seminar, and they were using most of our parking. Apparently, the organizers had no idea that event was going on. Humorously, one of the artists was reading an article (I think it was in Sunshine Artist magazine) talking about how lack of parking will kill an art show.
However, the seminar turned out to be probably the best thing that happened. They took an hour lunch from 12 to 1. Since there was very little food offerings in the civic center, most people had to leave to get food (which cleared up parking for a bit, not that we needed it). However, a small number stayed there and visited the show. It was so few people, you'd never notice it at an ordinary show. However, these were virtually our ONLY customers, so it was welcome. I made 3 small sales in that hour, which (other than a sale to another artist) were my only sales of that day.
Discussing with other artist what had gone wrong, the topic of advertising came up. Someone had mentioned that there was a large LCD sign out in front of the civic center, and that the art show wasn't even listed on the sign. I went out and watched the sign for several minutes, as it went through the complete cycle 3 times, and there was no mention of the art show. When we informed the organizer, she insisted that it was being shown, and that she had seen it on her way to work every day for the last 3 weeks. However, when told that it wasn't there now, she went to check. She confirmed that it wasn't there, and claimed it had something to do with a power outage that occurred the day before (though I'm not certain how that worked, since everything else, including the 1200 person seminar, was being advertised). They needed to call someone in to reprogram the sign but had no idea when it would get done (I suspected they wouldn't be able to get him in on a weekend).
Also on the topic of advertising, one patron had mentioned she heard about the show on the TV news. Great, right? Well, according to her, it wasn't even clear that the show was taking place indoors. She had understood it to be an outdoor event, and with the rain coming down she hadn't intended to come. It was only because there was a break in the storm that she decided to come check out the show...only to be surprised to find it indoors. I wonder how many others made the same mistake, and either didn't come because of the rain, or simply couldn't find the show because they were looking for a bunch of white tents.
Talking with other artists, very few of them had just barely made back their booth fee. Many hadn't received a single sale at all. I walked around and did a booth count, and came up with about 45 artist booths (there were a few more that belonged to the community art center, which I didn't count). With the show scheduled to run until 6PM that day, at about 1PM, the first artist began packing. About every 15 minutes after that, I did a walkaround of the show (yes, it was so empty, I had zero concern with leaving my booth empty while I took a brief stroll), and each time I found another artist packing up. Sometime by about 3:30, there were now 11 artists who were either gone or in the process of packing up. Several more indicated intentions to pack at the end of the day, or to come pick up their stuff Sunday morning. My estimate was somewhere between 25-50% of the artists would not be there for Sunday.
At that point I called my wife up at 3:30 and said "I've never done this before, but I'm seriously considering leaving". I told her I'd call her back in an hour with a decision, and she said she'd come help me pack if I decided to leave. In that hour, virtually nobody showed up, and my only sale was to another artist. I tried hard to think of a reason to stay but could come up with nothing. Almost nothing had gone right, and on top of everything else, the show was destined to look like a ghost town on Sunday.
It was a decision that was a bit difficult to make. It involved a conflict between pride and practicality. In the end, practicality won out. At 4:30 I made the call and asked my wife to come help me pack. By 6PM, my trailer was loaded just as the show was ending. As I made my final walk towards the exit, I looked out the window of the civic center to see a lovely double rainbow. It was almost like a sign to me that I was making the right move. Here's a picture (and by the way, what you are looking at here are all that remained of the 6 or so booths that were along the back wall).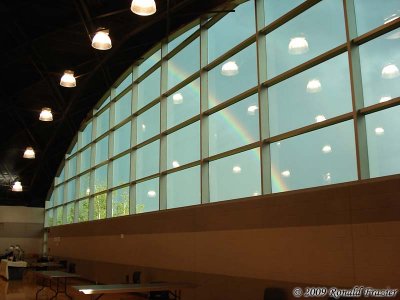
Day 3
Although I wasn't there, I knew another artist who stuck around. I was told that there were about 10 artists that didn't leave. Everyone spread out and gave themselves double booths to make it look more full (one artist spread his sculptures out over 4 spaces). Apparently hardly anyone showed up that day. There was a marine reserve symphony at 3PM, and a bunch of people came for that, but very few of them came over to the art show. In short, I'm absolutely certain I made the right decision to leave. I had much better ways to spend an entire Sunday.
What went right
Setup for the show was actually pretty straightforward. We had a few doors we were able to pull our vehicles right up to and unload right into the room where the show would be held. Setup went more or less without a hitch. From that aspect I had nothing I could complain about.
At the preview party, they had a nice food/drink offering for the guests which was also made available to the artists. There was a good variety of food from a number of local restaurants. At least I got something good out of it all.
Other than that, the only things that went right were my decision to leave, and a group of very friendly artists to spend the weekend chatting with (except for one lady who was a member of the community art center and tried guilt tripping the people who packed up early).
Conclusion
The booth cost $160 + $15 jury fee. I sold $167 in merchandise (and $65 of that was to other artists). I didn't even recover the fees, much less gas, materials, and time spent. Wow. That's a heck of a way to end out my art show year. This will certainly be memorable.
...click here to read more!
Tuesday, September 15, 2009
Organizing with Propanels and Velcro
I've had my Propanels for 2 summers worth of shows now, and I'm absolutely loving them. As I wrote about last summer I've gone crazy for Velcro with the Propanels. In that article, I wrote about some hooks I made. Well, I've found another way to make use of them...organizing my work area. 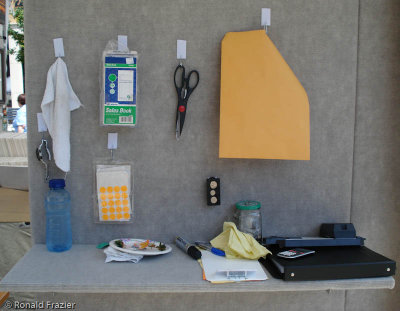
What you are looking at here is the back side of the back wall of my booth (the area out of sight from the customer). This is where I do all my work. When I ordered my propanels, I had 2 of the panels fitted with shelf slots. One of those shelves is in my booth with some materials for the customer to view. The other panel is along the back wall and turned around, so the shelf can be setup on the back outside wall. I use this to write receipts, stack up some of my supplies, assemble gift cards, etc.
Well, I also took some of my extra hooks and started using them to hang up some of the things I use often but want to keep out of the way. Scissors and a pack of price stickers hang directly on the hooks. My receipt book and knucklebuster slips are in a plastic pamplet holder, which is hung on another hook. I also hang up my watch when I don't feel like wearing it, as well as a damp cloth for cleaning things (or at hot shows, I soak a rag in cold water to help keep me cool...and I hang it from a hook below the shelf so it doesn't drip on the shelf). I also hang a garbage bag from a hook placed below the shelf. My calculator (seen here sitting on the binder) also has velcro on the back so I can keep it out of the way when not in use. I also have a few card that I velcro to the wall. One is a business card, so customers can see how to spell my name when writing out a check. The other is a list of credit card instructions, for when my wife it watching the booth, so that she knows how to make a credit card sale.
...click here to read more!
Sunday, July 26, 2009
Square cement weights
One of the most common ways to weight down your booth is with the round PVC pipe filled with cement. Several years back I posted a how-to on the topic: PVC and cement corner weights. At the Northville show last month, I saw an interesting variation on the design. The weight was square.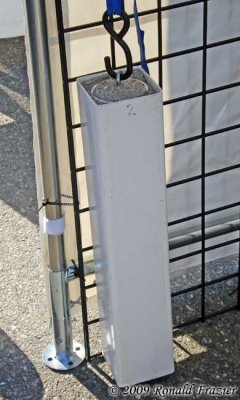
The artist that had these had originally made the weights from round PVC, but she didn't have any handles on them, and she got tired of them rolling. So she found the square tube, put her existing weights inside the square, and filled the gap with cement.
Although she wasn't sure of what the tubing was from, I'm pretty sure they are meant for vinyl fencing (you use a 4x4 wood post, anchor it in the ground, then slide on the vinyl tube). This means the tube itself is probably made from vinyl instead of PVC. I'm not sure what implications that may have for strength and durability. It might be thinner and crack more easily, but I'm not sure that would be a problem once it's filled with hardened cement. However, if you do decide to put handles on them to help with carrying, that might be a bit stressful on the vinyl. It might be a good idea to make sure the bolts are long enough that they stick quite a ways into the pipe. That way when the cement dries, the handles will be anchored to the cement more than the tube. You could also do the 2 nuts + 1 washer thing like I did for they eye bolt if you are concerned.
There is also the issue of how to seal the bottom. Round PVC piping has nice caps you can put on the end and seal with PVC cement, but for fencing, the caps I recall always seem to be decorative. I'm not sure what options you'd have there. If you can't find a nice, simple, flat end cap, then you might have to resort to custom cutting a piece of wood, some styrofoam, or whatever works, and then finding a way to prop up the tube really good so that when you fill it with cement the bottom doesn't fall out. If you use a thick enough piece of wood, you could drill some hole and screw through the tube and into the wood, holding it in place. You then may have to caulk it to seal it (I'm not sure how easily cement would leak through a crack).
Remember, I've never tried this, so I can't vouch for how well it will work. If you decide to try it, you are on your own. Maybe my concern about the strength of the vinyl isn't warranted and it would work great. Whatever the case, if anyone does decide to try this, send me an email when it's done (with maybe a photo or 2) and let me know how it works out and how you sealed the bottom.
...click here to read more!
Saturday, July 25, 2009
Catching up for 2009
It's been quite a while since I updated, so what have I been up to? I spent a lot of time enjoying myself, catching up on other hobbies, getting some stuff done around the house, all with some photography thrown in here and there. But as of June I'm stepping things back up again.
Late last year I upgraded to Lightroom 2.0 and discovered that my computer was way too slow to deal with it. So, this April I built a new computer and everything is running great. In June I took a trip to Yellowstone/Grand Tetons (and hit a few other places along the way), and although the weather wasn't the most cooperative for the photography I wanted to do, I managed to get by (though I got almost nothing in the way of sunrise/sunset, unfortunately).
I did my first show of the year in late June...the Northville Art in the Sun show that I was at last year. Whereas last year was pretty darn bad (just about broke even as I recall), this year was alright. Not superb, but better than a lot of shows I've done recently. I dropped the Livonia show I usually do in early June, as it has been absolutely terrible the last 2 years and I wasn't very thrilled with the way they were running the show. In exchange, I picked up 2 shows in mid September and early October, so I have 6 this year (and maybe more...I'm considering picking up 1 or 2 in Nov/Dec if I can find something worthwhile).
That about covers it for the most part. Not a whole lot beside just working on some new works, printing, matting, etc. I'm trying not to change a whole lot this year, as my goal is to keep costs down and try to actually turn a profit this year. I've been taking losses up to now because of how much money I had to spend between supplies, my camera and lenses, my wide format printer, the new booth and panels, etc. If I stick to the basics and most of my shows go decently, I'm hoping I can make it. It's not easy, as I'm always researching and thinking "I could buy this to make things easier, or build this thing to help organize things, or buy that to make my display nicer". For someone who is continually searching for ways to improve everything, it's not an easy thing to do, but I'm trying to restrain myself.
...click here to read more!
Monday, November 24, 2008
Teleconverter Shootout - Tamron vs Canon
Yesterday I posted a review of the Tamron 1.4X and 2.0X teleconverters. As I mentioned there, I was quite happy with the test results, but I also wanted to compare them to the Canon teleconverters to make sure there wasn't a significant difference between the brands (and if there was, I could exchange them before my return period ended). Well, I got in touch with my friend Wayne Fisk, who happened to own both of the Canon teleconverters, and I was able to borrow them for a few hours to do a quick comparison.
Physical design
As it turns out, the biggest difference between the Canon and Tamron teleconverters is in physical design. When you first look at them side by side, you will notice the Canon's are considerably larger, with the 2.0X showing the biggest size difference. When you pick them up, the Canon's are also heavier than the Tamrons, but the biggest surprise is that the 1.4X models have the biggest difference, with the Canon being almost twice as heavy as the Tamron. Measuring both teleconverters together, the Canon teleconverters combined are about 1/3 lbs heavier and about an inch longer.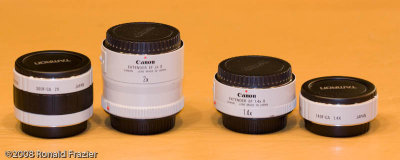
When you pull of the end caps, you will see more of a difference. While the back of the 1.4X teleconverters are nearly identical, the front sides are quite different. The Tamron had the front lens element recessed, while the Canon sticks out enough to protrude into the lens it is attached to. This is why the Canon teleconverters can only be used on select Canon L series lenses, while the Tamrons will work on almost any lens.
This also becomes a concern when trying to connect both teleconverters together for a combined 2.8X magnification. With the original Canon teleconverters, you needed to add an extension tube between the 2 to get them to connect. With the redesigned II series teleconverters, the 2.0X now has an indentation in the back to accept the protrusion from the 1.4X. This means you can only use the Canons together with the 2.0X closes to the lens, while the Tamrons will let you use either arrangement. Optically, it shouldn't make a difference. However, if you wish to use a lens that is slower than f/2.8, then you cannot use autofocus with the arrangement the Canons demand. As I stated in yesterday's review, even if you can trick the camera into autofocusing with more than the 1.4X, it doesn't seem to do much good as it has great difficulty (to put it mildly) achieving autofocus, so this doesn't seem to be an issue. However, just like the Tamrons, the new Live View contrast based focusing works perfectly with any teleconverter combination.
Back of both 1.4X teleconverters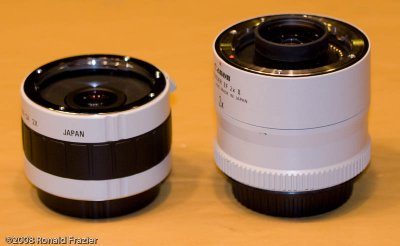
Front of both 2.0X teleconverters (the 1.4Xs look the same as these)
Back of both 2.0X teleconverters
The one other significant difference between the Canon and Tamron teleconverters isn't so easy to see, but if you look at the above photo carefully, you can see that on the Canon there is a thin black line between the metal mount and the white shell. This is the black rubber weather seal, which is intended to help keep water from leaking in in wet conditions. The Tamron teleconverters lack any sort of seal. However, it's worth noting that unless you have the Canon L series lenses and the higher end camera bodies, you probably don't have any weather sealing on the lens and body either.
Image Quality
I ran each combination of teleconverters from each brand through a few different tests. The first test was done with the camera at a fixed distance from my target. In the second and third test images, I varied the distance from the target depending on the teleconverters used, in order to make the target appear the same size in each photo, no matter what the magnification.
In the end, I saw no significant differences between the Canon and Tamron teleconverters in terms of sharpness or contrast. In some photos, one brand will look better than the other, in others the other brand wins, but in every case you need to look very carefully to decide. In fact, even when I thought one brand looked better, often coming back to the result 30 minutes later would give me the opposite impression. In short, it is extremely difficult to see the difference between the 2 brands, and I'm often not sure there even is a difference. As far as I'm concerned, they are nearly functionally identical.
Click any of the 3 images below to see the full size comparison images.
Summary
This quick test confirmed reports I had read that these 2 brands of teleconverters were almost identical. I'm completely satisfied that there is no real difference between the image quality of the 2 brands, and thus I'll be keeping the Tamrons. If you have a need for the weather sealing, then the Canon might be worth considering. For most users, though, I'd say the Tamron teleconverters represent a much better bargain, and thus I'd highly recommend them.
...click here to read more!
Sunday, November 23, 2008
Tamron Teleconverter Review
Since switching from my Sigma 70-300mm lens to my Canon 70-200mm, I've been happy with the results I get, but I do miss some of the extra range in that last 100mm. Even with the 70-300mm, there were times when I couldn't get close enough to the subject. I've been thinking about getting a teleconverter for a long time. After hearing good things about the Tamron Pro (SP) line of teleconverters, I decided to get both a 1.4X and a 2.0X and see how they worked out.
Choosing a brand/model
In chosing which teleconverter(s) to buy, I did quite a bit of research. The options were to stick with the Canon brand or to go with several of the other 3rd party brands. The Canon brand teleconverters were known performers, yet they weren't without their downsides. As expected, the Canon brand is more expensive. They were slightly heavier than some of the other options. Finally, because of the design of the Canon teleconverters, they aren't compatible will all lenses (not even many of the canon lenses). They mostly just work with more expensive Canon L series zooms (with a few exceptions).
On the other hand, looking at the other brands involved some tradeoffs. Yes they are cheaper and a little lighter, but image quality, build quality, and compatability are all issues to be concerned about. After doing a lot of research, I've seen a lot of positive information about some of the teleconverters from Tamron. They make a few series of teleconverters, and it is the more expensive ones (the Pro or SP series) which are the good ones. From what I read, they are a nearly an identical match for the Canons in terms of quality. I even found a review from one guy who bought both and found his Tamron teleconverter was sharper than the Canon. I looked at some test samples and was very pleased.
In looking around, I found the best prices on Amazon. The price for the 2X is pretty much the same everywhere...$210, however Amazon gives you free shipping. At that price, that makes it about $80 cheaper than the Canon 2X teleconverter (actually only $55 at the moment, since Canon currently has a $25 rebate). The price on the 1.4X, is about the same ($210) almost everywhere. However, it is much better on Amazon...currently about $140 with free shipping. That puts it at about half the price on the Canon 1.4X teleconverter.
Initial impressions
The Tamron teleconverters were very nicely designed. They had the same light gray coloring as the canon L series lense. They were small and light. Each teleconverter came with a nice black vinyl storage bag with draw strings. Even better, each bag was just big enough to hold both teleconverters, so you can carry them together and they'll take up slightly less space.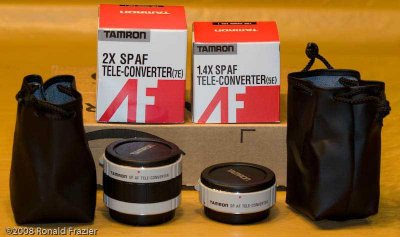
Tamron 1.4X and 2.0X Teleconverters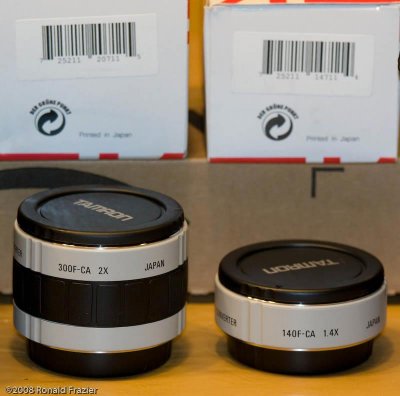
Model Numbers and UPC Codes
Basic functionality and performance
Giving them a quick try on the camera, they function just the way you would expect. The camera detects the teleconverter and reports the adjusted values for aperture (an f/4 lens becomes f/5.6 with the 1.4X and f/8 with the 2.0X). The EXIF data also properly reports the presence of the teleconverter by adding a +1.4x or +2.0x to the end of the Lens field.
When it comes to autofocus, you also get what you would expect. The lens focuses slightly slower to get a more precise focus in light of the higher magnification. Most cameras will only autofocus with an aperture of up to f/5.6. Thus an f/4 lens will autofocus with the 1.4X teleconverter, but not with the 2.0X. In order for the 2.0X to work, you'd need an f/2.8 or faster lens.
There is a way to trick the camera into autofocusing even without such a fast lens. You can place a small piece of clear tape over the 3 end contact pins of the teleconverter , which will break the contacts and prevent the camera from detecting the presence of the teleconverter. This means the teleconverter won't be reported in the EXIF data, and the f-stop reported won't reflect the teleconverter either. The plus side of this is that the camera won't refuse to autofocus. This seemed like a good idea in theory, but in practice it didn't seem to be of much use. I don't know if it was because of the lower light level or because the lens didn't focus slower to compensate for the increase magnification, but whatever it was, it seemed to have a really difficult time focusing. Even in bright light with plenty of contrast, the lens would just go from one extreme to the other, vary rarely ever finding the correct focus. So, even though you could get autofocus working, it was more or less useless.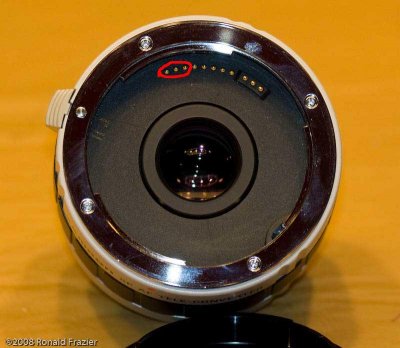
Pins to reenable autofocus
On the other hand, using the new live view mode (available on the newer cameras) with its new contrast based focusing, autofocus worked like a charm with either teleconverter (or even with both on at the same time). This was a very pleasant surprise.
Speaking of attaching both teleconverters at the same time, this too worked fine. However, due to the way the lens communication system was designed, the camera would only detect the teleconverter that was closest to the lens. This means that only one teleconverter will be reported in the EXIF data, and the reported aperture will only reflect that one teleconverter. Putting both the 1.4X and 2.0X teleconverters on an f/4 lens will turn it into an f/22 lens. However, the camera will report it as either an f/5.6 lens or an f/8 lens (depending on the order of the teleconverters). This also means that if you put the 1.4X closest to the lens, you can still use the regular autofocus with an f/4 lens (though just like when you trick it by taping the pins, regular autofocusing isn't very reliable using this method).
In short, everything about the way the teleconverters were designed and functioned was excellent, and behavior was exactly what you'd get from the Canon teleconverters.
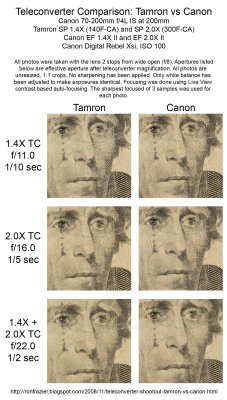
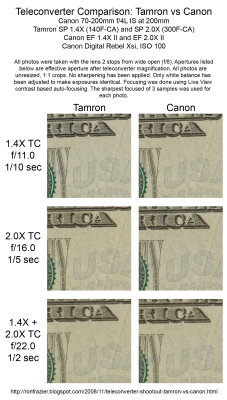
Image Quality - Test Methodology
In order to test the image quality of the teleconverters, I ran them trough a number of tests. Each test was done using my best lens...a Canon 70-200mm f/4.0L IS. In every case, the lens was used 2 stops from wide open, which is about where the lens performs best. This resulted in an aperture of f/8 with no teleconverter, f/11 with the 1.4X, f/16 with the 2.0X, and f/22 with both teleconverters used together. In each case, I adjusted the shutter speed accordingly to compensate for the smaller aperture, so that each test case ended up with the same exposure level.
I picked 4 focal lengths: 200mm, 280mm, 400mm, and 560mm. These represented the maximum zoom you could achieve when using this lens with neither, either, or both of the teleconverters. I then shot at each of the 4 focal length using all 4 possible combination of teleconverter magnification: 1.0x (no teleconverter), 1.4X, 2.0X, and 2.8X (both teleconverters). When shooing at a focal length that was less than the maximum achievable (such as 200m when using the 1.4X teleconverter) I zoomed out the lens as necessary to get as close as possible to the desired focal length (ie: setting the lens to 144mm and adding the 1.4X gives the same magnification as 200mm with no teleconverter). When shooting a focal length that could not be archived with that combination (such as 560mm with neither or just one teleconverter), I simply took the largest magnification available with that combination and resampled the results to approximate the more powerful focal length.
Image Quality - Test Results
On the surface of it, I learned exactly what you'd expect. In any case, no teleconverter is better than the 1.4X, the 1.4X is better than the 2.0X, and the 2.0X is better than the 1.4X+2.0x used together. In other words, if you can get the composition you are after without using a teleconverter, then you are best off not using it. It's better to use the lens at 200mm with no teleconverter than it is to put on the 1.4X and then zoom out to 144mm or less. In such a case, you are better off removing the teleconverter and zooming in.
Comparing the results of no teleconverter to the 1.4X was very positive. There was a significant improvement in detail compared to simply resampling, and the loss in contrast was minimal. There was very little tradeoff here, thus the choice of using the 1.4X when needed is pretty much a no-brainer.
When comparing the 1.4X to the 2.0X, the decision was more difficult. There was a slight improvement in detail, but at the expense of a noticeable decrease in contrast. Combining the teleconverters gave an even slighter (barely noticeable) increase in detail compared to the 2.0X alone, with an additional loss in contrast. Thus, in contrast to the 1.4X being a no-brainer, using the 2.0X teleconverter (or using both together) takes a bit more careful consideration.
Below are the test results. Click each image to go to the full size images.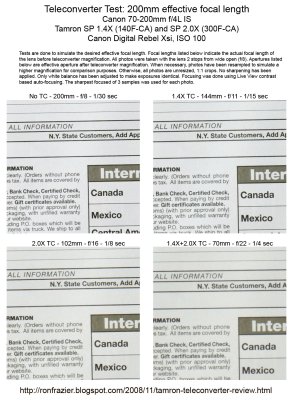
200mm test
280mm test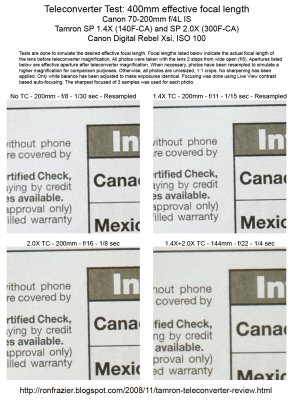
400mm test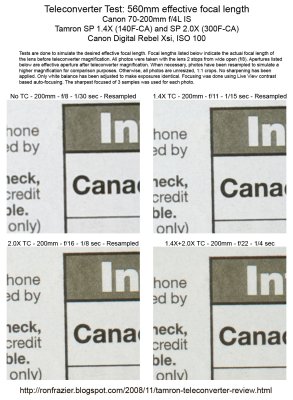
560mm test
Conclusion
I'm quite happy with the results. The improvement seen with these teleconverters is quite reasonable, especially given the price. I'd have no trouble recommending the Tamron teleconverters to anybody.
Of course, the real question is: how do they compare to the results from the Canon teleconverter? That will be subject of my next review, which will hopefully be ready by tomorrow.
UPDATE: I've posted a followup comparing the Tamron and Canon teleconverters and found them nearly identical. As a result, I'm very satisfied with the value of the Tamron teleconverters, and I highly recommend them.
...click here to read more!
Friday, October 31, 2008
I'm no longer accepting American Express
I've decided to no longer accept American Express credit cards at my shows. After long and careful consideration, I've decided it just isn't worth it. I originally signed up for American Express after hearing stories from another artist who said large sales increased after he started accepting AmEx. I was hoping it would do something similar for me, or at the very least, have zero impact. Instead, what it has done is increase my expenses.
When I first signed up for AmEx, I was allowed to sign up under a plan that would only cost me a small percentage of each sale. It was comparable to what I was getting for Visa/MasterCard/Discover, so I was happy to take it. In that first year, only got a few sales with AmEx. One was from a friend, and the other was from a lady who had nothing but an AmEx card on here (which she humorously carried between her breasts). That was only a $20 sale, but it was $20 I wouldn't have received otherwise, so I figured it was a good thing I decided to go for AmEx. For the rest of the year....that was it for AmEx.
By the second year, AmEx forced me to switch to a flat rate plan, which mean I would be paying $6 a month, but nothing more. I figured I'd stick with it. However, I started an experiment. Everytime someone payed with an AmEx card, I'd ask them a what if: "I'm just doing a survey of my customers. What if I didn't accept AmEx? Would you have had another way to pay?" For the rest of the year, in every single case, the answer was yes. So, it was looking like AmEx wasn't gaining me a thing. Yet, for some stupid reason, I didn't have the guts to stop carrying the card, so I continued to pay the fee.
This year was year 3, and I continued my experiment throughout the year, with exactly the same results. If I were to drop AmEx, it would cost me nothing in sales. However, this year, AmEx did something different. They started charging me a fee each time I had an AmEx transaction (on top of the flat rate fee).
Enough was enough. American Express gained me absolutely nothing in sales (other than $20 one time), and cost me quite a bit in fees. It made absolutely no sense to accept the card, so I cancelled my account with them. When I called, I thought I was going to have to spend a bunch of time, talk with a rep, and maybe get offered some sort of deal to continue carrying it. However, the automated system had a menu option explicitly for canceling (a rare feature with automated phone systems these days), and I was able to cancel without speaking to anyone.
It's sad that about the best thing I can say about my whole AmEx experience is that it was painless to cancel.
...click here to read more!
Thursday, October 30, 2008
Michigan Upper Peninsula Fall Colors
For the last 2 years now, I've been intending to take a trip to the Upper Peninsula to photograph the fall colors that are so talked about up there. However, each time, factors conspired against me and I never made it. A few weeks ago I finally got the chance to do it, and it was an incredible experience.
Planning the trip
My wife and I took 3 days off work so that we would have a 5 day weekend. I picked out a number of locations I wanted to see. Some of it was just popular locations. Others were somewhat obscure locations suggested by people on the naturephotographers.net forum. Finally, I had one location that was suggested to me by a patron at one of my art shows.
As far as where to go on which day, that was a matter of both color change progression and the weather. I monitored the current color status on a number of websites, including foliagenetwork.net, newsupnorth.com, and some reports from AAA (no link for those, sorry). Foliage Network seems to be the best of the bunch. Well, as the day approached, it seems most of the UP was changing at the same schedule, and pretty much the whole peninsula was being described as peak, so that was no longer an important factor in my planning.
The weather, on the other hand, was a different story. There was rain for the first few days over the Porcupine Mountains area, so I was planning on leaving that until later in the trip. However, the forecast then adjusted, and the entire time it was planning to rain there. We decided to take our chances and go there first.
Day 1 - The Drive
We were headed for the Porkies, which is about a 10 hour drive from home, so we didn't have much time for anything else. We were a bit slow getting out the door, so by the time we arrived at our hotel, the sun was just about to set. We photographed the sunset from the lake shore, though it wasn't much to write home about (however, it was quite cold and very windy). Nothing eventful for this day.
Day 2 - Porcupine Mountains
This day, I got up at 6 AM (sunrise is about 8AM) and headed up to the Lake of the Clouds (which is about 20 minutes from our hotel). When I got up there, it was pitch black out, and I couldn't see a thing. There wasn't even a moon to see by. I needed to get my flashlight out of the bed of the truck, then find the batteries in one of my bags, all in such pitch black that I couldn't see my hand in front of my face. That difficult process took about 5 minutes. Then I walked out to one of the overlooks. Luckily I had been here once 2 years earlier, so I had at least some idea of where I was going.
When I got out there, I was absolutely amazed at what it was like. Never in my life had I been outside in such absolute darkness, with no moon in sight, no sun about to rise, no cloud cover, and no major cities for a couple hundred miles (even medium sized cities were nearly 100 miles away). I was amazed at just how many stars I could see everywhere. All the blank spaces between stars were actually now a speckled field of 100s of extremely faint stars. I tried to take a few photographs, but it wasn't something I was prepared or experienced with, so it didn't work out very well. A bit later, at about 7:30 (after I had already been here for an hour) I managed to get a really nice 5 second exposure that silhouetted everything but the lake and the sky.
Lake of the Clouds at Dawn
After it started approaching sunrise time, and there was hope to actually be enough light to see a little color on the trees, I moved up to the rocky overlook where the other photographers (who were just now getting there...slackers) were gathered. A few minutes before sunrise, there was enough light to get the color with a long exposure, but the contrast with the sky was too great. I took a 6 photo series (ranging from 1/20 to 1.6 seconds) that I turned into an HDR image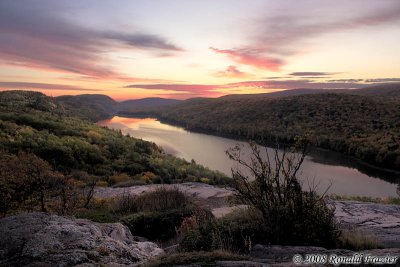
HDR Sunrise at Lake of the Clouds
As it got even brighter a few minutes later, I was finally able to really see the color.
Carp River in the Porcupine Mountains
At that point, I figured my wife had to be awake, showered, and ready to go, so I headed back to the hotel to shower, eat, and head out. By now it was sprinkling out, which was how it would remain most of the day. We headed back up to Lake of the Clouds so that she could see it, and so I could do some more photography now that it was much brighter. I did a few panoramas. We then headed off through the park, hit the Overlooked falls and the Summit Peak tower. I took a some photos along the trail
Mossy Rock and Leaf
Then we hit the waterfalls along the Presque Isle River. 
Manido Falls
By now it was getting late (days are short, especially when locations are far apart), so we got something to eat and headed back to the hotel. It was cloudy, so sunset was uninteresting.
Day 3 - Bond Falls, Munising, and Seney
The next day it was cloudy so I didn't bother going out for sunrise. We took our time getting up and headed off towards Munising, making a brief stop at Bond Falls along the way. Here there was some color at the bottom, but up top where all the small cascades were, there wasn't nearly as much color and I wasn't able to get any good autumn shots up there.
Bond Falls
We headed off to Munising and checked into a hotel. My wife wasn't feeling good at the moment, so we took a rest and didn't do much for a few hours. Then we went up to Munising Falls and Miners Castle for a few easy sights to see.
Miners Castle
After that, she was feeling a bit better, so we took a trip down to some of the small lakes that are abundant south of Munising. We checked out Pete's Lake and Grassy Lake, but there wasn't much to see there. Then we found Red Jack Lake, which had some really nice reflections.
Red Jack Lake
Then we headed just around the corner to Council Lake, which is regarded by many as being one of the best lakes. There were some nice birch trees around the lake, but when I was there it was way too windy to get any sort of decent reflections. We went back to town, and then headed over to Seney National Wildlife Refuge to catch the sunset. We were a bit late in making that plan, and when we got there golden hour was half gone. We did the best we could with what time was left, and I think considering the light we found, it ended up working out for the better.
Seney NWR
Seney NWR
I also managed to find a number of stunning reflections of swamp wood that looked like various creatures. The most striking was this angelfish
Swamp Wood Angelfish
As the light faded we found a spot to get some nice photos of the color. Each time I was tempted to stay somewhere and photograph the sunset color, we reluctantly drove further only to be glad we did when we found another unique and interesting spot to photograph each time.
Seney Sunset
Day 4 - Wagner Falls, Tahquamenon Falls, and Mission Overlook
The next day, I got up early to see if it was worth driving anywhere for sunrise. I went outside and couldn't see a single star. I checked the satellite on the laptop and saw nothing but a thick layer of clouds in every direction for well over 100 miles. As it started lightening up, I double checked outside and it looked like nothing but solid clouds. Sure enough that there was nothing to be seen, I settled back into the hotel room. A while later I walked outside and was disappointed to see that somehow I had missed an opportunity to get some nice color.
Missed Opportunity
Let that be a lesson to never assume you won't get something worthwhile. Anyway, after showering and breakfast, we made a quick stop at Wagner Falls (where there wasn't much color at all) and then headed straight for Tahquamenon. The day ended up being mostly overcast, which fared well for photographing across water.
We hit the Upper Falls first, where there was a little bit of color, but not a whole ton. However, the lower falls had a wonderful amount of color, and was by far the more interesting of the two. Unfortunately, they weren't renting rowboats at this time of year, so we didn't make it over to the island.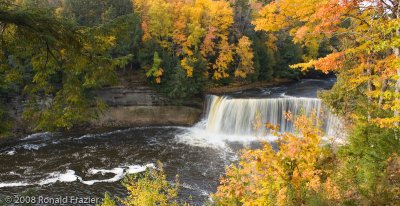
Upper Tahquamenon Falls
Lower Tahquamenon Falls
After that we headed off for our last destination. Someone had told me about the Mission cemetery overlook. We knew approximately where it was (within a mile or so), but weren't 100% positive. We headed down some of the back roads looking for it. On the way, there was a lookout point noted on my map, located at the top of a very tall hill. We diverted off to check that out. To make a long story short, they were some incredibly steep and twisty dirt/damp roads that were clearly intended for ORV's and not cars. Luckily we didn't get stuck, though my wife did get a bit panicked. We made it up to the top somehow, but all there was up there was a bunch of trees keeping you from seeing anything. It was a very interesting experience, but not worthwhile. Once out of there, we eventually found the cemetery on the west side of Spectacle Lake. Once there, the view was every bit as good as we were told.
Mission Cemetery Overlook
When we finished with that, it was still a bit early, so we headed over to the Point Iroquois Lighthouse for a few photos (it was raining last time we were there).
At this point, we had hit everything that was on our list. We needed to be home no later than midday of the next day and we had about a 6 hour drive ahead of us. The best we could have done was to get in another 3-4 hours of photography (minus driving time), but even then we weren't sure what to see. Instead we decided to just head home early.
Day 5 - Nothing
We got home the night before, so nothing to report here except a day of relaxation (at least for me...my wife had a test to study for).
More Photos
What I've posted here were just a subset of the best photos from the trip. The rest of the keepers can be found here:
2008 Michigan UP Fall Colors Gallery
Final Thoughts
Going up there was a wonderful trip. I'd recommend it to anyone that wants to see some great colors. Overall, I was very satisfied with the trip. I would have liked to see some more color at several of the waterfalls, and as a whole, I would have liked to see more red trees, as they were in short supply (mostly yellows and oranges everywhere). Other than that, it was great
...click here to read more!
Wednesday, October 29, 2008
2008 was a bad year for sales
It's been a while since I posted much. I've got a number of things to post about. I'll try to get to them over the next few weeks. However, for now, I just want to touch on how my art shows went this year. In a few word: not too good.
This year, before things even got started, I could see the writing on the wall with the economy (especially here in Michigan), and I wasn't too confident that things would go so well. So right from the start, I tried not to get my expectation too high. That was a good thing, as most of my shows went quite poorly. My only consolation was that I wasn't the only one doing bad. At each show, it was the general consensus among artists that things were bad. So it's not me. That's good to know, though I'm not sure what to do with that knowledge.
I examined my schedule from last year, and decided I wasn't going to add any new shows. I decided just to take the best of last year and eliminate a the bad parts. There were 2 shows that were outright terrible. However, one of them (Livonia) I had made the mistake of prepaying for the year before, so I was stuck going anyway. The other one (St Clair), however, got eliminated. Another show (Wyandotte) was actually reasonably profitable the year before, but it was such a long, drawn out show, that the number of hours I end up investing was just huge in proportion to the profit I made. I reluctantly eliminated that one from the list. Finally, the Troy show was also a pretty decent one day show the year before. However, now that I had a new booth setup and it takes a little more time setting up, I wasn't confident yet in my ability to be able to finish during the small setup window available for this show.
What I was left with was Livonia, Northville, Sterling Heights, Shelby Township, and South Haven. Much like last year, Livonia was a disaster. This time I was smart enough not to pay for next year. I won't be going back. Northville and Shelby Township were my 2 best shows last year, but this year I barely got a tiny profit out of them. In Sterling Heights, my sales were less than half of the previous year. Yet, when you consider that the booth fee was the same, and gas prices were higher, my actual profit was only about 25% of what it was the year before. Very discouraging. South Haven was the only show to do well. My sales total was within $50 of the year before.
When it was all said and done, the 5 shows I did this year actually got me about $400 LESS than the 5 shows I did in my first year (2006). Ugh!
So where do I go from here? At this point, it's looking like 2009 may be even worse than 2008. With a presidential election coming up very soon, I think the outcome of that may have an impact on how next year turns out. In either case, I don't think we are going to see a massive turn around too quickly. However, it seems one candidate does have the ability to inspire people, and inspiration can be a wonderful thing in making good things happen. But other than that, I'm not seeing a lot of promise. I'll have to evaluate a lot of different things, decide which shows I might want to keep as my cornerstones, and which ones to replace. Perhaps I'll think about why it is that South Haven did so well and see if I can come up with other shows like it (easier said than done).
The one good thing I can say is that I've got a lot of my expenses out of the way now. Overall, I'm very happy with the booth setup I have (other than I'd like to make some new print boxes...an item on my list for this year that never got done). I've upgraded my camera and lenses this year. Next year I'm hoping I'll be able to keep expenses to a minimum and actually turn a profit for once.
...click here to read more!


